|
|
xplorer²Exponential growth to file management productivity |

|
|
xplorer²Exponential growth to file management productivity |

Many times you have two or more folders that have the same contents and you want to keep them synchronized, i.e. make sure all "versions" stay updated whenever you make changes to one of them. The typical scenario is a daily backup of your current work documents, from your PC onto a safe removable drive, so if a mishap strikes your PC you can retrieve your work with minimum losses from the backup location.
Folder synchronization needs to track all changes between 2 folders, either on a single level or deeply including all the subfolders. Possible changes include:
That's when xplorer² and its dual pane layout comes in handy. It is ideal for comparing the contents of any two folders, and finding items that are missing from either one, or have been changed in any way. Once you identify the differences, you can decide how to deal with them — e.g. copy the new and modified files manually to equalize the folder contents.
xplorer² doesn't have a real synchronization function, it merely compares folders and marks the differences. The misnamed menu command Mark > Synchronize panes compares the contents of 2 folders, and tries to find file names missing left and right. When the same file exists both sides, it checks the modification date to find which version is "newer" and marks it as such. Here is an example comparison:
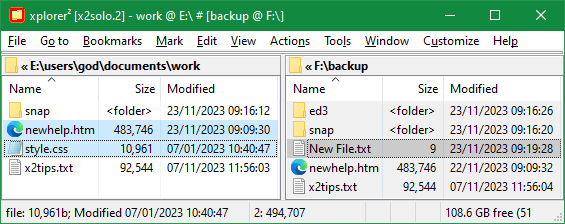
When you press <F9> key xplorer² compares the folder contents and marks (selects) unique files like STYLE.CSS that exists only in the left folder, and newer versions of files that exist both sides (compare the modification dates of NEWHELP.HTM, the newer version on the left is selected and the one on the right isn't). File X2TIPS.TXT has identical dates left and right so it isn't selected at all. To really synchronize the 2 folder contents, one must copy only selected files from one pane to the other (this must be done twice, once in each direction — observe the unique file NEW FILE.TXT on the backup folder to the right).
Notice how the plain <F9> "synchronize" command didn't mark any folder differences. Folder modification dates aren't very reliable to track changes in deeper levels. We will return on this important matter later.
For more control on what gets marked (selected) after the comparison, use Mark > Sync wizard command. The dialog indicates that comparison has two facets; first you determine how you want to compare items and then which items to mark. The large number of combinations allows you to do all sorts of checks to suit your synchronization needs.
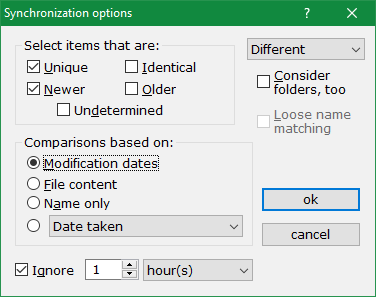
The comparison logic first tries to match items left and right using the filename as a guide. If a file in one folder doesn't have a matching namesake in the other folder, it is immediately considered unique (cf. the checkboxes in figure 33). If a file exists in both folders, the two copies are compared for differences, using the mechanism you specify:
Given the wealth of xplorer² browsing options and comparison parameters, there are many ways comparisons can become "abnormal". Here are a few things to keep in mind:
 drawn over their icons. Possibilities include items with same dates but different sizes, missing custom properties, content read errors etc.
The relationship between files is fixed by their properties and the comparison scheme you select. The second phase is to decide which files you want to mark, ear-tag them for further processing. There are checkboxes for all item states and you can check as many of them as you wish - although not all combinations make sense, e.g. selecting both "older" and "newer" files. The drop-down menu on the top-right lists some common scenarios for your convenience (modes for marking different or identical items).
The plain synchronize command <F9> is equivalent to ticking Unique, Newer and Modification dates options
Ticking Undetermined option will mark all those items that were not successfully compared (those with the question marks mentioned above). Tick Consider folders option to include folder items in whatever comparison method the files go through — but only in terms of name and date properties, their subfolders aren't considered. For this and loose name matching option see the deep sync section.
When all dialog settings are set to your liking, click ok button to start the comparison. Usually this is done very quickly unless you are checking custom slow properties or file contents. A progress bar on the status bar will keep you informed of the comparison progress. If it takes too long you can hold down <ESC> key to abort the operation.
When xplorer² finishes comparing you get the verdict either that "The contents of the two folders seem identical" or if any differences are spotted items are selected for further action. For example if you were scanning for differences, you can proceed by copying the marked files to the "passive" folder, ensuring that the files in both folders are the same, both in number and most recent content. Note that there may be unique and newer items in both folders — obviously not the same items — that need to be carried across.
| Sometimes you may need to synchronize folders including their subfolders, as in the situation to the right. If the hierarchy is shallow (few folders) you can turn on mirror browsing (Go to menu) and let xplorer² keep the inactive pane in the matching folder, as you browse folders in the active pane. As an example, starting from folders A:\ and c:\documents\kenny in the active and inactive panes respectively, if you browse into A:\help the inactive pane will automatically follow to read c:\documents\kenny\help. This mirroring will continue in both down and up direction, as long as folders with matching names exist. |
|
When many subfolders are involved, mirror browsing and comparing folders one by one is cumbersome. An easier way to compare two folder hierarchies is to browse the required root folders in a normal dual-pane window and pick Tools > Compare subfolders. This command will open a dual scrap window, flatten each hierarchy in a separate pane and will also launch the synchronization command. If grouping is supported, items will be grouped by folder helping you to inspect the comparison results. This way you will reveal all the changes that need to be made acting on all subfolders simultaneously.
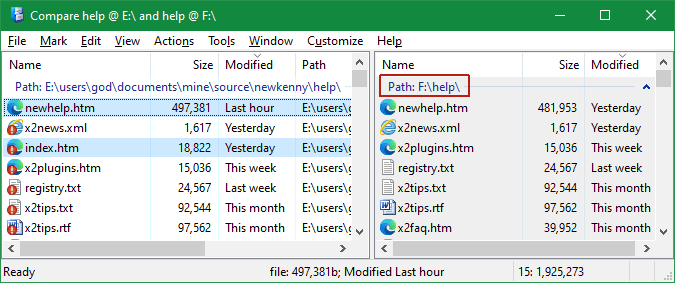
Arguably, inspecting the results of a deep folder comparison isn't the easiest thing to do. xplorer² turns on Mirror scrolling mode to help you examine files left and right, but there may be just too many results to juggle. To protect the marked files, you should turn on Sticky selection from Mark menu. Another handy feature is pressing <ALT+DOWN> keys to jump to the next selected item, in case they are far apart. Or to focus just on the marked items use View > Visual filter > Selected only menu and concentrate on the differences.
Once files are marked, use the special Edit > Sync-o-paste command available in scrap containers to copy all the files in their matching folders. So items selected in A:\ will end up in c:\documents\kenny, those in A:\help will end up in c:\documents\kenny\help and so on. Note that Sync-o-paste acts on the selected items and doesn't require a prior Edit > Copy command.
Another drawback is that when a folder sub-structure is entirely missing from one hierarchy, all contained items are left in an undetermined state, since their matching folder isn't available.
If you find this form of deep synchronization with scrap containers a bit of a headache, you can try an alternative that is based on robust copy <F5> command. Selecting Overwrite if newer else skip transfer option will result in copying only files that are new or changed, just as if you did a synchronization based on modification dates — and it doesn't need scrap containers or any prior synchronization commands! This will work best if you have all the changes in one folder hierarchy and you want to mirror them to some other "backup" location like a removable drive.
Here is a summary of a backup operation:
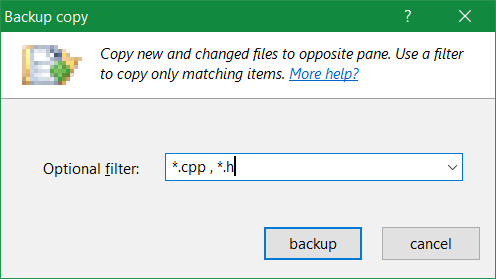
Usually you leave the filter box empty, to copy everything that's changed — or type a few comma-separated wildcards to copy only matching files. More complex filters are available from the drop-down list, as previously defined in the robust copy dialog. Copy options are fixed to "Overwrite if newer else skip" and "Ignore DST". Click on backup button to start the copy operation. Only new and modified files will be copied with no questions asked.
You can manage your documents so that they all fall under a single root folder like MyDocuments — organized in various subfolders of course. This kind of hierarchy makes backups very easy as you only do a single backup for all your documents. If on the other hand your work folders happen to be scattered in different places, say some in C: drive and some in E:, you can use folder junctions to create a single root "master" folder somewhere, and drop in there junctions to all the various work subfolders. Thus you have reorganized your important storage without actually moving anything, and backups can be done in a single step. For this trick to work you must enable the advanced option "Treat folder junctions as normal folders..." and all xplorer² recursive commands will follow junctions automatically.
The folder synchronization command just described checks for modifications of different versions of the same file. A variation on this theme is checking the state of file transformations, when the compared filenames are slightly different.
If you are involved in programming, then you will recognise this situation as compilation of source code to object files. So starting from a C++ file xplorer2.cpp the compiler churns out the machine translation in a new file called xplorer2.obj - notice the change of extension from .cpp to .obj. Mark > Check build command checks the states of source files comparing them to their "transformed" versions.

The dialog shown in the above figure accepts as input the transformation rule, which observes the source and target filename extensions. It can be seen that multiple comma-separated extensions can be used to check for all compilation projects in one stroke. Also note that a generic wildcard is accepted for the From field whereas the To field must be just the target extension(s), without the "." (e.g. type obj instead of .obj).
The idea with this command is to browse the "source" items in the active pane, and the "transformed" equivalents in the inactive (both could be in the same folder), then tick the boxes to locate items that either need transformation or they are Up to date. Click ok button and Check build command will then examine names and their filetimes and select source items in the active pane according to the checkboxes you ticked.
Once source and target files are matched their modification dates are examined to figure out which is newer. If the source is newer, it must have been modified since last build (cf. figure 35 checkboxes) and it requires re-compilation. If the target is newer then it is up to date, whereas if it doesn't exist at all the source is not built. You can check as many boxes as you want to tell xplorer² which source files to select. Let's take an example.
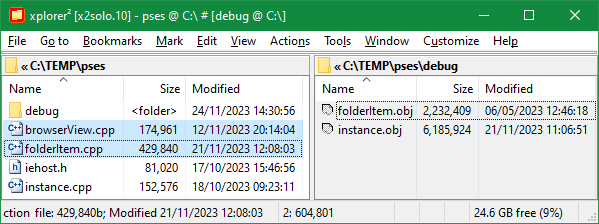
Using the options in figure 35 on a pair of hypothetical source and target folders, xplorer² marks all source files that require compilation. The file folderItem.cpp was modified after it was last built (check the date of its target folderItem.obj) so it is marked. browserView.cpp hasn't been compiled at all (no browserView.obj exists in the inactive pane), so it is "not built" and hence marked. instance.cpp on the other hand is up to date, and finally IEHost.h is completely irrelevant for this transformation rule so it is left unselected. Note that nothing is selected in the inactive pane to the right; this command is checking one way only.
Like the folder synchronization command, Mark > Check build merely ear-marks files that require building without actually taking any further action. It is up to the user to decide what to do with the selection afterwards, e.g. generate a script file that executes the compiler for each source file.
According to the second law of computers, no matter how big your hard disk, eventually it will fill up with movies, videos, pictures and what have you. Do you need all that stuff? Is space wasted in temporary and duplicate files? xplorer² has some tools to let you focus your disk cleanup effort at the biggest offenders, files and folders that take up the most space.
Tools > Folder statistics menu command creates a detailed analysis of the active folder and its subfolders. If you want to examine your entire hard disk, first browse the root C:\ folder then invoke the statistics command — naturally the bigger the hierarchy, the longer it will take to analyze. It will calculate details for each subfolder like number of files and size used, and will do so recursively for all the contained folders, and present the results as a tree:
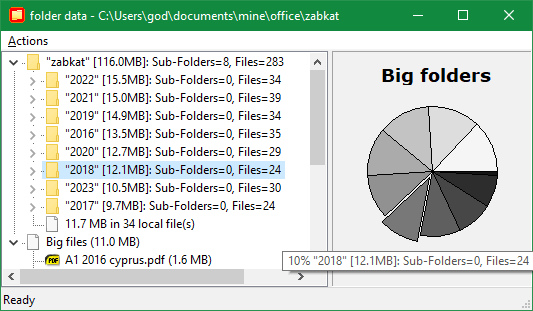
The largest folders appear first. To aid visualization of space usage, a little pie chart is shown too, popping out a pizza slice for each folder you select in the tree. Drag the splitter bar with the mouse to make the pie bigger or smaller. You can also use the tooltips over the pie pieces to discover the folder names.
The second main tree branch shows the 10 biggest files in the hierarchy examined, arranged by size. Examine the big files branch to see whether you don't need some of them and you can delete them to save space. Select a file and press <ENTER> key to browse its containing folder.
|
The tree is for information only. You can examine and open branches, but you cannot do much file management. If you want e.g. to delete a large unwanted folder, use Actions > Browse menu (or double-click on the folder) to open it in a regular xplorer² window. The tree won't autorefresh either, so if you delete a folder branch, use Refresh command to update the tree information.
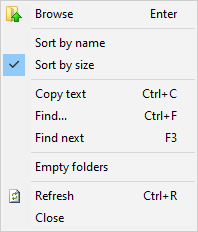
The single menu bar item called Actions holds a few commands, the most useful of which perhaps is Copy, which copies the entire selected tree branch as text, that can be subsequently pasted in a text editor for printing or whatnot. Use Find and Find next to search for folder names (this will open tree branches automatically). You can also switch the sort mode from size to sort by Name — although the former arrangement is more useful in this context.
Another useful menu command is Empty folders which detects folders that are empty (they have no file contents), and puts them in a scrap container for further action (e.g. select all of them and delete them). Empty folders won't take up much space but some people want to get rid of them regardless.
This command is smart enough to discover the topmost empty folder in a local hierarchy, and ignore its empty subfolders (if any) — that will be deleted with their parent folder anyway.
|
|
|
While browsing a folder with subfolders, Tools > Subfolder size command will show you the size of each individual subfolder, so you can tell which one takes most space. The size shown is recursive, including space occupied by all deeper level subfolders. This command also works in special folders like phones and zipfolders.
Recursively adding up subfolder sizes takes a lot of time and effort. As an optimization, Subfolder size command will only calculate sizes for selected folders. If there is no folder selected then all sizes will be calculated.
|

|
Enable the stock Contents column to see the number of items (subfolders and files) contained in a folder. This information is not recursive, it won't tell you about files deep inside sub-subfolders, only direct folder contents.
If you want to see subfolder sizes all the time, without pressing <CTRL+D> for manual subfolder sizes, activate the option "Subfolder size". This is a major resource hog, so if you are browsing a top level root folder like C:\ it won't work automatically. Sometimes calculating these sizes takes so long that you may browse a different folder before the recursive addition is complete — definitely not recommended!
xplorer² doesn't cache folder sizes, so each time you visit a folder the sizes are calculated again and again. This is totally wasteful, so if you like to see folder sizes and have pity on your system resources, please download a plugin called folder size, that works well with xplorer².
Duplicates come in many guises. In the simplest case a file will exist in many carbon copies using the same name. A little bit trickier is when a file exists with many different names but the same data content (renamed). Check duplicates command will help you detect all these kinds of extra files.
Duplicate files could reside anywhere, in your PC's hard drive or in external storage. The first step is therefore to load all the folders you want checked in a scrap container. If you want to check on external hard disks you must have them all connected. Here are some possibilities:

Next you specify the comparison criteria with the above dialog box. The options set in the dialog determine how the investigation is to proceed. You can have any combination of boxes checked (use clear button to reset all checkboxes before a fresh search) but the fastest would be to assume that duplicates would be 100% exact copies, that is they will have the same name, modification date and size.
If you are comparing modification dates, there could be phantom differences introduced e.g. by FAT32 partitions, that are only 2-second accurate for stored files. For such cases use Ignore XXX seconds box in the dialog. You get to choose how many seconds (or hours!) to ignore when comparing modification dates. Any 2 files that fall within the date tolerance limit are considered to have the same date.
Custom file properties can also be used as criteria for "sameness". Select the property you want using the drop-down box and you can extend the duplicates tester in creative ways (e.g. find all music files by the same artist or owner).
If you suspect you have identical files with different names or/and timestamps, then you can clear all boxes except for content (same size is then also implied whether you tick the box or not). This is the most robust detection mechanism but at the same time very time consuming, since each file is compared to each and every other same-sized file in the container, regardless of their name.
To speed-up content comparisons xplorer² uses the same statistical content trick as in synchronize command, where only a portion of huge files is examined instead of each and every byte. Also small files are excluded because there may be too many of them and you wouldn't save much space by their elimination. The advanced option called "Ignore small duplicate files" defines the limit of what is considered "small file" (default 1KB and under)
If you intend to delete duplicate files, please make sure you check Select all duplicates box in the dialog before you go ahead with the command. xplorer² will assume that the first item in each group is the "original" and select the remaining items for deletion.
When you are all set, click ok button to start the duplicate discovery process. Depending on how many items are in the scrap window and your scan options, the comparison may take long time. A progress bar will give you an idea of how much work is left to be done.
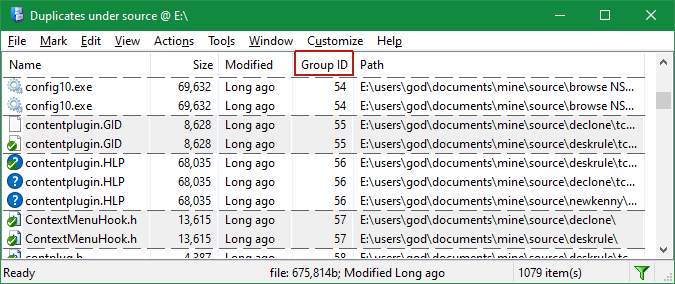
After the command finishes its work, all files that match the user criteria are bunched together in groups with different background color as in the above figure. All unique items are hidden. Note that some groups are made of 3 or more duplicate items.
Notice the Group ID column, which counts the duplicate group numbers. This is a pseudo-property as it doesn't corresponds to the files, only their relationship — but it is very useful regardless. If you change the sort order examining e.g. file dates or whatever, click on Group ID column header to restore the duplicate groups.
Such listings provide preliminary evidence of duplicate files. Depending on your dialog parameters you may need further proof before actually deleting the redundant copies. A good guide is the checksum column that you can activate using View > Select columns menu. It shows a numeric "summary" of a file's contents. When checksums are different files are 100% different; equal checksums on the other hand do not guarantee identity — although they imply a strong possibility that the files are identical.
To build up your confidence use the previewer pane to examine file contents. If you are working with images switch on Detailed thumbs pane style to see little thumbnails for each item. If you are working with plain text files you can use your trusty Diff tool to check pairs of files: select the 2 files then Tools > Run command menu to launch WINDIFF $A to compare them line by line ($A token represents the 2 selected items).
If you want to keep a file group entirely, select its items and press <DEL> key — in scrap windows this merely does a File > Remove command, the files aren't deleted. Otherwise to really delete duplicate files you must first select them. This is easier said than done when you are dealing with thousands of duplicates.
One easy method is ticking Select all duplicates in figure 38 before you even start checking. This command can't tell which is the "original" out of the identical files, but it uses the initial sort order of the items, leaving the first one in each group unselected and marking all the others. If you want to keep the older copy then make sure you sort by Modification date — ascending from older to newer — before starting the duplicates checker. Thus in each group all items but one will end up selected and ready for deletion.
If this automatic selection doesn't suit you, then you need to examine each group individually and select duplicates manually. As you finish with a group, delete the selected items immediately using File > Delete menu — or pressing <Ctrl+Delete> keys. This slow step-wise deletion will spare you any selection mishaps.
Technically speaking, when duplicate files are shown, the pane is both filtered since unique files are hidden from view (notice the green filter icon on the statusbar of figure 39), and unsorted since files are displayed in groups regardless of the original sort order. You can cancel this mode using Tools > Reveal unique or View > Show all menu command.
Another source of clutter in your hard disk is your photo collection. It is very easy to snap lots of photos with your mobile phone or camera, but not all of them are worth keeping:
xplorer² has commands that let you quickly discover bad and similar pictures, offering you the option to delete them and clean up your disk space. First you can choose the Blur file detail (use <ALT+K> keys to choose columns in detailed view mode). For JPG pictures it shows a number, which is big for pictures that are suspect; values greater than 100 indicate bad quality, whereas smaller values indicate smaller defects. Sort your picture collection by this column to bunch the bad pictures together, then inspect and delete what is not worth keeping.
To get rid of similar pictures, flatten a picture folder or use any other means to fill up a scrap container window with JPG photos to examine. Use Tools > Find similar photos menu command (or if using the Ribbon UI see under Duplicates button on the Home tab) to group them by similarity. Whereas checking for duplicates will only find files (pictures) that are exactly identical, this command finds pictures that are slightly changed.
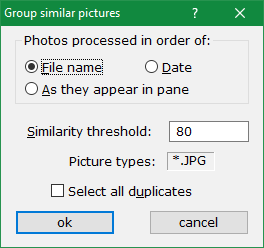
The dialog controls how similar pictures are found. To achieve reasonable detection speeds, it examines pictures either by filename or by modification dates, so that it only considers pictures that are likely to resemble each other (shot one after the other). Alternatively you can choose As they appear in pane radio button if you want to be in charge of the order photos are examined (e.g. in whatever sort order is in effect). At present only JPG photos are compared, any other file types you add in the scrap container are ignored.
You can tweak the similarity threshold up or down, to match pictures that are more closely (or loosely) related. A value around 80% is a good compromise discovering similarities without too many false duplicates — mistakes cannot be ruled out however. Even ChatGPT isn't flawless, never mind lowly SVM detectors. If you find many mistakes, increase the threshold to 90% or above.
Click ok to start the comparisons. Any similar photos found will be placed in groups, as per the duplicate checker function (i.e. in bands organized by Group ID column) and thumbnail view mode will be automatically enabled to let you compare the similarities discovered. Then just select and delete those you don't need, leaving 1-2 best pictures per group. Select two photos and press <ALT+SHIFT+Q> to preview them side by side in a large popup window (similar to peek preview but for a pair of photos).
Tick Select all duplicates in advance to mark photos for deletion automatically. However this will usually keep the first photo (in terms of date taken) as "best" which may not be the case. Always examine the groups yourself. Optionally turn on the Blur column to see which photos are technically of poorer quality.
The workflow is similar to duplicate results, you must somehow select what gets deleted and be careful to preserve the existing selection. Some groups may be totally rubbish so you can select for deletion all photos in such groups. In the end use File > Delete menu command to remove the unwanted photos.
Fuzzy grouping is an interesting (albeit oddball) feature that could be put in various uses. It uses fuzzy matching to group together items that are similar but not identical. For example, we can put all our music album folders in a scrap container (use right drag then Get subfolders from the drop menu), then use Tools > Fuzzy groups menu command to group the folders by name similarity. Just watch the groups in the following picture, which shows the dialog and the resulting groups simultaneously:
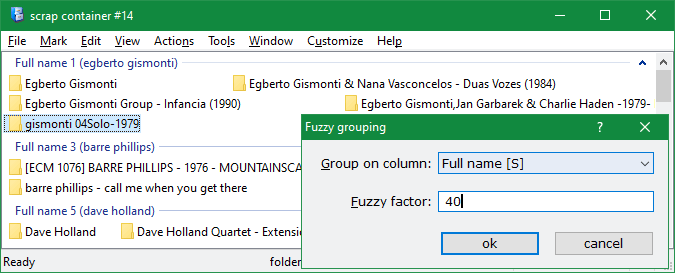
As you can see, using a 40% fuzzy factor, the first group contains all folders that contain "Gismonti" in the title, the third group has works by Dave Holland and so on. If you make the factor bigger (say 60), the fuzziness decreases, so items have to be more alike to be grouped together. For best results try a few different values until you hit on the desired groupings. You can use any text column for fuzzy grouping, it doesn't have to be by Name only. Just pick what you need from Group on column drop-down list. If you pick a number or date property it will be considered as text too — as it appears in the window.
Fuzzy grouping is a special case of custom grouping, only here the command defines the categories automatically using the property and fuzzy factor you supply.
If you use a regular expression (instead of a number) as the fuzzy factor, you can identify common substrings in filenames or other properties, and group on them. Let's use an example, consider these files:
alpha (2002).mp4
beta (2002) action.mp4
New File 2123
old (2001).mov
alien (2001).mp3
Four of these have a year, or 4 digit number, in brackets. If we use the regular expression \(\d{4}\) that matches this pattern for a fuzzy factor, we will generate these automatic groups:
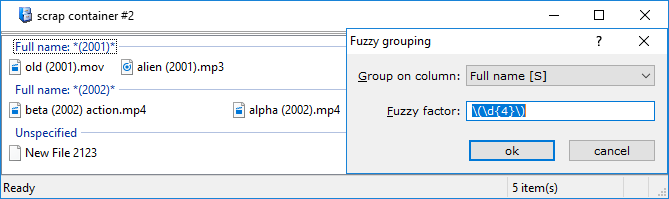
See how the file that doesn't have a year in brackets ends up in the unspecified (non-matching) group.
Here's another use of this command. If you browse shell:recent folder of recently accessed documents, you cannot arrange by file type because all files in there are shortcuts; the .LNK extension is masking out the real file type. You can work around this problem putting all items in a scrap window and do a fuzzy group on NAME [S] property (not full name) and this regular expression (that matches the extension past the dot):
\..*
You will see that files are grouped by their original extension!
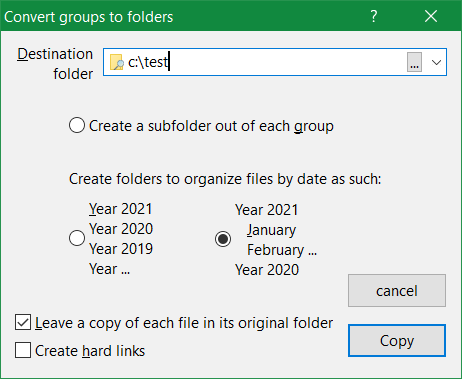
The dialog has 2 modes, or two ways to generate folders, one for real groups (tick Create a subfolder out of each group), and one for implied groups by date — the latter has 2 sub-modes, see below.
|
Say you used View > Arrange by > Show in groups menu to show items alphabetically grouped using their first letter, you can then use extract groups command to create folders that contain the items of each group. You choose a top destination folder and xplorer² creates subfolders under it, one per group (the folder names match the group titles you see). You can either copy or move the original files into these subfolders, depending on the checked state of Leave a copy... box. Tick create hard links box to create a space-efficient shortcut instead of full file copies. Make sure that the destination folder you specify is on the same NTFS partition as the source files, otherwise hard links won't work. Click Copy (or Move) button to start organizing files into group folders. Simple explorer copy routines are used for the transfer. To see the newly created folders you must browse the destination folder you specified (e.g. C:\TEST in the above example). For example if we had a scrap window showing groups by date (see the picture to the right) and used this dialog to split the groups, it would create one folder for each of the date categories — folder name matching group name — and place all the files of said group in their respective folder. Unlike other xplorer² commands, all the visible items are sent to group subfolders, not only those selected. A few other irregularities to note with this command:
|

|
This command can also organize items by date, whether you have groups or not. This is useful e.g. if you have a truckload of photos in a scrap and you want to automatically move them in subfolders according to their modification date. Use the two date radio buttons to choose how to have them organized, either one folder per year, or you can have items organized by year and month (i.e. each year subfolder has 12 subfolders corresponding to months). Folders are only created for items that need them; there may be gaps in the sequence if files for a yearly period (or month) are missing.
You can apply additional order to your photos using the export groups command in stages. For example, if you want to organize your photos by camera model as well as by date, so that you have one folder per camera model, and inside that you organize by year/month, you can do it as such:
This procedure could be automated using macros
|

|