|
|
xplorer²Exponential growth to file management productivity |

|
|
xplorer²Exponential growth to file management productivity |
A common operation is creating a duplicate of a file in the same folder. This can be done with two keystrokes, <CTRL+C> followed by <CTRL+V> will paste a "Copy of" item. xplorer² offers Edit > Duplicate menu command as an alternative.
Instead of pasting the whole file, you can create a windows shortcut (LNK) file using Paste link menu (or while dropping). These are small files that point to the real file (think of all the shortcut program icons on your desktop). When you double click on a shortcut, the target file is opened.
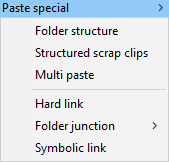
Other special kinds of targets can be created using Edit > Paste special submenu as below:
|
|
So which kind of link is best? There is no clear cut winner. See the table below for advantages and disadvantages of each type:
|
As you can see for most uses a symbolic link is the best option (if you don't mind the elevation to create one), except for when you rename the linked file. The humble LNK shortcut can survive if you rename or move its target, because of the link tracking windows service!

When it comes to transferring large amount of files and folders, the windows copy dialog comes rather short. xplorer² in exchange for the fancy animations, offers a robust alternative when copying from and to regular filesystem folders. The main features are:
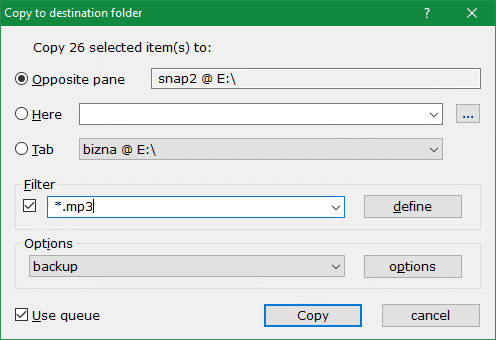
The dialog has 3 main areas: where you want the files copied, whether to apply a filter and various options.
Most of the time you don't need to tweak any copy options. You just press <F5> key to show the dialog and immediately press <ENTER> to start the robust copy using whatever options you used last time. In fact to copy to the inactive pane with the last used options press <CTRL+F5> key combination, and it will be done without showing the dialog!

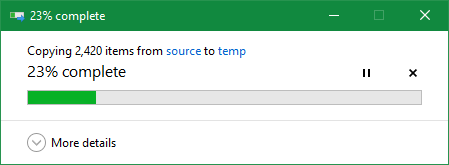
The progress dialog is horizontally-resizable. You can see information about the file being copied (From and To fields), a progressbar indicating how much work is done, a rough Estimated time left, and some statistics associated with the transfer; there's even a graph of the transfer speed over time, to keep you mildly amused :) — you don't really need any of this information. You can casually inspect the progress also on the (windows) taskbar icon:

A pause button exists to temporarily halt the file copy (for whatever reason); then click on resume button to continue, or cancel to abort the copy altogether. If you abort, the files transferred up to that point are not deleted. Whatever's done, is done. If you want to restart a failed or abandoned copy, use "Overwrite if newer else skip" option (see below) so that you don't waste time with files that were successfully copied in the first attempt.
If the source and destination folders contain items with same names, they will be overwritten. The old version will be replaced with the new file being copied. As this is a radical and irreversible step, by default xplorer² requests your approval with this messagebox:
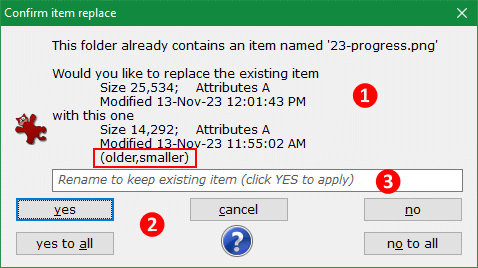
To help you decide which file to keep, xplorer² shows brief information (size and date attributes [1]) about the existing item in the destination folder, and the new one that is about to overwrite the old version. You should focus on the last line that highlights the differences of the new item older,smaller and then decide: to overwrite the old file click Yes button, or No to keep the old (existing) file. The action buttons [2] include yes/no to all buttons, that reply yes or no to any subsequent overwrite confirmation automatically. You see the pattern in the first few confirmations and you decide whether the remaining can be dismissed in the same fashion. If you click cancel at this point you abort the entire file copy.
Another option is to keep both files, saving the new one with a different name you specify in input box [3]. Doing this file by file manually can get tiresome, but you can select the Overwrite method option "Rename target" which will create such unique name copies automatically (it adds _1 to the base name). However keeping all these extra files isn't sustainable in the long term, sooner or later you must decide if they are all worth keeping or are just duplicates.
When it comes to replacing folders, i.e. when the destination contains a folder with the same name as the source, by default the target isn't overwritten — just extra files are added in it. If you want to use the same overwrite semantics for both files and folders, enable "Overwrite folders" option; then if a folder collision is detected, the entire old folder (cum subfolders) is first deleted, then replaced with the new contents. This is liable to destroy a lot of old content, so please be careful.
For most people, the smarter overwrite option is "Overwrite if newer else skip" (available as backup from the drop-down list, see figure 22). It is an automatic way to resolve conflicts; it compares file modification dates and keeps the most recent file (assuming it contains later changes you made). If the source file is older or identical (in terms of date modified) to the existing, it is skipped. This mode is perfect for backups, where you keep an up-to-date copy of your working documents in a safe external location (e.g. USB disk). If you do this daily, you don't need to copy your entire documents folder, only new and changed items. Thus you save time and effort — no time wasted confirming file replace operations.
|
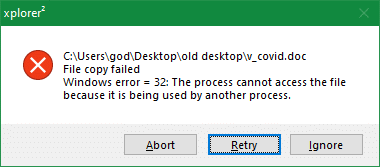
There are a number of situations where a file copy fails, as for example if the target file is open in an application. xplorer² will pop a message describing the issue, and depending on the situation will offer alternative courses of action, e.g. Abort-Retry-Ignore questions, where you click the button with your choice action. Usually the only feasible options you have are to ignore the problem if it looks like a 1-off, or abort the copy operation if more files are expected to fail in the same manner — say if you ran out of space in the destination drive.
A soft error you may encounter copying to FAT32 devices is about "Secondary streams" that couldn't be copied. ADS are used for storing comments or to mark downloaded files as risque. If you are certain you don't need this warning message (if you are not using file comments) tick the advanced option "Disable stream loss warning..." — one less thing to worry about. |
|
|
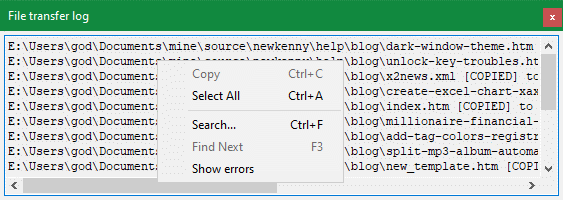
The progress dialog has a log that records each file operation individually. You can browse this using error log button (see figure 23) — a misnomer really because it shows more than errors. You can search the log pressing <CTRL+F> keys, or if you just need the error lines, right click in the log window and pick Show errors menu command. For subtle problems search for the special @@@ marker.
When you copy in backup mode, only files that were copied are logged (newer and modified) — there are usually fewer of them in large backups. To make sure you get a chance to see the log after the end of the transfers, tick the option "Retain window" so that the progress window won't close automatically. |
|
During silent operation, any events encountered that would normally require user intervention are dismissed automatically. More specifically:
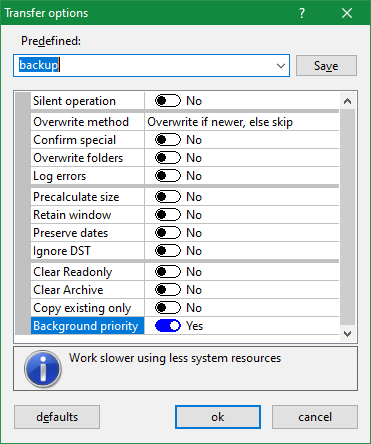
The robust transfer configuration dialog has a button for Options. Many important options have been discussed already; here's a brief explanation of all copy options:
|
|
This dialog uses the property control also used by program options. It shows all options in a list, which you can scroll up and down. The left column shows the property name, and the right its value. You can flip the "checkboxes" on/off (Yes/No) using the mouse or <SPACE> key. The selected option shows a brief explanation about what it is for in the text box below the options.
Set of options can be saved and reused. First tick all the options you need, then give them a descriptive name in Predefined box, and click Save button. Then you can quickly select saved option sets straight from the main transfer dialog (from the options drop-down list). To modify a previously saved option set, change the tickboxes and click Save again (using the same descriptive name) to overwrite the old definition.
If xplorer² is in in the middle of a large copy, any extra jobs will be added to the queue. You don't have to wait, just use Edit > Copy to command normally, and once one job is finished the next one will begin, until the queue is empty.
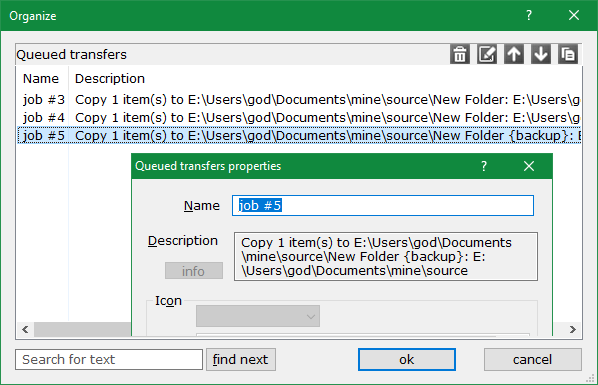
You don't normally worry about queued copies, but if you want to see what is waiting use Edit > Queue status menu command, which will show you queued jobs in a dialog similar to bookmark organization. You cannot change properties of any waiting jobs, but you can delete or move them up/down the order using the dialog toolbar buttons. Double click to see details on the source/target folders and any special options used.
Another recommended option is to set the task priority to background, which won't overwhelm your PC resources, thus you can continue working during big copy tasks.
If you opt for silent operation, then no errors will be shown till all queued jobs are finished. In the very end, and only if there were any problems, you will be notified about it.
When xplorer² is copying from or to special folders you will see the regular windows explorer progress and overwrite confirmations windows, that look different — compare with the snapshots in this section.
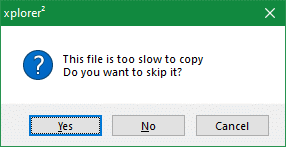
| Copy watchdog. When you copy to or from slow network locations, xplorer² is monitoring the transfer speed. If nothing happens for 20 seconds or so it will alert you to the problem with the message This file is too slow to copy.... You can either skip the slow file or persevere with the slow copy (in silent mode the file is skipped automatically). If you get too many of these interruptions, and your network is known to be slow to respond, you can increase the "Network folder ping" timeout to match your network (e.g. set it to 30000 milliseconds if half minute gaps are normal). Alternatively you can disable the watchdog altogether ticking "Don't check for slow copy..." advanced option. |
|
Whenever you start a delete operation that cannot go in the recycle bin (e.g. you press <Shift+Del> or delete in an external flash drive) the robust delete dialog kicks in:
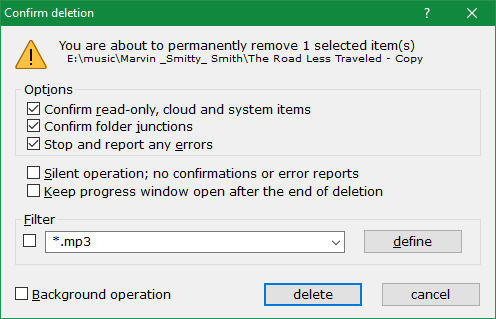
The first row of the dialog shows how many items are going to be deleted (beware of selected items hidden out of view you didn't mean to delete), and the full paths of the first few of them.
Deleting is much simpler than copying, but the robust delete dialog offers some similar options, as confirmation controls (checkboxes) that are self-explanatory. There is also a "Silent operation" option when you do unattended deletions and don't want to be delayed with confirmations or error reports. Errors are ignored but then probably the deletion will be partial.
When deleting folders, all their contents are removed recursively down to the deepest subfolder. This includes any hidden or system files that may reside within. If you don't have permission to delete them, an error will result.
|
You can even specify a filter (either a simple wildcard or a complex hyperfilter) so that only files that match it will be deleted. This makes sense when you are deleting into subfolders and you only want to remove a certain kind of file.
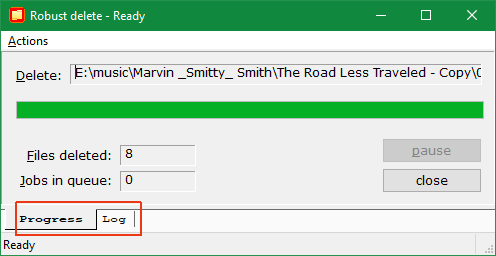
Click on Delete button to start the deletion. You get to see a progress report dialog like the one to the right. It is possible to pause and resume deletions, but they are usually too quick and you won't have time to do it! The dialog has a tab control you can switch among displaying progress or the Log. The latter text information is searchable, right click to see the search menu (like the one in robust copy log) The little Actions menu has commands to change the log's font and clear it. There's also a delete queue but usually it is empty unless you do a lot of successive deletions.
Robust deletion is permanent, deleted files won't go in the recycle bin hence you cannot undelete them easily. Use this command with care — that's why there's no option to skip the robust delete confirmation, it's your safety blanket.
|
|
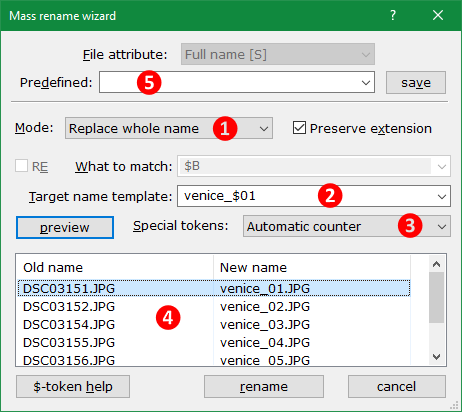
The most important setting is the Mode. Using this drop-down list [1] you set various modes that determine what kind of renaming is performed:
|

|
The list [4] shows you a preview of the transformation that is going to happen if you go ahead with the rename. The column old name lists a sample of the currently selected filenames in the active pane, and new name shows how each name is going to change. xplorer² automatically generates a preview from time to time, or you can click on Preview button to see the pending name changes. If your names are long you can resize the dialog window horizontally or/and vertically. Any filenames that won't change under the current rename settings are shown with a yellow background, alerting you to the fact — however this isn't necessarily an error to worry about.
If you remember the name of the variable token, you can type it straight in Target name box [2] or use Special tokens [3] list to help you find the token you are after. You can use multiple $-tokens in a template. The tokens useful for renaming are a subset of the available $-tokens used for command scripts. Here are some examples:
Tick the RE box (to the left of What to match field) to enable changing filenames with complex regular expressions. This is an advanced renaming mode that can help with certain kinds of rearranging parts of the filename using backreferences. This box is only available when Mode [1] is set to search and replace, and disabled in all other modes.
Here is an example. Let's say we have a filename LOG.17112006.TXT that contains a date in DD-MM-YYYY format, and we want to convert it into a more standard YMD (year first) format. We use a regular expression to match the 8 digits separated in 3 groups (day, month and year), then use backreferences to rearrange the 3 groups.
To match the original date format, we use (\d\d)(\d\d)(\d\d\d\d) in the What to match dialog box. There are 3 groups defined in brackets that match the date in the filename:
(\d\d)(\d\d)(\d\d\d\d)
LOG.17112006.TXT
To invert the location of the 3 groups and add separating dashes between the year, month and day, we use $3-$2-$1 in the Target name template (replace) box. $3 is a special backreference that stands for the 3rd group (year), so the resulting filename will be
LOG.2006-11-17.TXT
Note that parts of the original filename that were not matched by the regular expression remain unchanged. You can use any kind of search and replace trickery for other tasks too, e.g. to eliminate parts of the filename (leave the replace string empty). Sadly you cannot combine $-tokens within regular expressions.
Once you setup the rename parameters and previewed the results, click rename button to start renaming. Selected files are renamed in the order they are listed in the active pane. A progress bar on the statusbar shows you how much work is left to be done. If everything goes according to plan, you will see the new names at the end of the operation. If there are any problems, you will be informed and asked what to do; if the error is important just abort the rest of the files.
The mass rename dialog has many options. You can save your favorite rename operations, including all options, search and replace strings and so on with a name, and repeat them again later. Use the Predefined drop-down box (item [5] in figure 27) to supply a name for the current options, then click Save button to store them. In subsequent runs, use the drop-down portion to access your predefined settings and repeat rename operations easily. To remove a previously saved set of rename options, hold down <CTRL> key as you click on Save button.
Note the File attribute drop-down box is permanently disabled in mass rename mode. This field is used for changing other text attributes (comments etc) in bulk
Depending on your sort order, the selected files may be rearranged after each rename step, e.g. if you sort by name. If you want to preserve the original order as well (e.g. if you plan to add numbers to them), tick off "automatically re-sort" option.
This procedure could be automated using macros, especially if each rename step is saved and available from Predefined drop-down list
xplorer² makes extra effort to keep the original set of files selected and in order, which unfortunately leads to slower renames. If you are not using multiple rename steps you can set a small number to "Stepwise rename limit" advanced tweak
For files, date modified tells the last time you edited the file, made some changes in its content; whereas creation date is record of when the file was originally created. File dates and times are accurate to the millisecond although you can choose to see less detail.
File attributes are status flags and are mostly interesting for anorak types :) — see the expert section below. The shell property sheet allows changing some filesystem attributes like Archive or Read-only, but not all of them. xplorer² offers access to all attributes as well as to timestamps of files. Using Actions > Change attributes menu command on a selection of items you get this dialog which allows you to change 4 basic attributes and touch dates/times.
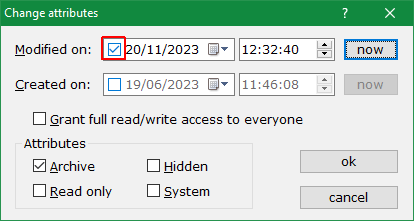
When the dialog first appears, it shows the current dates and attribute flags of the selected item. If more than one items are selected, then it shows dates of the first one and common attributes are ticked. If only some files have an attribute (and some don't) then the relevant box shows in ![]() indetermined state instead of ticked.
Only things that you actually change are affected; so if you don't check any date boxes, these won't be updated. In this way you can change only attributes or just dates, or both at the same time.
indetermined state instead of ticked.
Only things that you actually change are affected; so if you don't check any date boxes, these won't be updated. In this way you can change only attributes or just dates, or both at the same time.
To change a date, first tick its checkbox to enable the date and time change controls (observe how the modified row is enabled but date created is disabled in the above dialog snapshot). You can then set a specific date and time, or click on Now button to reset the date to current time (this is called touching a date).
When you are all set click ok button to go ahead with the changes, or cancel to abort the operation. If multiple items are selected, they will all be changed in the same fashion — they will be identical in terms of whatever changes you made. Otherwise each item keeps its original dates or/and attributes. The active folder pane will autorefresh to show you the new attributes you just set for the selection.
Except for fixing dates (set the same date for all selected items), you can swap various date properties, and shift a file modification date forward or backward. Use Actions > Change dates menu command (or the equivalent ribbon UI command found on Workbench tab, under Attributes button) to modify the selected items' dates.
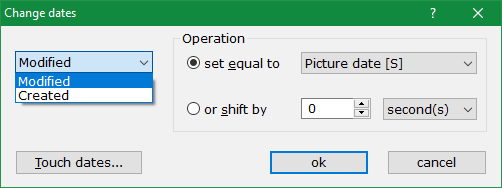
First choose which date to change (Modified or Created) using the leftmost dialog drop-down box, then choose the operation to apply. You either set the date equal to some other date property of the same file (e.g. set the modification date to the date a picture was taken or the video media creation date), or you can shift the existing date relatively by some amount forward or backward. Use negative numbers in Shift by box to set the date in the past.
It is also possible to set a date from the filename too, if the name contains the standard date format YYYYMMDD HHMMSS (e.g. some cameras set names like PIC_20181026_192237.JPG). For this operation select Name [S] from the property drop-down box. Naturally trying to set non-existent or invalid dates will generate an error message (e.g. text files don't have a Picture date property).
A possible application of Shift by operation is to adjust modification dates that were adversely affected by summer/winter time changes (DST) that may seem like fake file modifications to backup and comparison programs. Sliding dates up or down by one hour exactly will cancel the problem (prevalent mostly on FAT32 filesystems). You can shift dates by seconds or years, depending on the unit you select from the drop-down box.
Another way to remedy such phantom DST "modifications" is Actions > Sync-touch menu command, that will match filenames in the active folder pane with namesakes in the inactive pane, and will transfer date modified information from active to inactive panes. For this to work you should have the "original" and "backup" folders in the active and inactive pane respectively, and make sure that all differences are down to DST — or you may forgo real modifications in content!
Here is a sync-touch demo video
Click on Touch dates button if you want to set all selected file dates to the same date and time — this actually uses the previous dialog for changing attributes.
Sometimes you may want to transfer large files between two PCs and find that a single file is way too big to fit on e.g. a floppy disk or even CD. The Split and Merge commands from Actions menu will come handy in such a situation.
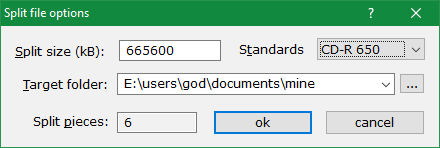
Actions > Split menu expects a single big file selected (the command is disabled when you select more than one file). First you break down the large file in as many portions as necessary, declaring your preferred split size (in kB) in the dialog, The standards drop-down lists a few typical media you may choose to provide an automatic split size — e.g. portions that will fit in a single CDROM. Split pieces will give you an idea how many chunks you will get for the selected file, for each selected split size.
Then you choose the target folder that will receive the fragments and click ok button to start splitting. For example if you have a file called bigone.dat that is 10MB and you break it down in chunks of 1MB, you will end up with 10 files named bigone.dat.01, bigone.dat.02, ... bigone.dat.10.
This will allow you to place the file segments on floppy disks and do the transfer to another computer. There you just need to make sure to place all fragments in a single folder, select them all after sorting by name (so that they'll be in order), and use Actions > Merge menu to put them back together; the file will be restored keeping its original modification date. You can now delete the split fragments!
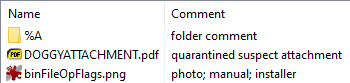
Comments are small pieces of text associated with files and folders, 100% controlled by the user and ignored by the filesystem. There are many possible uses for comments:
| You can examine file comments adding the stock Comment [S] column in detailed view mode. Comments also appear in details pane for the focused item in the active pane. They even show in Details property page (File > Properties menu) along with other properties — but they aren't easy to browse there. Most important of all, xplorer² allows you to use comments as search rules, so you can easily check and retrieve files that have one or more keywords. |
|
You set and modify comments for one or more selected files using Actions > Set comment menu command, which displays this dialog:
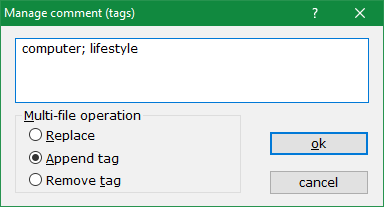
Comments can be as long as you like (up to 4096 characters to be exact), that's why you get a big box to type your comments. The dialog shows any prior comments if any exist; if multiple files with comments are selected, you see the comment of the first one selected.
When changing the comment of a single file Multi-file operation group is disabled because its modes aren't needed: you just see the entire comment and you get to change or delete it as necessary. When many files are involved you have 3 options:
When you are happy with the comments and the operation, click ok button to set, modify or clear the comments of the selected files. When the operation is over you will see a message on the statusbar "Operated successfully on xxx items", which should be equal to the number of selected files — unless there was some problem.
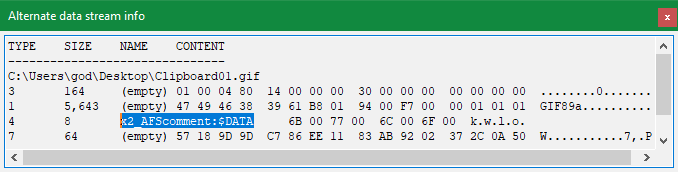
File comments rely on an advanced NTFS feature called alternate data streams (ADS). One way to view ADS is like separate chapters within a file. What you usually regard as file is the main stream where your data is held, e.g. your text. With NTFS you can associate other streams with a file or folder. So FILE.TXT can carry a stream called OTHER and it will be addressed as FILE.TXT:OTHER using a ":" to separate the stream name. When you move the file around, all these alternate streams are silently carried along.
|
The standard stream for comments is called SummaryInformation, but unfortunately the property system makes a mess of it for most file types, so xplorer² uses its own stream called x2_AFSComment. This makes things consistent within xplorer² but obviously other programs like windows explorer will not be able to read such special comments.
|
|
Another use of ADS is the Zone.Identifier information your browser attaches to files you download from internet, which cause various "unsafe" warnings. If you trust the downloaded file, press <ALT+ENTER> to see its properties and tick Unblock box in general property page.
|
There's another way to change comments or any other text (or numeric) file property, in bulk for all selected files.
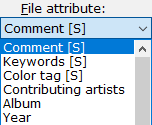
Actions > File properties menu lets you change editable text file properties like Author, Title, even tags (keywords) and comments. The dialog is identical to that used for mass renaming, only you select the file property to change using the File attribute selector box near the top of the dialog. Using a GUI similar to mass renaming you can either set, clear or modify through search and replace the existing file properties. This command is mainly for text properties, but it can also be applied to numeric ones, like track number # — just make sure your templates translate to numbers, e.g. using automatic counters $01. The procedure was explained in detail so it won't be repeated here. Just select the property you want to change using the drop-down list, and choose the mode, set your property manipulation template, preview the changes, and off you go! Some dialog controls that are only valid for renaming like Preserve extensions will be disabled in this function. |
|
|

|
