|
xplorer²
Exponential growth to file management productivity
|
 Advanced programming and scripting
One step up the ladder from DOS scripts, come user interface macros and file property algebra. These advanced topics are closer to computer programming than casual file management, but they don't require a degree in computer science to take advantage of. If you are used to MS Excel cell expressions, you should get the hang of it quickly. Note that xplorer² doesn't offer a fully scriptable programming model with file and user interface objects, but a simpler macro language for user interface elements, that should be within the reach of xplorer² medium-to-advanced users. As for the programmers amongst you, I refer you to the windows scripting host for the full monty <g>
User interface automation with macros

A simple in-app "programming language" allows you to automate many program tasks. It is not a full blown scripting language (as e.g. the one in MS Excel) but it is surprisingly versatile and easy to use. You write scripts, that is sequences of simple text commands that manipulate the program window as if a robot was in control. You can do these sorts of tasks:
- Execute a command that launches a dialog
- Find windows (dialog control elements) like buttons, text fields etc
- Set text in edit controls
- Check radio buttons
- Select from lists
- Click buttons
- Wait for commands to finish
All in all you can do whatever any user could do using the keyboard and the mouse to operate the program, only do it in a tightly controlled fashion. You can string commands together that operate on a series of dialogs to achieve complex results. Many times you can get a head start using the macro recorder, where you just use the program for what you intend to capture with the macro, and get a skeleton implementation for free. However first let's do it the hard way, writing everything from scratch. Here is an example script:
# copy selected files with filter
COMMAND "copy to"
WAITWND
FINDWND filter
FINDCLASS combobox
SETTEXT *.pdf
OK
As you can tell from the command names, this macro is equivalent to clicking on the Copy To toolbar button, waiting for the dialog to appear, then finding the Filter box and setting its value to "*.pdf" ; and finally "clicking" the OK button to start copying the files with the selected options (only PDF files will be copied).
Use Customize > Macros > Edit macro menu and copy/paste the above script in the editor area as such:
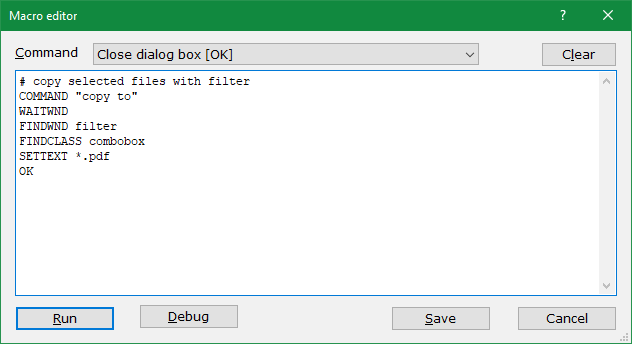
Figure 48. Macro editor: compose new macro
Going quickly through the macro editor dialog, we see a Command drop-down that lists the most popular commands, which you can insert with guidance on the expected arguments. Clear button erases any previous macro so you can start fresh. When you are ready, click Run to execute the macro, or Debug button to troubleshoot problems. Save will add the current macro in Customize menu so you can use it again in the future.
|
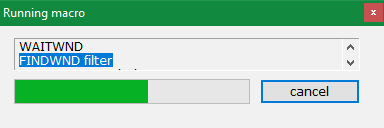
Click Run to run the above macro. If you had any PDF files selected, it will copy them to the inactive pane, otherwise it will do nothing. When a macro is running you cannot work with the main program window. You will see dialog boxes opening and closing in auto-pilot mode, following the macro commands. A macro control window appears on top of other windows that shows the progress of the execution. To abort a macro mid-way through its execution click on the Cancel button.
While a macro is running you should not switch to another window or application, otherwise the macro will probably fail. Nor should you interfere with random clicks or keypresses. Just hang in there till the macro is finished!
|
|
When you repeat a macro saved in Customize > Macros list, it works in silent mode; you won't see any dialogs poping up, just the result of the macro instructions. When the macro finishes, you will see a message on the statusbar — unless some error steals the show!

To abort a silent macro that seems stuck press <CTRL+BREAK> to stop it — if you can find the key!
Macro command syntax
Each line of a macro contains just one command and its arguments, if any. For example:
COMMAND "copy to" # start the copy to dialog
COMMAND is the reserved command name that tells the macro what to do, "copy to" is the argument (which program command to execute), and the rest is the comment. Comments are ignored by the script but help you to make sense what each command is doing. Inline comments begin with the hash # symbol.
The macro language instructions and searched command and window labels are all case insensitive. You can use any case you prefer, e.g. command "COPY TO" is just as valid as the above example.
Arguments are necessary for many commands. They are usually constant text strings as the name of the toolbar button you are trying to click. Use "quotes" whenever you have spaces in arguments (many words). Arguments can also be numbers e.g. 32793 is the equivalent identifier for "Copy to" toolbar button (use Help > Command finder menu to find numeric equivalents to commands). Most of the time it will be easier to use the text label, but sometimes there will be no alternative than to use the number, e.g. for hidden commands. Arguments can also be variables, which will be discussed below.
Commands names should be searched as they appear in xplorer² menus or toolbar. If you are using a translation, search commands in your native tongue; using english names will not work in this case. For language-independent macros use command ID numbers instead of their names.
Many commands return a value, e.g. FINDWND returns the handle to the window found. You don't see this result immediately but it is stored in the last result register ($0). Subsequent macro commands may rely on the previous result to function properly, e.g. CLICK needs a window handle found earlier. The last result is piped from one command to its successor automatically.
9 elementary variables are supported to be used as arguments, called $1 to $9. Most of the time you will use $0 if you want to visualize the result of the last command (MESSAGE $0).
Finding windows and menu commands
The most important operations you will be using all the time is finding control windows (buttons, edit controls etc) to operate, and issuing message commands (using menu or toolbars) to the program — using FINDWND and COMMAND respectively.
If you are familiar with windows programming, you will know that each menu command and toolbar button appearing in a program's user interface correspond to a message number. Likewise, controls that appear in dialogs have an identifier number. For instance 32793 is the message number corresponding to "Copy to" toolbar button; and the OK button in most dialogs translates to number 1. Unless you are a big time geek <g> that can use Resource hacker or Spy++ you cannot be expected to know these numbers!
Laymen needn't worry. Instead of fumbling with cryptic numbers, you can use the text that appears on a menu, toolbar or dialog button to tell the macro which command you are after. Take note which text appears on the menu command you want to issue, and use it as the argument to COMMAND. For toolbars use the tooltip if the button you are after has no text showing. It is best to use the full command text as it appears in the GUI, which will ensure that the intended command will be issued. Partial names can be used too, but keep in mind that the first matching name will be used, which may be some other command or window! All
TIP: When troubleshooting macros, insert a MESSAGE $0 instruction under a FINDWND or COMMAND. This will show you which window or command was found ($0 is the last result variable). Once you are done debugging you can delete or comment out these MESSAGE $0 instructions. Alternatively you can run the macro in debug mode where you single step the execution and see detailed information about each command, see which window is operated upon etc.
Finding buttons on dialogs is easy, just use the name of the button with FINDWND. Other controls have some descriptive text label before them, which may be used to locate the control. Sometimes a control has no useful text or label; in these cases locate the control nearest to the unlabelled one, then move forward or backward with NEXTWND or PREVWND instructions till you hit the desired dialog control. The directions "forward" and "backward" correspond to the tab order in the dialog — or in plain english, what happens when you press <TAB> key to move around in a dialog window.
When searching for commands and windows, keep in mind that the search is within the active window. If no dialogs show, that means the main program window; if a dialog is showing, the search is within the dialog controls. Use the wait instructions (e.g. WAITWND) to make sure the window you want to manipulate has had time to show up.
Dealing with syntax and execution errors
When you first start working with macros, inevitably you will make mistakes. For example you can misspell an instruction name or forget a necessary argument. In that case a syntax error will result and the macro editor will highlight the token that caused the trouble. Here are some pointers to keep in mind:
- One macro instruction per line. Don't use ; to terminate commands
- Some instructions expect arguments, some don't
- If your arguments contain spaces, enclose them in "quotation marks"
- Are there matching unique labels for all jump instructions?
Once the basic syntax is correct, you can try running the macro. Here you may encounter subtle problems that will cause execution errors. The macro will stop, highlight the command that faulted and show an error message. Here are the runtime error codes explained:
- 1: unknown?: mystery error code probably caused by an error message during executing the command in the GUI
- 2: Wrong argument: you passed an empty variable to a command that expects an argument
- 3: Search failed: a command or window could not be found (or is disabled)
- 4: Wrong window class: you tried to operate a window in an unsupported way, e.g. change the text of a button or click an edit control
- 6: Command disabled: the command or window cannot be manipulated because it is disabled
Error code 2 (wrong argument) is raised also when an instruction cannot find the correct last result from the previous command. For example you cannot use CLICK without a preceding FINDWND. Most commands that operate on dialog controls require a window handle in the last result $0.
When you get an unexplained error 3 (not found), it could be that the dialog didn't have time to appear. If you use COMMAND and expect to operate the dialog controls, use WAITWND to make sure that the dialog is visible before you start manipulating its controls. FINDWND instruction is searching the dialog that is currently active (excluding the macro dialog itself).
Finally you may realize that a running macro is doing crazy things that were not intended. In that case click on Cancel button to abort the macro execution.
Debugging macros
The simplest problem you encounter is a syntax error, where you make a spelling error to a command name or forget to close a quotation mark. These errors are easily corrected in the macro editor (see the previous section). Somewhat harder are runtime errors that reveal something's wrong with the logic of your macro.
When you run a macro and it errors out, you are offered to run it again in debug mode. Or click Debug button in the macro editor to enter the debugger.
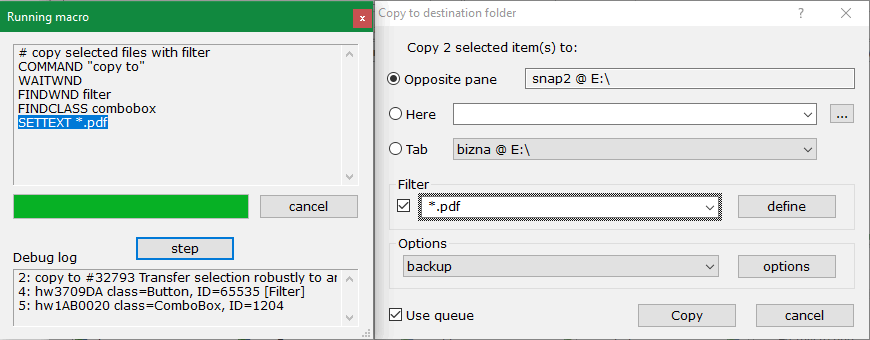
Figure 49. Running a macro step by step
In debug mode, the running macro (modeless) dialog is taller — you can resize it to taste. Instead of running the macro wholesale, it runs one line at a time. The current instruction is highlighted. Click on step button to proceed with the next instruction. Each command shows a little information in the Debug log area which you can examine to see if it does what you meant to do.
A cool feature is that it will highlight the last dialog control found — notice the thick border around the Filter combobox in the above picture.
It isn't quite in the same class as WINDBG, but with all the information shown, you should understand what the problem is, and go back to the macro editor to correct it.
Conditional execution
By default all execution errors are terminal and stop the macro dead. However you may want to take responsibility and manage the execution despite previous errors. For example, if a control cannot be found you may want to try to search for another. If you want to ignore all errors, use the instruction: ERRORSTOP 0.
Once you turn off the automatic error handling, the last result $0 variable will reflect the execution status of the last instruction. You can test for success using the JUMPOK instruction, which will jump to a label (i.e. move the point of execution) only if everything goes well — otherwise the instruction immediately below it will execute. Here's an example that looks for a window called test and stops execution manually if not found:
ERRORSTOP 0
FINDWND test
JUMPOK found
MESSAGE "window not found"
EXIT
LABEL found
CLICK
Using conditional jumps and GOTO instructions you can modify the order that script lines execute. Instead of linearly executing all lines in sequence, you can jump to earlier or later lines depending on your logic. Jump destination points (LABEL) can be any text you like to make sense of your script. If you have multiple jump points, make sure each label gets a unique name.
Simple loops are also possible using a control variable as a countdown counter, as such:
POP 5 # repeat 5 times
STORE $1
LABEL repeat
MESSAGE $1
DECR $1
JUMPOK repeat
# end of loop
The trick is that DECR instruction updates (decreases by 1) the counter variable $1 and the last result, so when it reaches zero, you break the loop (JUMPOK fails). Also note the roundabout way to initialize the counter variable using POP then STORE.
Macro command reference
The macro composition dialog has a listbox with the most common commands so you don't need to remember the names. Below you will find the full list of supported macro instructions and their expected arguments.
A typical instruction accepts a single argument, but there are some that apparently work on thin air without arguments. This is because they use the result of the previous command as their argument — this is called pipe argument. For example CLICK operates on the result of an earlier FINDWND command. If a command fails the result is zero (void).
Arguments can be either constants (strings or numbers) or variables ($0 to $9). Variables represent strings, numbers or window handles, depending on what is stored in them. The last result is kept in variable $0. Unless otherwise stated, the following table uses name for either a string or number, furnished either as a constant or variable.
Table 6. Macro instruction reference
| Instruction
| Argument
| Pipe arg.
| Result
| Description
|
| FINDWND
| name
|
| window
| Find a window by name on it or next to it (if labelled). Searching for part of the name is ok if you are sure that it will uniquely match the window. Also finds by window numeric identifier. The search is in the topmost active dialog or the main window. FINDWND 0 returns the currently active dialog.
|
| FINDCLASS
| name
| window
| window
| Find a window by its exact class name (e.g. edit, button etc). If the prior result is a window, it finds the next window of the same class, if any, possibly cycling from the top.
|
| FINDFRAME
| title
|
| window
| Find a top level window by its titlebar text and switch to it (make it active). The window must be selectable, e.g. not blocked by a modal dialog.
|
| GETFOCUS
|
|
| window
| Returns the active window (where you last clicked).
|
| SETFOCUS
|
| window
|
| Activates the window
|
| NEXTWND
|
| window
| window
| Returns the next window in the tab order
|
| PREVWND
|
| window
| window
| Returns the previous window in the tab order
|
| CHILDWND
|
| window
| window
| Returns the first child window (of whatever was found earlier)
|
| PARENTWND
|
| window
| window
| Returns the parent window
|
| CLICK
|
| window
|
| Clicks on the window found earlier. May fail if the button is disabled
|
| CLICKDEF
| name
| window
|
| Executes the default accessibility command for child name (if using a number, start from 1). This is for non-standard buttons that don't have window handles (exposed through MSAA). For many standard controls it's equivalent to double-click on a list item.
|
| SETTEXT
| name
| window
|
| Sets the window text to name. Only meant for edit controls and combo boxes.
|
| ADDTEXT
| extra
| window
|
| Adds the extra text to the existing edit control text, at the current insertion point. In contrast, SETTEXT replaces the entire window text, discarding the old contents
|
| GETTEXT
| $var
| window
|
| Gets the text of the last result window and stores it in variable $0 - $9
|
| GETCOUNT
| $var
| window
|
| Gets the number of items in listview control and stores it in variable $0 - $9
|
| GETITEMTEXT
| index
| window
| text
| Extracts individual item text from windows like listview controls. Items should be specified by a number from 1 to GETCOUNT; for selected item use 0.
|
| SELECT
| name
| window
|
| Selects an item in a combo, list or listview control either by name or by number (1 → max items present). SELECT 0 will unselect everything
|
| GETSEL
| $var
| window
|
| Gets the selected item number in selectable controls and stores it in variable $0 - $9. If there's no selection an error is generated
|
| SETCHECK
| 1/0
| window
|
| Checks or clears a checkbox or radio button, if enabled. Special value 2 means flip previous state
|
| OK
|
|
|
| Terminates the active dialog. It is a combination of FINDWND "ok" followed by CLICK. It may fail if the dialog won't close due to validation errors.
|
| CANCEL
|
|
|
| Simulates pressing ESC key. If a dialog is active this will be equivalent to clicking on Cancel button
|
|
| COMMAND
| name
|
| help text
| Issues a program command (WM_COMMAND) by number or by name. It is equivalent to using a menu command or toolbar button. Searching by name is more intuitive; it finds the command from a menu or toolbar that corresponds to the (partial) name. For toolbar buttons without names use the tooltip (popup) name. If the active window is a dialog, it finds the named button and simulates a click. If the command is disabled (e.g. ghosted toolbar button), it fails. If successful, returns the explanation text of a the command issued (use MESSAGE $0 to see it).
|
| CMENU
| name
| window
| number
|
Simulate a context menu (right click) on the window last found, and find the menu command that corresponds to name. Returns the command identifier of the menu item found. Can be used for the shell context menu or any other background menu
|
| WAITWND
|
|
|
| Wait till the active window changes, e.g. a new dialog window opens
|
| WAITIDLE
|
|
|
| Wait till the active window finishes processing the last command.
If you call consecutive COMMANDs make sure you WAITIDLE between them otherwise macro execution will be slow
|
| WAIT
| period
|
|
| Wait a fixed amount of time in milliseconds (1000 = 1 sec). The argument may also be a window handle in a variable, where it behaves like WAITIDLE for that particular window.
|
|
| ERRORSTOP
| 1/0
|
|
| Turns the "resume on error" policy on/off (default is to stop on any error).
|
| LABEL
| name
|
|
| This instruction doesn't do anything but marks the destination of a jump/goto instruction
|
| GOTO
| label
|
|
| Unconditional jump to label name
|
| JUMPOK
| label
| any
|
| Conditional jump to label name. Checks the result of last command and if it is failure/empty/0 then does nothing. So it only jumps if the last command was successful
|
| JUMPERR
| label
| any
|
| Conditional jump to label name. Checks the result of last command and only jumps if it was 0/failed/empty — the opposite of JUMPOK
|
| EQUAL
| name
| any
| 0/1
| Compares its argument with the last result. If the 2 values are compatible and equal, the result is 1, else 0
|
| DECR
| $var
|
| $var-1
| Decreases the variable ($1 - $9) by one and updates last result too. Used for loop control.
|
| INCR
| $var
|
| $var+1
| Adds 1 to a variable ($1 - $9) and updates last result too.
|
| MATH
| expr
|
| number
| Calculate the expr argument and store the integer result. Allows performing simple integer arithmetic e.g. ($1+3)/2
|
| POSITIVE
| $var
|
| 0/1
| If variable is positive (>0) returns 1 else 0. Meant for integers mainly.
|
| EXIT
|
|
|
| Stops execution; any instructions below this are ignored
|
| JSR
| label
|
|
| Unconditional jump to label name as a subroutine. There is no stack and no nesting is supported. Use regular $0-$9 variables for information exchange
|
| RET
| code
|
| =code
| Resume execution at line following the last JSR instruction. Used to return from a "subroutine" with a code inserted in $0
|
|
| MESSAGE
| name
|
|
| Pauses execution showing a message. Debugging aid mainly used to visualise the result of the last command as MESSAGE $0
|
| ADDSTR
| name
| old
| old+ name
| Adds name to the old string result. If you need a newline use "\n". Intended for composing longer messages. With an empty argument it resets (empties) the string result.
|
| CHOPSTR
| format
| full
| part
| Splits the last result string into tokens and returns one of them. The format argument includes the split character and the substring number to return. For example \2 would separate a path on \ points and return the second part; \t-1 would split on tab characters and return the last part (negative numbers count from the end)
|
| REM
| any
|
|
| Comment line that doesn't do anything but explain something. For inline comments use #
|
| INPUT
| prompt
|
| text
| Pops up an input dialog where you enter a string, which is then stored in the result. Prompt is used as the question to ask. Tip: use INPUT 0 to import the text from the clipboard.
|
| STORE
| $var
| any
|
| Stores the last result in a variable $1 — $9 for future use
|
| POP
| any
|
| =any
| Copies the constant or stored variable into the last result $0 register to be used in a subsequent command
|
| SENDKEY
| keys
| window
|
| Send keyboard input to a window. E.g. CTRL+LEFT will send a combination of control and left arrow keys. Most special keys are recognized by name (see VK_xxx names), and for the rest you can use the equivalent virtual key code number, e.g F1=112 (from hex 0x70)
|
| KEYDOWN
| key
|
|
| Simulate a single key press down (and hold). Unlike SENDKEY a window target isn't required as pipe argument, the key goes to whatever window has the focus. Can be used to simulate <SHIFT> combined with button clicks in dialogs.
|
| KEYUP
| key
|
|
| Simulate a single key release. Each KEYDOWN should have a matching KEYUP or the keyboard will go funny.
|
| NOPOPUPS
| 1/0
|
|
| Turn silent mode on/off, i.e. don't show any of the dialogs that would normally appear during macro execution. This mode is on by default if you repeat a macro.
|
|
Harnessing macros will take some practice. Please consult some of the sample macros in the appendix
Automatic macro recorder
|
If you don't need the full power (and learning hassle) of the scripting language, you can record simple macros pressing <F12> key to start the macro recorder (or use Customize > Macros > Record macro menu command). Use the mouse and the keyboard to do what you like (issue commands, tweak dialog controls and buttons, etc), then click on finish button to stop recording. The equivalent script representing your actions will be generated automatically and presented to you, just as if you had typed in the instructions. Then you can do slight modifications with the macro editor.
|

|
The recorder will only generate plain macros (without loops), and the resulting code looks spaghetti, but it should be adequate for the average macro requirements — and you don't need to do any "programming". If you start the recorder and click Finish immediately, without any actions, you will be presented with the last macro used.
Macro recorder handles simple window controls very well such as buttons, checkboxes, text edit controls and the like. However it cannot deal with some advanced controls like Tabs. The latter can only be manipulated with macro instructions. See the sample macros in the appendix for some examples.
Macro program environment
Usually the folder you browse and the items already selected are the input variables of the macro, the files that will be operated upon by the macro commands using xplorer² menus and dialogs. Although it is possible to browse folders and select items using macro commands, setting up a multi-selection, especially if multiple folders are involved is a challenge. That's why it makes sense to select the items first manually, then use a macro to operate upon the selection. If you nevertheless want to fix the input selection as part of the macro, keep in mind the following points:
If your macros rely on dual pane mode, you want to make sure which pane is active, left or right? Use FINDWND "left pane" to find the left pane and SETFOCUS to make sure it is active. This is very important if you need to transfer files between folders.
When using macros to configure dialog command options, keep in mind that a dialog may have some previous selections that depend on the last time you used it. It may not be the same as the time you wrote the macro! Be aware of what may be ticked already or preselected. For example when using rule-based dialogs always click Clear button in your macro to remove the previous rule definition.
Saving and reusing macros
|
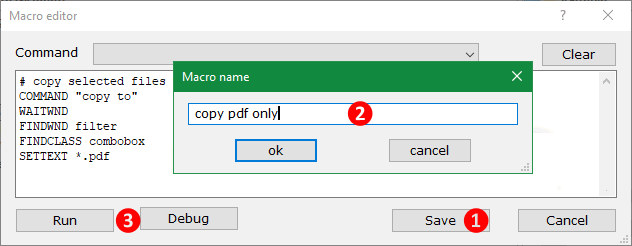
You can save useful macros for later in Customize > Macros list. The saving procedure is a bit unorthodox, but straightforward. First finalize the macro commands and test it well with the editor. When you are done, bring up the editor again (use Edit macro menu command to edit the last macro), click Save [1] button, give it a descriptive name [2] for the list, then Run [3] the macro. If you don't run it, it won't be saved. If you don't want to run it fully, you can "cheat" clicking the Debug button, then cancel the debugging without running anything. This way you will save the macro without running it.
The macro list menu works like bookmarks, use its Organize menu command to add icons for toolbar and keyboard shortcuts for easy access. You can also edit an existing macro from organize dialog, adding or removing instructions, but it will feel a bit crumped. Another way to modify a saved macro is to first run it, then edit it (as the last macro used with Edit macro menu), and finally save it with the same name — which will overwrite the previous definition.
|
|
 Programmable columns: file property algebra
You may be familiar with DeskRule's desktop detective panel that enables searching with combinations of file properties and attributes. xplorer² (ultimate edition only) programmable column is an extension to this concept: it allows you to combine file properties, boolean and arithmetic operators and a few functions into expressions, whose result is the value of the Programmable [S] stock column. This result can be then used as any other column, for display, sorting, filtering and searching for matching files. It is really versatile and the possible uses are too many to enumerate — just use your imagination!
To use the programmable column, switch to detailed view mode, right click on the column header row and pick Programmable from the menu. This will allow you to change the expression and will show the programmable column too:
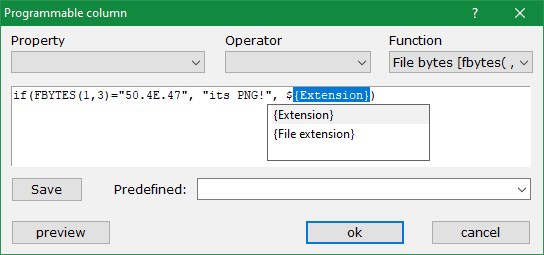
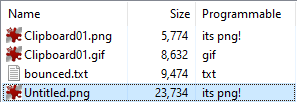
Figure 50. Define programmable column expression
The programmable column definition dialog has controls that guide you to create expressions, with drop-down lists for file properties, boolean and arithmetic operators and some simple functions. Or just type your expression in the edit box provided. As you type, it will autocomplete file property names for the more experienced users. Say you type $EXT (the dollar is very important) a popup will find all the matching properties that have ext in their name and you can insert them easily — press the <Down> arrow key to select from the completion list.
All elements of programmable expressions are case insensitive
Click preview button to see the results of your expression on the selected file in the active folder pane. If something goes wrong, it will pop a syntax error with the likely error location.
All file properties (columns) can be used in the calculations. The rules can also search in files (GREP function) and extract specific file bytes (FBYTES function). The result of the expression can be either text or number or even a date, depending on the properties and operators used. If you use conjunctions of boolean operators, the result will be 1 or 0, for true or false respectively.
For instance the above example expression if(FBYTES(1,3)="50.4E.47", "its PNG!", ${Extension}) will check each file's contents to detect whether it is PNG format, in which case it will show "its PNG!"; for other file types it will show the extension. See how it works for the few files in figure 50 above.
Programmable expressions are not programs. The expression can be as long as you like but it is evaluated as a single line of "code". Think of cell expressions in MS Excel
=SUM(A1:A5)
If programmable column is enabled, it applies the last expression you defined on each and every file, and shows the end result. You can save expressions you use frequently by supplying a name in the Predefined box in the above dialog and clicking Save button. This is similar to storing hyperfilters for search commands. Then expressions become available for future use from the history drop-down dialog control — pick one from the list and the programmable column display will be updated.
Except for this "draft" you can have 4 more columns in Customize > Programmable menu. The first item listed is the draft programmable column mentioned above; use Add new submenu to define more composite file properties. Supply a title in Predefined box (you don't need to click Save button). This title is the column header in detailed view mode. You can turn on individual programmable columns either from Customize menu or using the column selection dialog. All these columns are also available as hyper-filter conditions (e.g. to select or search for files).
This custom list has an Organize command where you can rename, assign shortcut keys and custom icons for toolbars in the usual fashion. It is limited to 3+1 items so you will need to delete definitions you don't use often — you can have them saved in the old Predefined box.
Programmable columns consume lots of resources, especially if you base them on slow raw file properties or access file content with GREP function. If you show simultaneously 2 or more programmable columns, the slow down is going to get worse. Use them sparingly!
File attribute algebra
This dialog allows you to do amazing feats which would normally require you to write a program or advanced shell script. You can combine any file property with arithmetic (add/subtract/multiply etc), relational (equal, greater than etc) and boolean operators (and/or etc) to create arbitrary expressions that can be evaluated for each file. For example take the expression:
(${Modified} > ${Created} + 2) & ${Size} + 5KB < ${Size on disk}
It will match files whose modification date is later than the creation date + 2 days, and (&) their reported size plus 5 kilobytes is less than its total size on disk. As this uses the & (AND) boolean operator, the result will be 0 (false) or 1 (true). This value will show in the programmable column, and can be used as a search rule to identify files with custom qualities.
When you become familiar with the "official" property names and operators, you can type such expressions manually (press <Ctrl+DownArrow> key to autocomplete properties), or you can use the dialog drop-down lists to help you compose a complex rule with properties, operators and functions. A few clarifications are in order:
- Variables. These are file attributes, enclosed in braces with a leading dollar ($) sign; ${Modified} is the date last modified property (consistent with their use in $-tokens). The name inside the bracket is the same as the column name — it may include spaces. Type a $ then start typing part of the property name and the dialog will offer you the possible name completions.
If you use special properties that not all files possess, the expression may fail. If for example you try to use "date taken" property on a text file, the expression will come up blanc (false always) — it is only supported for JPG files.
- Constants. Anything that is not a variable or a recognized operator is considered a constant. The type is automatically deciphered, e.g. 2 is a number, 3.4 is a floating point number, 25/12/15 is a date and so on. Numbers can be followed by KB/MB etc if you prefer size units.
- Date constants. Except for regular dates, you can use things like "yesterday" or "last year" (use quotation marks to preserve space characters). You can also use constants like "March 2015" which would match any date within the said month. For date ranges use the > and < operators in a conjunction e.g. ${modified} > "25 feb 2015" & ${modified} < "1 jun 2015"
- Wildcards and regular expressions. A string constant can be either a literal like "hello world" or wildcard like test.*. Many of the special characters that appear in regular expressions could be mistaken for arithmetic operators, so please put wildcards and regular expressions in single quotes e.g. 'FILE[1-9].TXT'. Also note that when comparing string operands, equal (=) implies identical strings (ignoring case), whereas the approximate (~) operator means that one string needs to be part of the other, e.g. a partial match.
Sometimes it is hard for the program to automatically fathom out a regular expression or differentiate it from a wildcard, if there are not enough special characters present. In that case, to force a regular expression enclose it all in brackets e.g. '(a.+)'. The meaning of the regexp will be the same and it will be unambiguously recognized as such.
- Unusual operators. Most operators have their usual sense, e.g. 1+2=3 will always be true. Here are a few exceptions:
- When you subtract dates, the result is a number (their difference in days).
- $date + number increases the date by that many days
- Adding strings concatenates them "str"+"ing" = "string"
- You can compare strings, e.g. "a" < "box" is true (like sorting strings)
- All string comparisons are case insensitive so "A"="a" is true
- Using brackets you can have really complex expressions with nesting.
- Arithmetic operators are calculated first, followed by comparisons. Boolean operators execute last. Use brackets to override the default operator precedence.
- Arithmetic between mixed types (except those mentioned above) will likely result in a syntax error
- Helper functions. Various string and date functions are supported like len(text) which returns the number of characters in the string argument (=4 in this case). Functions require one or more arguments that should be enclosed in brackets and separated with commas, e.g. find(abc,b), and return values that can be used even within other functions, e.g. mid(${Name}, find(${Name},'12'), 5) will extract a substring of 5 characters in the filename, after the first occurrence of 12 in said filename. Anything goes inside function arguments, including arithmetic operations etc. If you supply the wrong number or/and kind of argument to a function, a syntax error will be triggered. See the table below for all the supported functions.
TIP: If you want to use a string constant that happens to be a reserved function name, use quotes, e.g. len("len") is a valid expression that would return 3.
Table 7. Supported helper functions
| Function
| Description
|
| num=LEN(str)
| Return the number of characters in string, e.g. len('abc') returns 3
|
| substr=MID(str, nStart, nLen)
| Extract a substring out of a bigger text string, starting at position nStart and extracting nLen characters, for example mid('abc12', 2, 3) would return the string 'bc1'. Can be also used to access individual characters if nLen is 1.
|
| str=TRIM(str)
| Eliminate whitespace around a string, if any. It cuts off any leading or trailing spaces, e.g. trim(' ab ') would return 'ab'
|
| num=FIND(strHaystack, strNeedle)
| Find a needle in a haystack and return the position of the first occurrence — or 0 if nothing is found. find(abc12,bc) would return 2. The search isn't case sensitive. Regular expressions are supported for searching
|
| str=FINDRX(strHaystack, regexp)
| Similar to FIND only returns the matched string instead of the hit position. FINDRX(abc12, '\d\d') would return 12. Use 'single ears' for the regular expression (2nd argument).
|
| num=DPART(date,str)
| Access parts of the date, e.g. dpart('march 2016', year) would return 2016. The second argument str can return other parts of the date e.g. month or day (or even just d).
|
| num=TIME(date)
| Access the time portion of date, returning a floating point number HH.MM in 24 hour format. Useful for defining rules on time of day only.
|
| date=DATE(str)
| Converts text to dates. Usually this is done automatically; still this function can be used without an argument (DATE("") ) to return the current date and time. This can be used e.g. to calculate the file age in days.
|
| str=DATETIME(date,dfmt,tfmt)
| Format a date using separate date and time format strings. If you omit tfmt (3rd argument) no time will be shown. Format strings are the usual windows specifiers yyyy MM dd (see the documentation for GetDateFormat).
|
| str=NUMF(fmt,num)
| Format a number using a printf-like format specifier. For example NUMF("%.2f", ${Length}/10000000) would show audio duration in seconds with 2 decimal points.
|
| xxx=MIN(xxx,xxx)
| Compare the two arguments and return the smaller one. This function accepts all kind of argument types (numbers, dates, etc) and returns the same kind. So min(-1,2) would return -1.
|
| xxx=MAX(xxx,xxx)
| Similar to MIN function, this returns the larger of the 2 arguments
|
| xxx=IF(term, if_true, if_false)
| Evaluates term and if it is true returns the second argument, else the third. The 3 arguments can be whatever makes sense for your conditional logic. term is true if it isn't empty or if it is non-zero.
|
| num=ABS(num)
| Returns the absolute value of a number, e.g. abs(-1.3) would be 1.3
|
| str=STR(xxx)
| Convert any type of argument into a string, useful for passing dates and numeric variables to other string functions. It can also convert hex strings obtained by FBYTES into plain text
|
| num=GREP(str)
| Search file contents for occurrence of text (must be one keyword but can be a wildcard). If successful a positive value is returned, else 0 if keyword is not present in file.
|
| str=FBYTES(nStart,nLen)
| Extract nLen bytes from file, starting at file offset nStart (beginning=0). The returned string is the hexadecimal representation of the file bytes. For example PNG files can be identified because FBYTES(1,3)="50.4E.47" (use a hex file viewer to understand why)
|
| num=INT(xxx)
| Convert any type of argument into a number; it can also convert hex strings from FBYTES if up to 4 bytes long.
|
| substr=TOKEN(str, separ, nTok)
| Break up a string at separ points, and return the nTok entry (1=first token, -1=last). Special separator values are " " to break at spaces, \n which breaks at newlines and \t that splits on tabs. Similar in concept to CHOPSTR macro instruction. Example: token("hello world"," ",2) returns 'world'.
|
| stdout=SYSTEM(strCmd)
| Execute DOS command strCmd and collect its console output. For example system('dir "' + ${path} + ${name} + '"') will execute the DIR command on each item (this example isn't particularly useful :). Note the use of 'single ears' to compose the command including the "double quotes" around the path name -- in case it contains spaces -- and the + operator used to compile the command string. With a little imagination it can be used as a poor man's (slow) column handler! Commands executed should be in %PATH% or full paths must be specified. External commands that don't write to a console (e.g. GUI programs) are not supported.
|
| num=DIRCNT(wildcard, type)
| Applies only to folder items and returns the count of direct subitems that match the wildcard ('*.JPG' will count all the JPG files, '*' will count everything; regular expressions allowed). The second argument can be files, dirs or both, to count items of the specified type (dir=folder).
|
| xxx=FILE2(expr, path)
| Calculate a complex expression on a different file path for comparison purposes. The expression can contain anything (except for an embedded FILE2) and must be included in a single "quoted" string, e.g. FILE2("GREP('hello world')", "d:\path\" + ${name}). If you need quotes within the subexpression, use 'single ears'.
|
| xxx=FILEPROP(prop, path)
| Fetch a certain file property from a different file path, for comparison purposes. For example ${Modified} > FILEPROP(${Modified}, "d:\path\" + ${name}) will compare the current item's date with its namesake in D:\path folder to see if it is newer. Note only a single property can be fetched, which should not be in "quotes" — but you can have multiple FILEPROP statements if required
|
| path=PNEXT(num)
| Returns the path of the next (num=1) or previous (num=-1) item, as they appear listed in a pane. This path can then be used in FILEPROP or FILE2 to fetch a property of a neighbouring item, e.g. ${size} - FILEPROP(${size}, PNEXT(1)) would calculate the size difference of 2 items (except for the last one in the list). PNEXT cannot be used for sorting or searching for items.
For best results use it in the default (first) programmable column.
|
| ok=EXISTS(path)
| Test if a path exists. Return value is 1 if it is a file, -1 if a folder, or 0 if nothing exists.
|
|
If there is some problem with the complex expression like a misspelled file property or an operation between incompatible arguments, xplorer² will report a syntax error, highlighting the trouble spot. Correct the typo and you are ready to search.
Sometimes a property name on its own can be a useful rule, e.g. ${Keywords} without any other operators will match files that have some tags defined. Or combine it with a leading NOT (!) operator to match files that do not have tags! Bare property names are also convenient for yes/no properties like ${IsFolder}, otherwise you must be careful to compare them only against zero (=false or no).
The programmable column is useful for many advanced search tasks, e.g. find pictures whose width/height ratio is 4/3. It will also allow general tomfoolery like (${Modified} - ${Date taken})/2 = ${Size}, which arguably is not much use <g>. A final note is that extracting this column is rather slow; the more properties you use in an expression, the slower it gets. If you use multiple properties in a search expression, use the faster ones like filename and size first, and leave the slower ones (e.g. GREP) at the very end.
© 2002-2026 ZabKat LTD, All Rights Reserved
zabkat.com