|
|
xplorer²Exponential growth to file management productivity |

|
|
xplorer²Exponential growth to file management productivity |

xplorer² unleashes the full potential of file searches since you can use any and all pieces of file information as parameters. You can thus home in to the files you are after with unparalleled precision avoiding irrelevant hits. You can search a few hand-picked folders — even within zip archives, or whole networks, and even refine search results.
You initiate a search using Tools > Find files command. The ensuing dialog (figure 43 below) is relatively simple considering the amount of information it conveys. Broadly speaking it is divided in two sections, the search context [1] that specifies where to search, and the hyper-filter [2] that controls what to search for, the parameters of the files that will be considered positive hits.
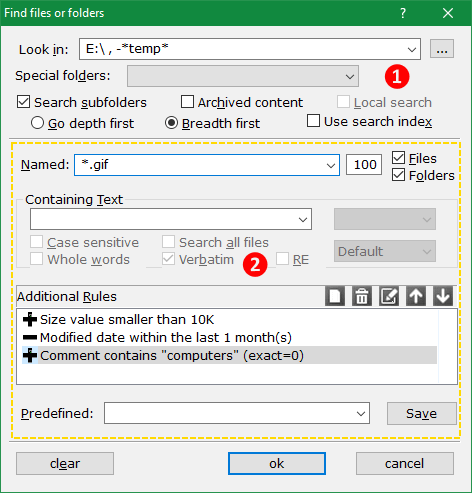
First we concentrate on the top portion [1] where we define which folders and how to search in them. By default the search context to Look in is the folder you were browsing when you issued the <Ctrl+F> find command. This is the root search folder and everything under it will be searched, all the way to the deepest subfolder. You can also specify broader contexts using the Special folders drop down box. This includes popular search locations like Documents, local hard drives, This PC that includes anything attached to your PC and any mapped network drives etc. Selecting a special folder as root for the search overrides Look in field.
Usually you will want to search all the subfolders below those specified in the Look in field, as long as Search subfolders is checked. You can also control the traversal method: Depth first will favor files in deep subfolders whereas Breadth first will scan the folder tree in layers. Both methods will scan the entire searched folder hierarchy eventually.
If Archived content is checked, xplorer² will step into zipfolders, FTP sites and pretty much any other unusual folder that comes in its way. You can use all stock file properties and even search for contained text just like in regular folders. The down side is that searches become much slower, so only tick this box if you know your target file is within an archive.
By checking Local search, you instruct xplorer² to search within the files already contained in the scrap window, possibly inserted by an earlier find command. This essentially refines the search. A similar result can be achieved using Mark > Matching a rule command in a scrap container window.
When it comes to defining the search parameters, you are really spoilt for choice. The search hyper-filters defined in the dialog comprise:
You can define hyper-filters with as few or many criteria as you want. You can go from a nearly empty filter (e.g. all fields clear except for Folders box that will find all folders) all the way to any arbitrarily complex filter with tens of rules combined in boolean contexts. Only items that match all aspects of the filter are considered hits.
If you want to do a new kind of search, first click Clear button to erase any traces of the last hyper-filter. Then manually add the new filter parameters or repeat a filter you saved earlier using the Predefined drop-down list. When you are all set, click ok button to start searching.
Searches can take a lot of time to complete. As soon as you initiate a search, a scrap window opens and shows matching files and folders as they are discovered. An active message pump allows you to start working with the first matches immediately, while the search is ongoing. You can abort a search by pressing the <Esc> key — or close the scrap window.
![]()
You can check the progress of a search either by noticing the folder being scanned on the statusbar, or use Tools > Search status menu for a more detailed report, including all the folders that have already been examined, information about errors or exclusions, etc. This information is available even after the conclusion of the search. The search log is itself searchable using the context menu.
The scrap container with search results is a fully operational file management pane, so you can preview, open or manage all the files and folders found immediately — but wait till the search is finished if you plan to do any operation en masse. If you want to see a search result in a regular xplorer² window, right click on it and pick Open file location from the context menu.
If you searched for contained text, the draft preview tab will show you the keywords found highlighted . If you click in the preview pane and press <F3> key you will see the next keyword match, if any exists. If you used any fancy file properties in your hyperfilter, right click on the scrap pane list header row and use Details from filter menu command. This will make sure all properties you searched for appear, helping you understand the search results.
|
Many search parameters are valid in archive search, so you can search by name, size, dates and so on. Most of the stock properties are valid too. These special folder types support their own custom properties, and they can be used as search criteria as well! See for example a zipfolder which has columns for CRC-32 and compression ratio (pic to the right).
You can also search for contained text in compressed files. xplorer² temporarily extracts (decompresses) the searched files and searches them like "normal" documents. Obviously this will be a slow operation. |

|
You can also search inside connected phones (which appear under ThisPC umbrella folder) using basic properties and even contained text. Searching in cloud folders is also possible, only xplorer² won't check for contained text in cloud-only (offline) items unless the advanced option "Allow downloading on-demand cloud files..." is ticked.
If you repeat a certain search often it makes sense to keep it for later. Once you search using <Ctrl+F> use Tools > Save search menu command in the scrap window to save the last search scope. This includes all the properties of the search dialog (figure 43): the starting folder, the search context (e.g. search subfolders and other flags) and the search filter.
Give a good descriptive name to each saved search so you can recognize it later. To repeat a search saved earlier, open a scrap window and use Tools > Recent search menu. Note xplorer² does not cache old search results, the search is repeated from scratch. If you want to save the results only, create a CIDA file using Actions > Write contents menu.
xplorer² installer registers the .X2FND extension for saved search files. So another way to start a saved search is to double click on a saved search file. xplorer² by default puts them in AppData folder but you can move them anywhere you like.
Desktop search is a windows system component that accelerates file searches creating a search index, a database of file properties and contained text. When you create a new document, its properties and text contents are added to the database, making subsequent searches very fast indeed. Instead of searching folders one by one, hits are retrieved looking up this index.
xplorer² ultimate edition can tap in the fast searches available in windows explorer, querying the indexing server directly. You will notice a substantial speed increase especially if you search for text in the file contents.
| You don't need to do anything special to take advantage of this integration; when you press <Ctrl+F> to start a search, in many situations xplorer² will automatically retrieve results quickly from the system index in phase 1 of the search. It will then pause and allow you to review the results. If you think the file you wanted wasn't found just click on robust search button (you will find it at the very end of the results) to continue with xplorer² robust (albeit slower) search, folder by folder. |

|
|
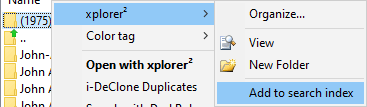
To take advantage of fast searches you must make sure your work documents are indexed. This is easier if you store your stuff under the system Documents folder, which is automatically indexed. If you keep your documents in other locations, right click on the top level folder and use Add to search index command from xplorer² submenu. This need be done just once, then any new document you create in that folder (or its subfolders) will be indexed automatically.
You can add any local folder to the search index. You can even add removable USB drives — but these need to be connected if you want to fast-search in them. Adding network folders in the index on the other hand is next to impossible. Network searches are condemned to be slow.
|
|
There are a few limitations to keep in mind. Searching for text in files will only find whole words and not partial keywords — at best you will find stems at the beginning of words. So if you search for long you will find files containing the words Long and Longer, but not those containing prolong. You can't search for special characters like brackets, math symbols or quotation marks (they are ignored). Search index is good for word searches only.
xplorer² will not use the indexing server in the following occasions:
A simpler way to access the system index is Tools > Fast search menu command. Instead of defining detailed search rules, you just type a keyword. xplorer² then starts a search under the current folder for any file or folder that contains this keyword in its name, text contents or any other searchable property (e.g. tags or author).
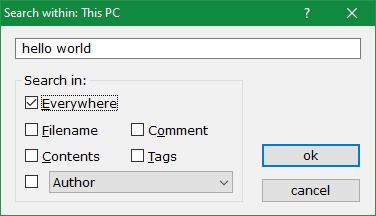
Tick Everywhere box if you want to find keywords in any searchable property. That is the simplest search mode. If you want to target something in particular like Filename or text Content use any of the other checkboxes. You can tick as many as you like. You can use custom indexed properties as well using the drop-down list (see Author in the above example).
Once you type your search keywords and tick the property options, click ok button to start the search. Like regular search a scrap window will open for the results. However here there is no backup robust search phase, files will only be found if they are indexed. If you see an error message on the status bar, make sure the folder you are searching within is in the search index.
![]()

|

|