|
|
xplorer²Exponential growth to file management productivity |

|
|
xplorer²Exponential growth to file management productivity |
In large folders, most files are hidden from view, especially if you are showing full details (one file per line). A standard horizontal or vertical scroll bar ![]() will appear, giving you an idea how many items are hidden and about your current location within the folder. You can operate your scroller with the mouse to see hidden items, but for more precise control use the keyboard to roam the active folder pane:
will appear, giving you an idea how many items are hidden and about your current location within the folder. You can operate your scroller with the mouse to see hidden items, but for more precise control use the keyboard to roam the active folder pane:
As you move around, the focused item is changed and usually cancels all previous selections too. To move the focus without affecting the existing selection hold down <Ctrl> or turn Mark > Sticky selection on. This will help you to hand-pick items scattered in the folder listing (similar to explorer's checkbox selection mode).

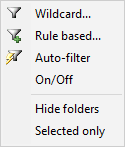
There are several types of visual filters, activated from View > Visual filter submenu:
|
|
Whenever any filter is hiding items from view, you will see a green funnel ![]() icon on the statusbar. Double click on this icon (or use View > Show all menu) to cancel the filtering and see all the items in the folder.
icon on the statusbar. Double click on this icon (or use View > Show all menu) to cancel the filtering and see all the items in the folder.
xplorer² can filter on regular expressions too, which are a more complex kind of text wildcard. Regular expressions are supported in rule-based filters.
|
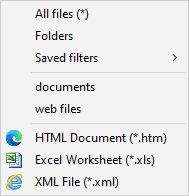
View > Visual filter > Auto-filter menu command is like wildcard filtering for file type (extension), which you don't need to type manually. When you choose this command (or click on its toolbar button) xplorer² examines what kind of files exist in the current folder (active pane) and pops a menu with them — and some more commands as you can see to the right. In this example, the folder contained a few HTML, some XLS and some XML files, which are listed alphabetically. Selecting one of these menu items will show only a particular file type, just as if you typed the equivalent wildcard (e.g. *.HTM) for visual filtering.
Auto-filter menu also lets you show only Folders and cancel the visual filter (show All files). Saved filters is a submenu that lists all rule-based hyperfilters that you have saved; select one of these saved complex filters to apply it on the current folder (it doesn't have to be wildcard based). Finally you can filter for broad document categories (search for "File types" in Global tab) defined in the registry as comma separated lists of file extensions. The default definition for "web files" for instance would show both HTM and XML files (but not XLS). |
|
When the program option "Show hidden files and folders" is not enabled, then any files or folders that are marked as hidden (have the H file attribute) are not shown at all. This is like an implicit filter on the file attribute property. The little eye ![]() icon will appear on the statusbar when hidden files are obscured in this way.
icon will appear on the statusbar when hidden files are obscured in this way.
One way to block a particular file or folder from showing in xplorer² is to change its attributes to include H (assuming it doesn't already have the attribute). Then it will not be visible if you turn off show hidden files option.
xplorer² supports a global exclusion filter for both folder views and tree, hiding matching files and folders. The advanced setting "Global exclusion filter" is defined as a comma separated list of wildcards to exclude from view (alternatively it can be a saved hyperfilter name defined earlier). For example *.DLL,*.SYS would define a global filter that hides any DLL or SYS files permanently.
When you define a global exclusion filter, the hidden files statusbar icon will show as a reminder. You cannot turn off a global filter, it is always enforced. As it is pervasive, only relatively fast file properties are allowed. If you attempt to use a slow hyperfilter here, it will be ignored.
These simple selection and unselection methods work with one item at a time. You build a large selection adding more items one by one. This manual effort can get tedious and unpractical if you require many items selected — not to mention that one accidental unprotected click can unselect everything you worked so hard to select in the first place! To protect against such mishaps use Mark > Sticky selection menu; when this mode is on, all mouse clicks work as if you had <CTRL> key pressed. To resume normal selection mode, select Sticky selection again to turn it off.
There are several commands in Mark menu that help you select and unselect multiple items in one go. Let's start with the simple additive commands, that select items on top of those already selected: (to start a fresh selection cycle, just hit <Alt+A> to unselect everything beforehand)
|
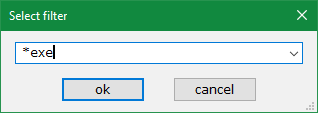
The above commands take a number or text input as a parameter. A simple text input dialog is shown for this purpose that hardly requires any explanation. You type your wildcard then click ok button to execute or cancel.
Using these elementary marking and unmarking mechanisms, either individually or combined, you can build collections of items whose complexity is only limited by the user's ingenuity! |
|
Now let's discuss the non-additive marking mechanisms. These will destroy any previous selection, so they must be done first:
All these criteria-based selection commands affect all files and will reset any previous selection leaving only items that unambiguously pass the criterion in question. Typically such commands are performed first, possibly followed by elementary (un)marking commands to refine the selection. However when such criteria are used to unselect files (e.g. see Unselect button in figure 16) they only affect matching items.
Mark menu also contains a number of commands that affect the selection which are explained in other parts of this guide. Broadly speaking they consider all the files with a variety of criteria, and select files that match them. For example in dual pane mode you can mark items that need to be copied to synchronize two folders, or source files that must be built to make a compiled language project.
|
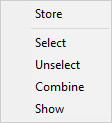
You can save the current selection (filenames) using Mark > Selection > Store submenu. This can be used as a safe repository as you build complex selections step by step, especially with commands that erase the previous selection.
Once you have a selection stored, you can either restore it (Select command) or use the stored filenames to Unselect. You can reuse a previously saved selection in the active pane as a mask via Combine menu. This advanced mode combines the existing and saved selection so that only items that are in both lists end up selected (boolean AND operation). So an item must be both already selected and part of the list stored with <Ctrl+F11> to remain selected; otherwise it is cleared. This command is handy for refining selection patterns. |
|
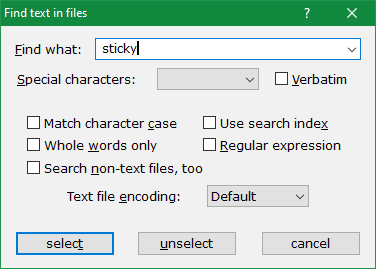
The simplest use of this dialog is to type one word or phrase to search for in Find what input box, and click select button to start looking for text inside files that are shown in the active pane. Matching files are selected and any prior selection is cleared. If you hold <SHIFT> as you click on select button, any existing selection is preserved and matching files are added on top. It is also possible to unselect matching files using the respective button.
This command finds text exactly as you type it, and internal spaces are significant (it's not like google search). For example searching for "this that" is different than "that this" (reversed order), and even "this that" (notice the extra space separating the words). Don't use quotes " unless you want to find a quote character. Think of it that you search for phrases instead of individual keywords. The advantage is that you can search for symbols as well as numbers and letters.
Several checkboxes in the dialog control how text is searched as below:
The command automatically detects the encoding of plain text files (UTF8, unicode etc), if a Byte-Order-Mark (BOM) is present at the beginning of files. If BOMs are missing or you want to search within OEM files, you can force the encoding using the combo box supplied (see figure 16). To disable content interpretation altogether, including encoding and text filters, pick Raw encoding; this will allow e.g. searching for BOMs or other binary content.
|
For further information and regexp samples you can see this reference
These complex filters are pervasive in xplorer² user interface, and a common dialog structure is used to define them, regardless if they are used for visual filtering, rule-based selecting or file search. Once you get the hang of them, you can use them everywhere to match files with precision. Here is an example dialog for visual filtering (View > Visual filter > Rule based menu command); if you compare it with find files dialog, you will see that are very similar.
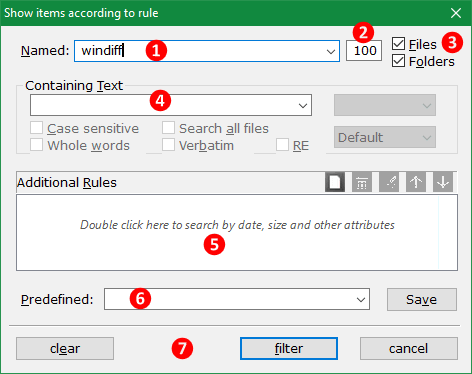
Hyper filter dialogs have 3 sections that define the filter (name [1-3], contained text [4] and additional rules [5]). At least one section needs to be filled in with your file matching parameters. Empty sections appear disabled (ghosted) to minimize visual clutter in this admittedly complicated dialog. Let's have a quick look at the input fields:
You can define hyper-filters with as few or many criteria as you want. You can go from a nearly empty filter (e.g. all fields clear except for Folders box that will find all folders) all the way to any arbitrarily complex filter with tens of rules combined in boolean contexts. Only items that match all aspects of the filter are considered hits.
When a filter dialog shows up, its fields are loaded with the filter you used last time. If you want to define a new filter, click clear button to empty all fields. Note the button controls in section [7] depend on the command, it's filter for visual filtering, select when you are going to use the filter for selection and so on — they act like the typical OK button, that closes the dialog and executes the filtering command.
To store a filter, type a descriptive name for it in the Predefined [6] combo box and click on the Save button (see figure 17), and the current definition will be added in the drop down list. From then on you only need to select the saved filter from the Predefined list and its rules will be automatically restored for you.
To modify a previously saved filter, make your property rule changes and save it again with the same name — thus overwrite the old definition.
To delete a saved filter that's no longer needed, first select it, press Clear button to delete all its rules and finally click on Save button to confirm the deletion. Arguably this isn't very intuitive; the dialog UI is streamlined for saving and using complex filters, which is what you do most often anyway.

You can add, edit, reorder and delete rules using the little toolbar on the top right of the Additional rules list box (similar to how we manage bookmark lists). If you right click in the rules box, a context menu pops up with the same commands as on the toolbar. All the usual keyboard and mouse clicks are also recognized within the list, e.g. <DEL> key will delete the selected rule, double-click will edit a property and so on. Each rule has a descriptive text and an icon reflecting its boolean context (+ for AND, - for NOT and | for OR).
Searchable file properties belong to three broad categories: dates, numbers and text. This determines how the properties are interpreted & searched: number and date rules are matched as ranges between a Low and High limit, and text properties are searched for contained text (e.g. we are searching whether the comment property includes a keyword).
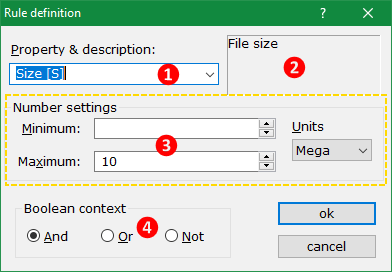
Click on Add new toolbar button to add a new rule. A dialog opens to select a property and set the rule parameters as such:
|
Figure 18 shows the parameters for a numeric property (File size), which comprise a minimum and maximum limit. A file size x will match the numeric rule if it falls within the limits you supply (min < x < max). Either limit may be missing if you want an open-ended rule; in the above example the minimum size is empty, so that makes the rule Size less than 10MB (x < 10MB for the mathematically inclined). If you are after an exact number, make both minimum and maximum limits identical.
Numeric properties support units of measurement using the Units drop down list. File sizes in bytes will be big numbers, so it is convenient to pick Mega as a unit — that implicitly multiplies your typed limit by a million (10MB ~= 10,000,000 bytes). Properties with small values (e.g. picture width) don't need units, set them to 1. Minutes unit is for matching audio and video Length (duration) property, measured in minutes |

|
Let's have an example. Say you want to find a file whose size is either smaller than 1K or above 2K but not inbetween. The simple solution would be to use two Or rules, one searching for files up to 1K and another one above 2K. Or you can use your boolean skills and define a single rule that says: Not "size between 1024 and 2048". Your boolean expertise saved you a couple of seconds there <g>
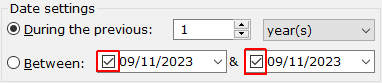
If you select a date property, the middle part ③ of the rule definition dialog will change as above, to accept your desired date range. Date properties can be defined as periods from the present time (During the previous) or as ranges (Between). Leaving any end of the range empty (untick the checkbox) removes the respective date boundary. For example if the low end of Between range is unticked, the rule will match any files that are up to the date specified in the upper limit box. You don't specify time (hour) limits directly. The low range is assumed from the beginning (00:00 midnight) and the high end includes the entire day (up to 23:59)
With During the previous mode you must select the time unit (years, months, seconds etc) and the quantity (number), so you can create rules like modified during the previous 3 months. This can also be expressed in Between mode with a low date limit 3 months from today, and the upper set to now — but it wouldn't be as clear to grasp.
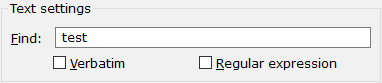
Finally, if you select a text property (like Comments or Owner) ), the middle part ③ of the rule definition dialog will change as above. You search text properties like you search for text in files: just type part of what you are after in Find box. All searches are case (and word boundary) insensitive for the broadest possible match. In this example if a file's Comment property contains any references of test, it will be a match, else no cigar. Wildcards (* and ?) are also supported, unless you tick the verbatim option. Advanced string matching is possible ticking the Regular expression option.
After this long explanation, you managed to define a single rule; click ok button (see figure 18) to add it to the current hyperfilter — the new rule will show in Additional rules box. In the same fashion you can Edit an existing rule; double-click on it and the rule definition dialog will let you change the match conditions.
The up/down toolbar buttons in additional rules box are meant to reorganize the rules. When xplorer² is testing files against a hyperfilter, it processes the rules in the order they are shown in the rules box, so it makes sense to put fast rules first and slow rules towards the end of the list, to accelerate file matching. However xplorer² does this reordering automatically even if you won't!
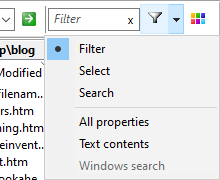
Most of the work you do in xplorer² involves finding, filtering and selecting items, before doing something with them. The edit box next to the addressbar is a convenient way to do all these things from a single tool. Arguably it is one of the best productivity features in xplorer²!
By default the quick filter box is set to (visual) filtering mode. Instead of fumbling with wildcards and complex rules and dialog boxes to pass parameters, start typing what you want to find in the active pane and after the 4th letter the quick filter will automatically activate and show only files with matching names — you don't even have to press <ENTER> to start filtering, it is done live and as you type. If you type enough letters, the active pane list will shrink to a couple of items only, hopefully including the one you are after. To reveal all hidden files, click on x to the right of the box to clear the filter — View > Show all menu command does the same.
|
Normally the quick filter tries to match your input with filenames only; your partial filter string can appear even in the middle of filenames and it will be considered a match (e.g. type hel and you will match help.txt, shell.dll and any other file that contains hel. If you want to match text against all details shown in the pane (e.g. size, date modified and anything else that is visible), use the drop-down menu and tick All properties option. This type of filtering is slower therefore in large folders filter-as-you-type won't work — you need to press <ENTER> key to filter out files that don't match. You can even search for text inside documents ticking Text contents menu item, but that will make things even slower.
xplorer² ultimate can search much faster in all properties and text contents if you tick Windows search menu. You can find whole words or stems (beginnings) quite nicely this way, if you browse folders that are in the search index. In professional edition this command is disabled.
Use the drop-down menu to switch to Select mode. The action button will change into |
|
|
Quick filter and selection mode work with the items in the active pane (it works even in the mini-scrap) — usually that means items in the current folder browsed. If you switch the box to Search mode from the drop-down menu, then it can search the current folder and its subfolders, like a regular find files command.
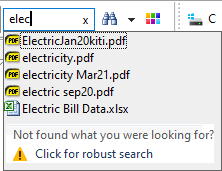
If you do a simple search for filenames only, matching filenames appear immediately in a popup window, and automatically update as you change the search keyword (live search as-you-type). You can preview and open files directly using the context menu on search results, or browse the containing folder for more file management actions. To jump into the search results pane press <TAB> key. As the popup is space limited, the search stops after 25 results are found; if you cannot see your target file, click the footer for robust search, which will do a regular full scale file search. The live minisearch feature does not work if you tick any slow match options like All properties. In such a case a regular search is performed, in a separate window. |
|
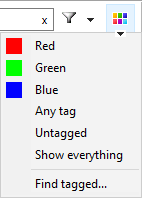
The colorful button to the right of the filter box, is another way to quickly filter files based on their color tag. Please see the following section for more details.
Despite their expressive power, fumbling with hyperfilters and text rules can be too time consuming. Mark > Quick search menu is a convenient shortcut that selects files that contain a phrase, either in their content or in some text column, including filename. It is a local search mode (scans items already in the pane) equivalent to a hyperfilter with one rule per text column, each matching your phrase in a boolean OR fashion (i.e. any one match will be enough); if no column matches the phrase, the command searches the text within the file. This latter slow stage can be skipped if not required, hitting <Esc>.
Quick search will only scan columns that are visible in the active pane. To make the most of this command you may have to activate a few interesting columns, e.g. Comments, Version information etc, depending on your context.
Quick search uses the addressbar for text input. Instead of using Mark menu you can press <SHIFT+TAB> to jump to the addressbar and type your phrase, beginning with a colon, e.g. :your phrase, then press <Return> key to apply; any matching items in the active pane will be selected. If instead of marking you want to filter the matching items (hide everything that doesn't match), type your text and press <Shift+Return>. Stored hyperfilter names are also understood if enclosed with curly braces, e.g. :{saved_filter_name} is a valid input.
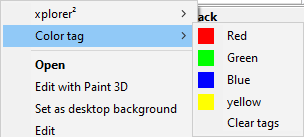
Sometimes you need to mark a file for later processing. One way is to place the item in the mini scrap pane. Another possibility is to color tag it, so whenever you browse its container folder it will stand out with a color border drawn around its name. Likewise you can color tag a folder in the tree pane, making it easier to locate — then its tab's icon ![]() will also be painted with the same color.
will also be painted with the same color.
Color tags are set through the shell context menu (xplorer² adds a couple of its own commands at the top).
Alternatively add the Color tag
|
|
Adding a color tag won't change the actual files in any way (xplorer² uses a private database for color tagging information). You can use many colors for different kind of markings — the meaning of colors is entirely up to you. The color borders drawn around the names can be combined with rule-based color coding — but color tagging is much simpler and quicker.
|
Tagged items are hard to miss, their color borders are very conspicuous among normal unmarked items (you can make the borders even thicker using advanced option "Color tag border"). There are commands that filter a pane for its colored files; you can also search to find tagged files in subfolders.
You can quickly filter the active pane (except the folder tree) to show only items tagged with particular color, using the color filter button next to the quickfilter box. This color button opens a submenu with all the filtering options. You can show only one particular color or all tagged items regardless of color (Any tag command). You can hide all color tagged items and only show those Untagged. In the end Show everything command will cancel any color filtering (you can also double-click on the statusbar visual filter icon). This menu includes a Find tagged command that can show you color tagged files in other folders. In the tag search dialog first specify which colors you are after using the checkboxes, then state your search scope: do you want to search only below the current folder or everywhere? |
|
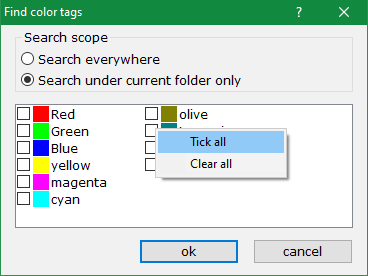
Click ok button to start the search. If there are any tagged files with the colors you ticked, they will be presented in a standard search results window. If nothing can be found you'll get an error message instead — consider enlarging the search scope e.g. ticking Search everywhere option in the find tags dialog, or tick more color boxes (there is a tick all command in the right click menu).
The tag search dialog is very fast but will only search for colors. If you want to combine colors with regular file attributes like names etc, use find files dialog and add a rule on the color tag stock property. In this context tags are plain numbers in the order they appear in the color list (1=red, 2=green etc). This kind of combined search will be much slower though.
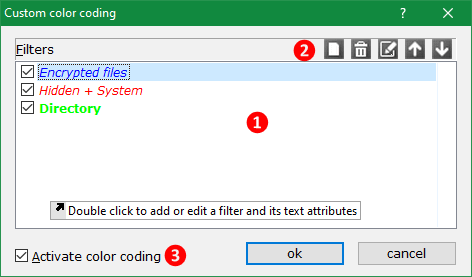
The custom color coding dialog (left) shows all the color rules you have defined in a list [1]. You can manipulate individual items (add/delete/edit) using the toolbar [2] and the equivalent context menu commands, as we saw earlier. The list shows the exact effect (color and font) that each rule will have on matching items.
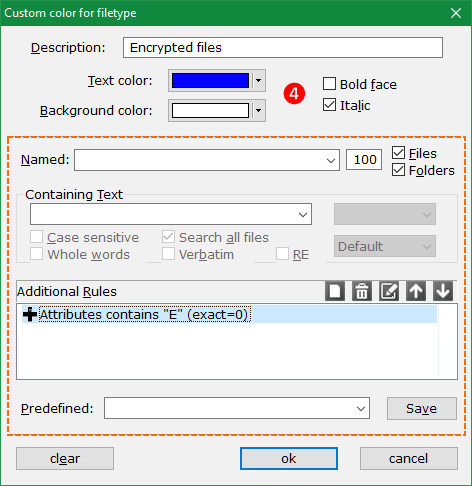
"Color coding filetypes" is rather a misnomer for what this system offers. Not only can you change colors, but also fonts (apply bold and italic effects). And we don't just filter on filetypes, you can use any file property using mighty hyper-filters to define a color category. For example the encrypted files category above is defined using the file attribute property (see dialog to the right) — of course you can also use a wildcard like *.cpp to target a file type (extension).
Double click to add or change a color rule. The top section [4] is where you define the text attributes: foreground and background colors, and bold/italic style. The Description field isn't very important in terms of function, only as a reminder for your records — typically a summary of the filter. The biggest portion of the dialog is for defining the membership rule (compare with figure 17) — don't be put off by the apparent complexity. For simple wildcard color coding you would only use the Named edit control.
To turn on color highlighting tick Activate color coding [3]; clear the checkbox to return to normal colors. You can also turn individual color rules on/off using the checkboxes in front of each rule, if necessary. Note that coloring is a view-related property, so you can have e.g. the left pane highlighted and the right normal. You must turn color coding on/off for each dual pane (or tab) separately.
|

|