|
xplorer²
Exponential growth to file management productivity
|
Multi-folder containers
Scrap containers were once a novel feature introduced by xplorer² ages ago, before other similar tools copied the idea. Regardless they are a very useful concept that allow you to manage files from different folders simultaneously.
Use Window > Scrap container menu (from the main window) to open a scrap window. Many commands that deal with subfolders (e.g. file search) also create scrap windows automatically to present their results, files that reside in different folders. As you can see, scrap windows look similar to the main window (see figure 1) and they work more or less the same way. The figure below demonstrates all the possible window features, most of which are optional and can be turned off using View menu.
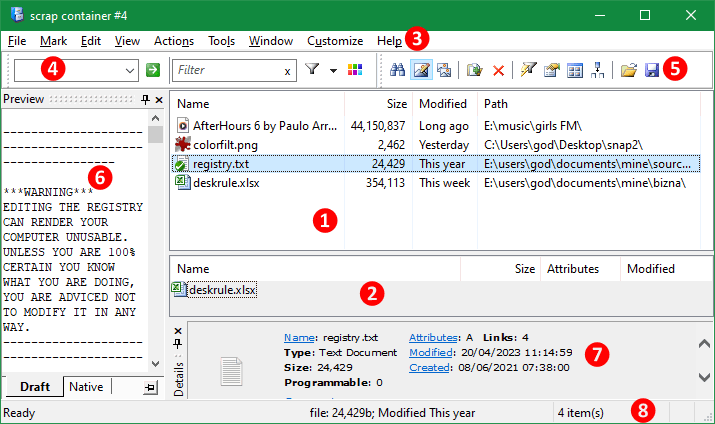
Figure 21. Scrap container window
Here is a brief description of scrap window elements, by their reference number in the red circle:
- ① Active pane.
In here you hold a collection of items, both files and folders. Notice the Path column that shows the full path of each item, demonstrating they are coming from different folders. Click to select one or more items, then apply one of the available menu commands. Notice that there's no titlebar in the active pane as there's no concept of "active folder".
- ② Second pane.
You don't usually need dual pane functionality in scraps, but it is possible to have a spare pane for comparisons. Turn it on/off using View > Dual pane menu and tile it vertically or horizontally. The inactive pane shows with a darker background color. This pane isn't sentenced to permanent inactivity though, just click on it to make it the active pane!
- ③ Menu bar.
It is organized in a similar fashion as the main window menu so you can find your bearings. You will find almost all the commands there — even a few unique for scrap containers.
- ④ Address bar.
Here you don't select folders to browse but you could type commands to execute. The most useful part is the quick filter box that lets you filter and select items in the active pane — but quick searching menu command doesn't make sense and is disabled.
- ⑤ Main toolbar.
Shows a list of frequently used commands. Use the context menu to set its appearance and customize it adding or removing buttons.
- ⑥ Preview pane.
This resizable and dockable pane shows a preview of the focused item in the active pane, depending on its type. Turn it on/off using View > Quick viewer menu.
- ⑦ Details pane.
Shows extended and type-related information about the focused item. Turn it on with View > Details pane menu, and autohide or close it using the pin and [X] button on its titlebar.
- ⑧ Status bar.
Shows information about the focused item, total selection byte size, progress and error messages etc. Compared to the main window statusbar a few panes are missing, e.g. you don't see free drive space.
Most conspicuous is the absence of the folder tree and drive bar (see figure 1), as here we don't browse folders individually, but work with item collections. Other than populating the active pane, the workflow is almost identical:
- Set the active pane style to any suitable mode (details, thumbnails etc)
- Sort, group, filter and select items for further file management
- Use the peripheral panes [6-8] or peek preview to examine the selected items.
- Use drag-drop and the shell context menu for simple file operations
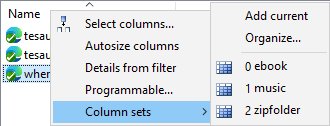
As long as you have "Save program state on exit" option enabled, scrap containers remember the window size, layout and file details you used last time, and they will look exactly the same next time you open a scrap window. You will probably want to define a few custom column sets and switch details according to the type of files you work with. You can easily switch column sets if you right click on the view header row (see side picture)
Details from filter is an interesting menu command you can use if you do a file search that includes some unusual property like Author — or something that's missing from the current details. It checks the hyperfilter last used and makes sure all its properties appear in the active pane, so you can understand the search results.
 Programmable menu command is an ultimate-only feature that lets you create your own composite file properties Programmable menu command is an ultimate-only feature that lets you create your own composite file properties
|
|
Populating scrap panes
You can hand pick items and create your collection in a number of easy ways, bringing items from the main xplorer² window to a scrap pane:
- Drag-drop one or more items from a folder view or even the desktop
- Use File > Send to scrap menu command to insert the selected items (or use <Ctrl+S> keys)
- Copy source items with <CTRL+C>, then "paste" them in a scrap pane — this will merely place them in the collection.
- Copy then paste with <CTRL+V> full paths (in text form); to import many items,
there should be just one full path per line in the clipboard, no delimiters or quotes.
When you place items in scrap containers, their actual disk location remains unchanged. The scrap collection is merely taking notes of items' locations. On the other hand items in scraps are real enough and fully operational. For instance if you place a
folder item in a scrap, it is a live drop target: if you drag-drop
another item you will have it
moved (or copied) inside said folder! When inserting items with drag-drop be careful of any
drop targets highlighted and steer clear. Find some empty spot to drop the new items (wait till you see
link drop feedback, which will insert the item without any drama). For safety don't add items with drag-drop altogether, use one of the alternative methods or use
right mouse button drag.
You can build collections in one go or step by step. Each new batch of items is added to the existing collection. To remove one or more selected items use File > Remove menu, or right click someplace empty and use Clear from the pane's background menu — that will clear all contents and you can start a new collection.
Removing items from a scrap does not delete the actual files, they are just removed from the collection. <DEL> key in scraps merely removes selected items from view; if you want to really delete them, use File > Delete menu or press <CTRL+DEL> key combination.
Scrap containers accept items from both filesystem and "virtual" folders. If you want to see file details in mixed-bag collections, say regular files and compressed zipfolder items, prefer stock columns that work consistently in both types of folders.
The flat earth view
Moving on from manual to automatic ways to populate scraps, there are a few ways to load the contents of
a folder and all its subfolders in a single scrap window. Such flat views comprise entirely of files — there's no point managing the subfolders objects themselves in this situation.
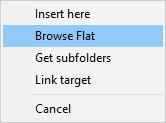
- Use File > Browse flat on a folder from the main window; this will open a new scrap container for the contents
- Right-drag a folder and drop it in a scrap, then use Browse flat menu command; this way you can flatten folders in an existing scrap container.
- If you want contained subfolders only instead of files, right drag and use Get subfolders menu command
- The right drag menu command Link target inserts a local shortcut to a network item instead of the remote item; see the discussion in mini-scrap section below
- Highlight a folder in a dual-pane scrap and press <Alt+Return> to flatten it in the inactive pane.
|
|
Such flat views are useful when you want to operate on items recursively into subfolders, instead of doing things one folder at a time.
We are sure you'll discover many more uses yourselves!
Managing collections

Scrap containers are fully fledged file manager windows, so you can work with them directly, without worrying about their container folders. Whether you manually collected the items, recursively flattened folders or browsing the results of a file search, you can preview, open and use the same palette of simple and advanced file management commands. Scrap containers have some unique commands too, not available in normal browser windows. You can check for duplicate files and compare the content of folder hierarchies, find similar photos and more.
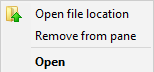
In case you need to open the folder that contains an item in a normal xplorer² window, use <Ctrl+Enter> key or right click on the item and pick Open file location command from the menu.
If you select items from many folders (especially if multiple file types are selected) the shell context menu works, but it may include too many commands and be very sluggish. Try to use commands from the main menu bar instead, if you can find an equivalent command — most of the basic commands appear both in the main and context menus.
|
|
There are some complications in multi-folder views.
If you copy items belonging to different folders, then try to
paste them somewhere, they will be placed in a
single target folder, destroying the relative folder structure. Perhaps that's what you need, but in case you want to keep their original path relationship use
Edit > Paste special > Structured scrap clips menu command. See the discussion in
advanced paste operations.
Shell "documents"
The term "scrap" suggests something fleeting and impermanent, and indeed these containers were originally conceived as quick-and-dirty temporary holders of items, which would be discarded as soon as some simple file operation was performed on them. However, it was soon realized that there was another possible use mode: saving scrap contents for future use.
Actions > Write contents creates a file with .CIDA extension and writes location information for all the items in a scrap pane. You can reopen such saved files at a later time and restore the scrap container, just like as if it was a shell document. xplorer² registers .CIDA files for its own use so you can open them by merely double-clicking on them, even when xplorer² isn't running — or use Actions > Load contents menu.
You can take advantage of this functionality in many ways. For instance you can create cida files as "table of contents" that keep the locations of files with similar content throughout your filesystem. This would be equivalent to creating a normal folder and keeping shortcuts to the same documents, but if you go the scrap way you have direct view of the actual files. Or you can create playlists out of your music collection and save each as a CIDA file, one for each genre. The sky is the limit!
We stress that only the location of the files is stored in .cida files, not the files themselves. If you delete or move the actual file, xplorer² will not be able to reload it when reading the .cida file. When such errors occur you can optionally see a log of all missing files that may help a subsequent manual repair.
|
Normally you will be reusing cida files on a single computer to access a set of related files. If you want to access the same files from a different PC you must save some extra information to make the cida file location-independent; that is the purpose of "UNC pidl files" type in Save as type drop-down box, as in this snapshot:
|

|
Multiple scrap containers
At present scrap windows don't support tabbed browsing, but you can open multiple scrap containers for the same functionality (albeit not as screen-tidy). When you have many scraps open, the last one you used is considered "closer" than the rest, so if you Send to scrap from the main window, the selected items will go to this "nearby" scrap. The target scrap's titlebar can be seen on the main statusbar:

To be 100% sure of the destination scrap, use drag-drop instead of <CTRL+S>
You can see a list of all windows in xplorer² process (including scraps) via Window > List menu. To help you identify which window is which, scraps that are generated automatically have a descriptive titlebar, like the one below created by Browse flat command:

Loading CIDA and search results also have good titlebars; for the scrap windows you open manually, use Window > Set title menu command to set a titlebar that reflects the contents — that should help you remember what each scrap window is all about.
Mini scrap pane
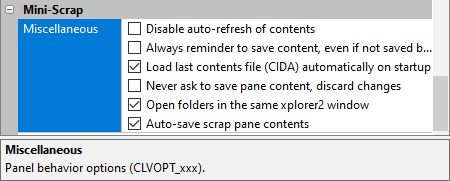
It can be argued that in some situations it will be more convenient to have a scrap pane (virtual folder, drop box, "playlist", multi-folder view or however you want to call it) within the main xplorer² window, rather than opening a separate scrap container. This functionality is furnished by View > Mini scrap menu command.
There is only one such pane available per window, but it is quite versatile. It is resizable and dockable on any window side. It is almost identical in functionality to a stand-alone scrap container: you can put in it files and folders from many locations, you can select view modes, sort orders, even arrange the content in groups. Most of the menu commands are available too, including load/save through the background context menu. When you click on the miniscrap, it becomes the active view (instead of the folder panes), and you can preview items as you select them in the miniscrap!
The miniscrap is rather small for managing lots of items, but here are a few possible uses:
- Temporarily hold files, tagging them for later processing en masse.
- Bookmark pane: when you double-click in a folder (or folder shortcut) in the mini-scrap, it is loaded in the active pane. This can be considered a replacement for the tree, showing only the folders you are interested in instead of the whole hierarchy.
- Launch pad: put in some favorite documents or even program shortcuts for easy opening. Program icons behave as drop targets so that you can pass file arguments using drag-drop.
|
If there is no stand-alone scrap container open, <CTRL+S> sends selected items to the miniscrap. By default the contents of the miniscrap are automatically saved and re-loaded when you restart xplorer²; this makes its use as a bookmark pane very attractive and convenient. You can access a number of recently used "playlists" too through the context menu. An alternative is to right-drag a stored CIDA file and drop it onto the mini-scrap, picking Browse flat from the context menu.
|
|
If you store network items in the miniscrap, then chances are that next time you restart xplorer² without a network connection, such items will be considered "gone" and removed from the pane permanently.
Instead of adding the real network file or folder, right-drag it and pick
Link target from the drop menu. This will create a LNK shortcut file in the %TEMP% folder, and add
it in the pane instead of the remote item. This shortcut will behave the same invoking the network item when double-clicked, but as it is stored locally it doesn't risk being removed automatically. Another use of adding links — even for local items — is that you can
rename the LNK shortcut and give it a more descriptive name, without affecting the real target.
Storing LNK shortcuts in %TEMP% folder isn't robust against disk cleanups; for safety create your own shortcuts somewhere safe instead and emulate Link target function manually
One advantage of the
quick access list is that it won't suffer from similar problems, you can add network items in it without issues.
© 2002-2024 ZabKat LTD, All Rights Reserved
zabkat.com