 To watch the demo videos in this document you need an internet connection. If your internet browser blocks flash content, please use Internet Explorer instead.
xplorer² Quick Start Guide
File exploring reinvented: Feel like home miles away from home
This bitesize guide describes the basic features of xplorer², a tabbed dual-pane file manager that maintains the familiar look and feel of the standard windows explorer while offering tons of advanced features. Unlike most alternative file managers that seem to require a PhD in computer science to figure them out, xplorer² offers a clean and shell integrated extension model for productive everyday file management. If you know how to use windows explorer you'll feel immediately at home; yet xplorer² can take you places you've never been before - not with explorer anyway!
xplorer² runs on all 32 and 64 bit windows platforms, and offers almost everything windows explorer does in an economical user interface based on the familiar tree/view window layout:
At the same time, it fills in all the gaps in the basic explorer model. Instead of filling in pages enumerating explorer's shortcomings, let us just say that xplorer² has all the features you'd expect for managing large numbers of files efficiently, and perhaps most importantly does so in a well thought-out user interface squeezing even the last drop out of efficiency via simplicity. It is not just about enumerating features, it is how they bind and blend together into a wholesome unit. The basic concepts are:
xplorer² also has some unique features that aren't available on any other file manager as far as we know. The so-called scrap containers are multi-purpose "shell documents", collections of files and folders from arbitrary locations. The concept is rather strange to getting used to but offers unparalleled flexibility allowing:
Scrap containers are also used for the results of the powerful file search command, a little masterpiece on its own right. If you wanted to search for files that had specific MP3 tags and were modified in the last week and are not owned by you then look no further! This is yet another unique feature of xplorer², empowering searches on any and all attributes you can see in the numerous columns (file details), combining them in boolean hyper-filters.
Apart from these major topics, there are many features and little productivity enhancers throughout the program, far too many to list in fact. It is recommended leaving the "Tip of the day" on for a while to learn about all these time-saving details.
If you are an "old hand" with computers and file management (i.e. you have heard of DOS and Norton Commander) you'll find xplorer² an optimal combination between command-line efficiency of yesteryear with all modern amenities and conveniences of today's user-friendly file management. Newer users will hopefully see what explorer has been robbing them of all this time!
With its small size (around 1 MB) and low system resource use, advanced multi-threaded multi-window design for speed and efficiency, customization, a clean minimalist interface and keyboard shortcuts for most frequently used commands, we trust you won't be disappointed for choosing xplorer² for your file management needs. In fact chances are you'll never look back to explorer or any other file manager.
The following sections will give an introduction to xplorer² and the things you can do with it. Some of the features described are not available in the free version; these topics are clearly marked with the [PRO] symbol. See this table for a list of features missing from the lite version.
|
NOTE: For the remaining of this document it is assumed that users are familiar with windows explorer and basic file management operations, including drag/drop (with left and right mouse buttons), shell context menu etc.
To watch the demo videos in this document you need an internet connection. If your internet browser blocks flash content, please use Internet Explorer instead.
|
| Note for international users If you are browsing the online version of this quickstart guide you can click on the flags on the right to translate it to a few widely used languages automatically. Note that the translation isn't perfect but may be better than nothing at all! This feature requires javascript. |
Overview
Ribbon toolbar |
Column mode
Browsing the shell namespace
Folder views |
Sort and group |
Folder view settings |
Show or hide items via filtering |
Previewing, viewing and launching items |
Searching for text in files
Managing files and folders
Selection engine |
Basic file management |
Robust file transfer |
Robust deletion |
Mass renaming |
Changing timestamps and attributes |
Splitting and merging |
File and folder comments (tags)
Scrap containers
Shell documents |
The flat earth view |
Mini scrap
Examine and maintain your filesystem
Comparing & synchronizing folders |
Checking file transformations |
Visualize disk space usage |
Detecting duplicate files |
Photo cleanup |
Fuzzy groups |
Convert groups to folders
Search for files and folders
Additional rules in hyper-filters |
Search results |
Saved searches |
Windows Desktop Search |
Quick search |
Multi-function tool |
Manage color tags
Automation of DOS (and windows) commands
$-Tokens |
Command output redirection |
Automatic script generation |
Optional command line arguments
User interface automation
Macro commands |
Programmable column
User Interface customization
Color coding filetypes |
Keyboard customization |
Toolbar customization |
Toolbar skins |
Storing hyper-filters |
Program options
Customer support
Suspected bugs |
Minimum requirements |
Feature comparison table |
Program registration |
Ultimate (portable) edition |
Credits
| NOTE: If you are looking for something in particular, press <CTRL+F> keys to use the search function of your browser. You can then search for a keyword or a menu command name to get information about it. |
The main window is shown in Figure 1. There are four main areas: The active and inactive folder views, the folder tree and the quick previewer window. A toolbar, menu and status bars complete the picture. If this appearance looks rather complicated, you can turn off all the elements you don't need (from View menu), e.g. the tree, the previewer, even the second folder pane.
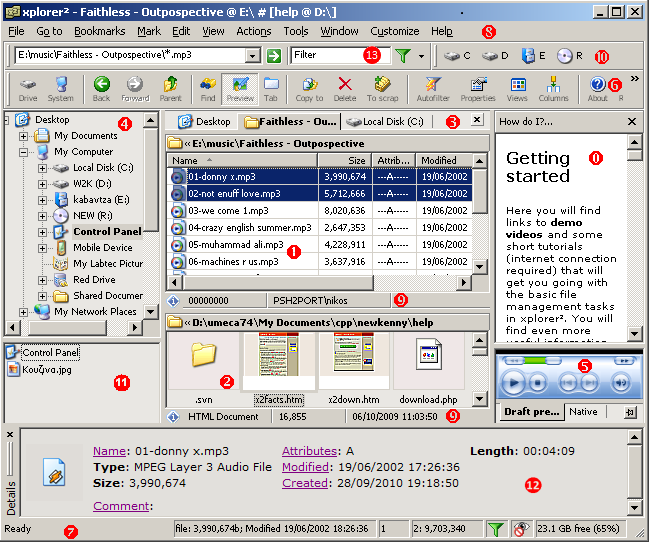
Here is a brief description of the main window elements:
The four major parts are separated with splitter windows, which you can resize to taste. You can also select whether the folder panes are stacked horizontally or vertically using View | Tile horizontally menu. You can move the quick preview panel to the left (under the tree) using the relevant check box in Tools | Options | Advanced. Once you reach a satisfactory arrangement xplorer² will remember it for you and reinstate it every time you start the program - unless you clear the Save program state on exit checkbox in the options dialog.
[PRO] All peripheral panes (tree, quickviewer etc) can be rearranged to taste if you grab them from their titlebar and move them around to another side of the xplorer² window. An outline rectangle indicates the new docking location. If you hold down <CTRL> key while dragging a panel it will stay floating (detached). Once you setup the panes to your liking, use View | Toolbars | Lock dock sites command to fix their position. Use the little pin icon on the titlebar of each docked pane to toggle its autohide mode. When autohidden, a pane is minimized to a tab-like button and you can expand it by hovering the mouse over this button. Click again on the pin icon to permanently dock the pane.
In a sense, xplorer² has a Multiple Document Interface (MDI) where each "document" is a folder. Only one folder is active at each time but many others are easily accessible, from tabs in the active and/or the inactive pane. Tabs are added with File | New tab and removed from the Window menu. You can rearrange tabs with drag-drop. Right click on a tab to see a context menu with various commands including Lock which locks a tab from browsing - folders open in new tabs.
Instead of a traditional menu bar and toolbars, you can have the newer ribbon user interface, which combines the two, offering a more intuitive organization of commands. If you see the old-style menu you can turn on the ribbon using View | Ribbon command.
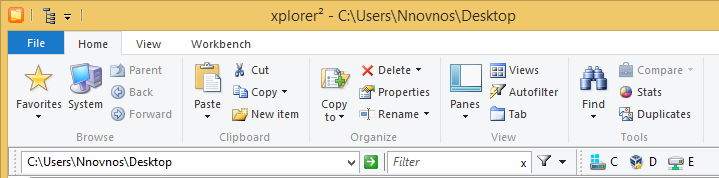
The ribbon is like a big tabbed toolbar. The basic Home tab contains the most frequently used commands, whereas other tabs offer more detailed control for advanced features. The leftmost File tab (dark blue) is a traditional drop-down menu where you can exit the program, get help, and get back the original menu if you don't like the ribbon!
Many ribbon buttons are split into a main command like Paste and a drop-down portion that shows variations of the main command (e.g. Paste link). You can get information on what each button does if you hover the mouse over it. Most xplorer² menu commands are present on the ribbon but for accessing all the commands you need to turn off the ribbon from "File" menu.
The ribbon offers limited customization support. You can right click on a button you use frequently and put it on the Quick Access Toolbar, the little toolbar the ribbon puts on the window titlebar. You can put up there all the commands you need then right click on the ribbon to minimize it, and reclaim the space it uses.
| TIP: The ribbon toolbar is optional. If you find it confusing or you need the traditional menu bar to access some of the most advanced xplorer² commands, use the leftmost FILE ribbon tab and choose Show normal menu command. Alternatively you can execute any command clicking on the Command finder (question mark) button on the quick access toolbar. |
Usually when you browse into a subfolder, the current tab switches entirely to it. Say you were browsing C:\path\DESKRULE and then you entered the subfolder C:\path\DESKRULE\INSTALLER, you'd expect to see the contents of INSTALLER folder replacing the old pane contents. If you turn on Miller browsing (File | Column mode menu) then both the original and the subfolder contents will show side by side. If you enter a new sub-sub folder e.g. C:\path\DESKRULE\INSTALLER\APPX then a third side panel will open, and so on. As you browse deeper, panes to the left shrink in width. If you have too many folders simultaneously open, a scroll bar will appear to help you manage the panes, since only a few of them will show at a time.
Miller browsing will strike Windows users as odd, but it is popular with Mac computers and their Finder file manager. Its advantage is that you can see neighboring folders simultaneously and transfer files from one to the other. Like dual pane browsing, only increased to multiple panes!
You move from one miller pane to the next either with left/right arrow keys, or clicking with the mouse. Only one folder is active in a miller column set, which will show in white background; all the other folders show with a darker background. The active folder is dominant: its path shows as the tab's current path, and all menu commands will operate in files selected in the active pane, just as if it was the only folder showing. After you create miller panels, each one could be set independently (e.g. one in thumbnails, the other in details, and a 3rd in list mode. But usually they all share the same view mode.
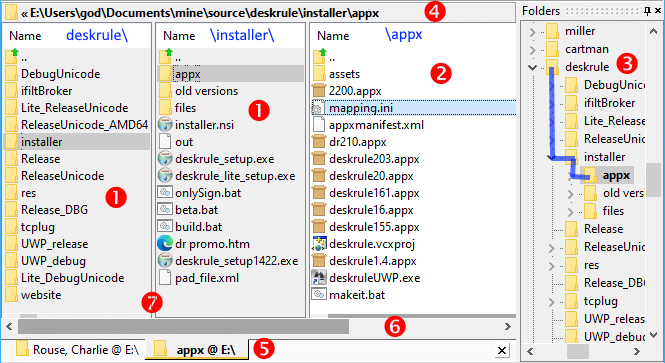
Let's go through the elements of a tab showing side-by-side folders, showing this mini-hierarchy:
DESKRULE
INSTALLER
APPX
When you open a new miller pane, the old pane shrinks down in width. By how much? If the pane is in detailed view mode, then it will be shrunk to the width of the NAME column. If it is in list or thumbnail mode, then it will shrink to the size of the currently selected folder item. You can set a maximum width limit to miller columns from program options (Window property page) setting a value for Max list column width. There are more tweaks available using Tools | Advanced options editor, e.g. the maximum number of side panels (default is up to 6 parallel folders).
If you use the folder tree or any other UI element outside the miller container to browse into a folder "far away" (e.g. typing a path in the addressbar), then the current miller pane is reset to the new folder. But miller mode remains active, so if you browse subfolders of this new master folder, sideway panels will pop up. To turn off miller mode completely, use File | Column mode menu or click on the equivalent toolbar/ribbon button. Also note that miller panes will not survive a program restart, only the last active folder will be re-loaded when you start xplorer² next time.
 Overview
  Contents
  Managing
Nowadays the shell is vast. Apart from the normal hard drives, CDs, you have your local area network, FTP & webfolders, and all sorts of "virtual" folders like Control Panel etc. xplorer² can access (almost) everything that your windows explorer can including non-standard namespace extensions. More importantly it helps you get from A to B quickly and effortlessly with a variety of folder access mechanisms:
 toolbar button

Normally you browse folders in the active pane but there are other possibilities, depending on keyboard modifiers:
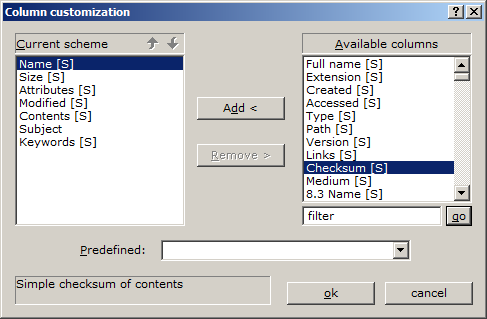
Once you reach your folder you can view your contents using the standard modes accessible from View | Pane style menu: Large/small icons, list, details and thumbnails. In detailed view you can select the columns of information you want to see for your files. xplorer² supports all the standard shell columns and has its own extra columns too, called stock (denoted by [S] in figure 3). Use View | Select columns to pick the columns that are most appropriate for your task.
Most of the regular (filesystem) folders support the same columns: 32 standard (windows XP) plus 26 stock columns. When you install additional column handlers (e.g. see Audioshell ID3 tag columns) xplorer² will use them too.
In later windows versions the number of columns (file attributes or metadata) has increased exponentially (e.g. 350+ columns available for windows 7). The column selection dialog box has a filter field that allows you to find a column from the Available list. Type a few letters of the column you are after then click on GO button to filter the column list.
"Virtual" folders like My Computer have their own columns, depending on the type of information they contain. Although you can select columns in such folders, most of the time you won't need to.
There is a third class of folders which, whereas not being part of the filesystem, have pseudo-filesystem qualities. Examples are webfolders, zipfolders (XP), FTP folders etc. xplorer² knows how to get information like file dates and sizes out of such folders which means you can turn most stock columns on and have a near filesystem "experience". In addition you can have near-normal access to the "files" including previews of contents, thumbnails, even synchronize them with normal folders.
|
NOTE: Stock columns are available even in older windows like NT4 and 98, whereas explorer columns require windows 2000 or newer. [PRO] Custom column handlers (shell extensions) work even in windows vista and 7/8, despite being discontinued by windows explorer. So you can continue using your favorite column handlers like foldersize. If you install Total Commander WDX plugins you also get extra [X] columns that behave like regular shell extensions. The ultimate version also allows system properties to be used as columns using szSystemPropsList registry setting — available through the advanced options editor. |
All columns belong to 3 broad categories: text (owner, comments, attributes), numbers (size, checksum) and dates (modified, created). These categories determine the arrangement of items when a column is used to sort a folder. (Categories also determine how columns are used within hyper-filters). View | Arrange by allows sorting by the most frequently used columns; to sort using an extended column just click on the respective column header.
| TIP: You can view file details through infotips (popup text descriptions) too. Enable infotips from Tools | Options | Window and then pick which details you want to see per file type as explained in this article. |
When in large folders item grouping (View | Arrange by submenu) will help you organize your content in categories based on the main sort column. Within each group items are sorted alphabetically; if you want to specify a different secondary etc sorting method, just click on a column header while holding down <Shift> key.
Such secondary sort modes are also supported in plain (ungrouped) views, again using <Shift> key while clicking on a column header. To cancel the multi-sort mode, just click on a header without pressing <Shift>.
For windows vista and later, it is possible to collapse and re-expand a group using the little arrow at the right side of the group header. This way you can concentrate on the files you need. You can collapse all the groups at once using <Ctrl+Shift+Left> arrow key; to expand all groups just refresh the folder view.
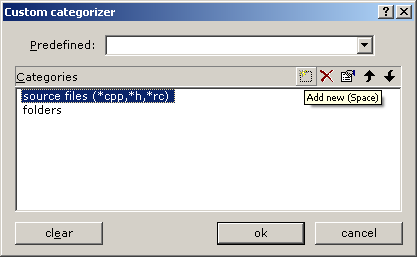
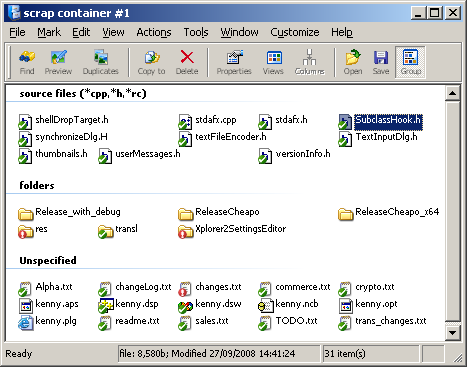
View | Arrange by | Custom groups is an extension of the grouping concept. Instead of relying on column information, you can control exactly which groups will appear and in what order using the dialog in the above figure. Using the small toolbar at the top-right corner you can define, edit and reorder your custom groups using standard hyperfilters. Each filter determines the group membership. Items are placed in the first matching group (in the order they appear in the dialog). Any items that cannot be categorized end up in the "unspecified" group.
For example, applying the two categories in figure 3b (each defined by a simple wildcard filter) on a folder will result in the following grouping:
Once you define a custom grouping you can save and reuse it using Customize menu. This menu also contains a relevant command called Color coding. Here you use a similar procedure to define a set of hyperfilters, but instead of grouping you customize the display attributes of matching items so that they stand out. See the color coding section for details.
If you want to stop arranging in groups (either simple or custom) uncheck the menu command View | Arrange by | Show in groups or click on the equivalent toolbar button.
xplorer² offers a sense of continuity as you browse your folders, maintaining your settings including view modes, sort orders, column widths, etc; it even remembers the item that was focused the last time you browsed a folder and brings it into view when (and if) you return.
In other words, by default xplorer² uses the current view settings for any pane as default. If for example you change from detailed view mode (View | Pane style menu) to list mode, then list mode will be default from then onwards for all folders browsed in that pane or tab.
A different way to manage folder view settings is to setup a pane like you want it using various commands from View menu (e.g. pane style, number of columns, grouping, sort order) then declare this view mode as default using Actions | Folder settings | Default menu command. This way you tell xplorer² which default view mode to use for all folders. If you change any view parameters in some folder they will only last temporarily until you browse another folder, where the default settings will again return.
Note that folder settings can be different for each pane (left/right or up/down in dual pane mode), and even for each folder tab in a pane. You can have one pane in detailed view mode and the other in list mode. When you quit xplorer², only the active tabs save their settings; next time you start xplorer² all tabs will look like the two last active tabs.
| [PRO]: You can force particular folders in a fixed view mode using Actions | Folder settings menu. So for instance you can have "My pictures" folder to appear always in thumbnails, even when you are browsing in a pane that is normally in detailed mode. When you get out of such customized folders the pane returns to its previous view mode. |
In smallish folders set in large icon or thumbnail mode, items can be arranged as icons on your desktop. Use View | Arrange by | Manually menu command to move items with the mouse and leave them where you like. The positions can be saved as part of other custom folder settings (Actions | Folder settings | Save menu), so when you come back to this folder you'll find the items where you left them. Note you can sort (e.g. by Name or Date) a manually positioned folder if you need, temporarily destroying your custom positions, but once you switch back to manual arrangement, the positions will be restored.
You can limit which items are shown in a pane using wildcards, in the usual DOS fashion (e.g. type *.txt in the addressbar to show only files with txt extension). You can have multiple comma-separated wildcards too, as in *.txt , *.dat. This visual filtering allows you to work in large folders concentrating only on a subset of the items. Other filtering methods are:
Whenever any filter is hiding items from view, you will see a green funnel icon on the statusbar. Double click on this icon (or use View | Show all menu) to cancel the filtering and see all the items in the folder.
Except for regular information like file sizes and dates, xplorer² offers access to the contents of files, as long as they are in normal or near-normal (e.g. zip) folders.
The most convenient option is to turn the quick viewer pane on from View menu. Then as you move the cursor around in a folder pane you can see the preview of the focused item. The quick viewer can show text (including RTF, Unicode and UTF-8), graphics, HTML, office documents, even audio and video files. You can customize many aspects (e.g. font) using the context menu in the previewer pane and also through Tools | Options | Window. The draft picture viewer supports zooming in/out and rotations through a toolbar or touch gestures.
[PRO] xplorer² can tap into text filters compatible with windows indexing service, to extract plain text from otherwise unreadable formats like office documents, Adobe PDF etc. This text can be previewed, stripped of its formatting, giving you an idea of the content. Depending on what other programs you have installed you may already have many such text filters. If you need more, there are some free components to download:
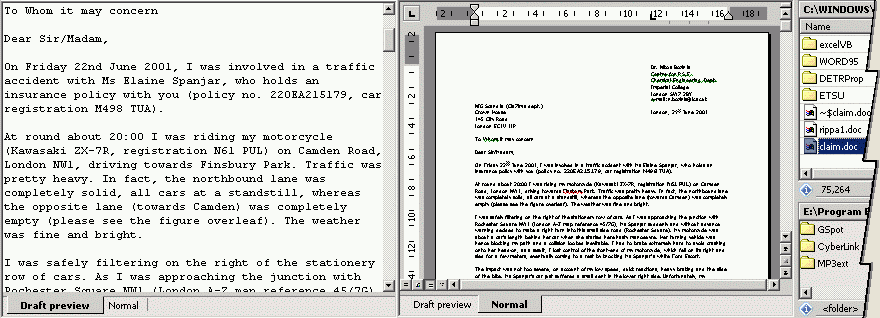
[PRO] In addition, the professional version can show exact previews for certain document types that can be activated in place in internet explorer (ActiveX). The figure above is an example of the same content - a word document - displayed in "draft" and "native" mode. Native mode is more representative but draft is quicker and maybe adequate for most needs. For windows vista and later xplorer² taps into shell preview handlers that provide a rich yet resource efficient quick preview of documents and images.
Instead of a permanently docked preview pane, an alternative method is View | Peek preview menu, which pops a large window previewing the selected item. Hit any key (except PageUp/Down) and the preview goes away! The preview is similar to the Draft quick preview tab, so it will show images and plain text (including text extracted from DOC/PDF/XLS documents) only. For music/video or accurate Native preview you must still use the regular quick preview panel.
Likewise you can press both left and right mouse buttons together to preview the file under the mouse cursor. Just enable mouse peek from Tools | Options | Window. Then let go of the mouse keys and the preview will go away!
A variation of this command can show popup previews for two files simultaneously. Select 2 items that have thumbnail previews (e.g. photos) and press <Alt+Shift+Q> keys and a popup window will show their large previews side by side for easy comparison. This is especially useful when considering similar photos before you decide which one to keep. Press any key or click the mouse to hide the preview window.
NOTE: if just one item is selected and you are in dual pane mode, this command compares the focused items in the left and right folders.
When it comes to text files in particular, you can view or edit their contents using File | View and File | Edit commands, respectively. The natural text viewer is editor², included in the program distribution. It is preferable because it is fast, low on resources (especially when you view multiple files) and it shares search options with xplorer². However you can specify alternative external text viewers via Tools | Options if you prefer something more advanced.
Naturally you can launch documents using their associated program too, by hitting <Return>, double-clicking or right-clicking and picking Open from the shell context menu.
Mark | Containing text is a handy tool that allows you to search for text within all files shown in a pane, without having to open them individually. You specify what to search for and various options in the dialog (see figure 4) and xplorer² will mark all the matching files. A few remarks are in order:

The quick previewer is aware of files that have successfully matched a <Ctrl+G> command. When positive match files are focused, the previewer will load the part of the file that contains the text in question, and will zoom around the hit, aiding further examination of contents.
| ADVANCED: Boolean text searches |
|---|
|
You can search for multiple text strings and also assign a boolean connotation to each substring. To achieve the former you just separate the expressions you are after with commas, e.g. hello , world will mark as positive hits files that contain either hello or world (or both). You can add a boolean effect using the special characters + for AND and - for NOT, at the beginning of each expression. E.g. searching for help, +me, -god will mark files that must contain "me", maybe contain "help" and not contain "god". (You shouldn't use spaces after the + or - characters, unless you want to match a string that starts with spaces.)
The down-side of this flexibility is that if you want to search e.g. for commas verbatim, you have to either enter them as special codes (conveniently included in the Special characters drop-down box) or check the Verbatim checkbox to disallow multistring use. Also note you cannot combine boolean searches with regular expressions - you'll have to use the constructs in Table 1 for equivalent boolean functionality. |
| Meta-character | Meaning |
|---|---|
| . | Matches any single character |
| [ ] | Indicates a character class. Matches any character inside the brackets (for example, [abc] matches "a", "b", and "c") |
| ^ | If this metacharacter occurs at the start of a character class, it negates the character class. A negated character class matches any character except those inside the brackets (for example, [^abc] matches all characters except "a", "b", and "c").
If ^ is at the beginning of the regular expression, it matches the beginning of the input (for example, ^[abc] will only match input that begins with "a", "b", or "c") |
| - | In a character class, indicates a range of characters (for example, [0-9] matches any of the digits "0" through "9") |
| ? | Indicates that the preceding expression is optional: it matches once or not at all (for example, [0-9][0-9]? matches "2" and "12") |
| + | Indicates that the preceding expression matches one or more times (for example, [0-9]+ matches "1", "13", "666", and so on) |
| * | Indicates that the preceding expression matches zero or more times |
| ??, +?, *? | Non-greedy versions of ?, +, and *. These match as little as possible, unlike the greedy versions which match as much as possible. Example: given the input <abc><def>, <.*?> matches "<abc>" while <.*> matches "<abc><def>" |
| ( ) | Grouping operator. Example: (\d+,)*\d+ matches a list of numbers separated by commas (such as "1" or "1,23,456") |
| { } | Indicates a match group |
| \ | Escape character: interpret the next character literally (for example, [0-9]+ matches one or more digits, but [0-9]\+ matches a digit followed by a plus character). Also used for abbreviations (such as \a for any alphanumeric character).
If \ is followed by a number n, it matches the nth match group (starting from 0). Example: <{.*?}>.*?</\0> matches "<head>Contents</head>" |
| $ | At the end of a regular expression, this character matches the end of the input. Example: [0-9]$ matches a digit at the end of the input |
| | | Alternation operator: separates two expressions, exactly one of which matches (for example, T|the matches "The" or "the") |
| ! | Negation operator: the expression following ! does not match the input. Example: a!b matches "a" not followed by "b" |
Note that this syntax is slightly different than the popular Perl-compatible regular expressions. For instance groups are denoted with {} whereas many users may be familiar with ().
The command Mark | Quick search can also be used to search for text in files featuring a much simpler user interface, with the broadest search options possible.
Browsing Contents Scrap containers
Sooner or later your files and folders accumulate so you end up with hundreds of files within a folder or even worse. xplorer² helps you move around efficiently within large folders and select (mark) items for further processing. You can roam a pane revealing items in a variety of methods using the keyboard or mouse:
As you move around, the focused item is changed and usually cancels all previous selections too. To move the focus without affecting the existing selection hold down <Ctrl> or turn Mark | Sticky selection on. This will help you to hand-pick items scattered in the folder listing (similar to explorer's checkbox selection mode).
Most file management commands act on the selected files and folders en masse. xplorer² has a wealth of alternative mechanisms to aid the very important task of marking items for further processing (Mark menu):
Using these elementary marking and unmarking mechanisms, you can build collections of items whose complexity is only limited by the user's ingenuity!
| NOTE: The elementary selection mechanisms are additive; whatever you select is added on top of any existing selection. To start a fresh selection just hit <Alt+A> to unselect everything beforehand. |
Mark menu also contains a number of commands that affect the selection which are explained in other parts of this guide. Broadly speaking they consider all the files with a variety of criteria, and select files that match them. You can mark items that contain some text, or that need to be copied to synchronize two folders, or that are duplicates and must be deleted, or even source files that must be built to make a compiled language project. The quick search command is convenient for searching generic text.
Finally xplorer² can automatically select items (and subfolders) that tally approximately to a Total size, so that you can optimize transfers to media with limited capacity, e.g. USB sticks.
All these criteria-based selection commands affect all files and will reset any previous selection leaving only items that unambiguously pass the criterion in question. Typically such commands are performed first, possibly followed by elementary (un)marking commands to refine the selection. However when such criteria are used to unselect files (see Unselect button in figure 4) they only affect matching items.
Once your selection is finalized you can manipulate your items in various familiar ways, e.g. copying, deleting, drag-dropping, etc. xplorer² uses exactly the same clipboard formats as windows explorer so you can transfer files to and from the desktop, external explorer windows and any xplorer² windows seamlessly. When it comes to pasting you have a number of advanced options (Edit menu):
| TIP: You can check whether a drive is NTFS-formatted using its property sheet. From "My Computer" right-click on the drive in question and read the Type field from Properties | General. Generally speaking only drives on NT-based PCs have any chance of being NTFS; windows 9x only support FAT32. |
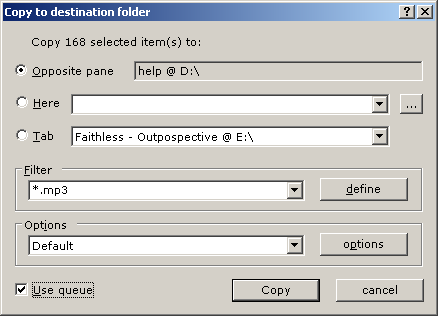
One big advantage of dual pane file management is that the inactive pane is a natural and convenient target for copy/move operations. Edit | Copy to and Move to commands are ideal for such transfers from the active to the inactive pane. You may see from figure 5 below that you can also opt to send the selected items to an alternative target folder (Here field). This combo box remembers all the folders you typed in it, so it acts as a list of your favorite copy destinations.
If you have folder tabs, these are also listed in the dialog as possible targets of the file transfer operation. Just make sure you check the Tab radio button and select the appropriate folder from the drop-down list box.
| TIP: The Here input field in figure 5 - and all other fields in xplorer² dialogs meant for paths - support path autocompletion. Type part of a path that exists and hit <F1> key for the first possible completion; another <F1> will fetch the next completion etc. After you find your path segment, type a backslash and a few characters to autocomplete the next segment, and so on. Also you can click on the "..." button and select a folder. If you prefer explorer-style path autocompletion there's a relevant checkbox in Tools | Options | Advanced |
[PRO] Normally all selected files and folders (including subfolders) will be transferred to the destination. If you want to exclude certain files use the Filter field; a standard hyper-filter can be either Defined or selected from those saved earlier from the drop-down list. If a simpler wildcard filter (e.g. *.cpp) would suffice you can just type it instead of defining a complex hyperfilter. When a copy filter is active, each file is examined and is only transferred if it matches the filter.
xplorer² can copy to and from all three major folder categories, including zipfolders, FTP etc (if supported by the OS). During a lengthy file operation you can still use the program - although the reaction speed will suffer.
| NOTE: Windows in general get bogged down whenever the OS accesses disks for I/O. The whole system comes to a near stand-still. Launching a second file operation in parallel will make things worse, in fact much worse if both operations access the same physical drive. The read/write head keeps jumping back and forth to accommodate both tasks and you end up waiting far longer than the combined time of the 2 individual operations. Therefore it is advisable to avoid parallel operations whenever possible, e.g. by queuing jobs. |
Folder tabs can also help moving files around. Just drag a selection and drop it on the tab of the target folder. If you hover the mouse pointer over an inactive tab during drag-drop it will be automatically activated for you, too.
To create new files or folders, use the respective commands from Actions menu. You can also create all the standard new shell file types via the Shell new submenu, located in the context menu of each folder pane - please make sure you don't right-click on any item; place the mouse pointer on some empty space instead.
When it comes to renaming files and folders, you get a few more options than the standard inplace name editing: (File menu)
Finally when it comes to deleting you can either send items to the recycle bin, or delete directly bypassing the bin when you hold down <Shift>. A third option is shredding (from Actions menu), which completely eradicates the files/folders overwriting their contents with zeros before eventually deleting them.
| WARNING: It is very hard to undelete files when you use the direct method (with <Shift>). It is impossible to retrieve files that have been shredded. Please use these commands with caution! |
| WARNING: When you delete a folder junction you risk deleting all the target folder contents without warning. To avoid such a mishap it is advised to name junctions clearly (e.g. using "junction" as part of the filename), pay attention to the "J" file attribute, or even better create a coloring rule to make such objects stand out. If you want to remove the junction without affecting the real folder contents use Edit | Paste special | Folder junction | Delete. |
Windows Vista has introduced the concept of User Account Control (UAC) which simply put means that even if you have an administrator account you do not have full control of some special files and folders, and as a result you cannot copy into or delete from some folders like Program Files. To bypass such controls use Window | Administrator menu command to launch xplorer² in full power administrator mode. For more information see this blog article.
When it comes to transferring large amount of files and folders, the windows copy dialog comes rather short. xplorer² in exchange for the fancy animations, offers a robust alternative when copying from and to regular filesystem folders. The main features are:
These advanced options are available from the dialog of Edit | Copy to command, as seen below. You can save option sets you use frequently with a descriptive name so that you can easily switch from your normal to e.g. unattended copy mode (silent operation) and back to normal with minimum clicking of checkboxes, radio buttons etc. Saved option sets are also available from the main dialog within a drop-down list box.
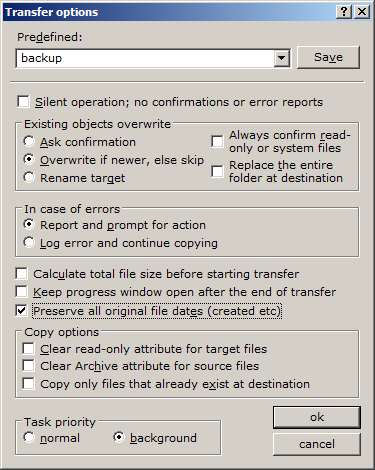
| TIP: If you want to copy only newer and changed files, and leave out those that didn't change, use Tools | Backup copy menu command. This will select all files and folders in the active pane and copy them to the inactive pane folder (the backup location, e.g. an external drive), using Overwrite if newer else skip copy method — and in the end it leaves your default copy options unchanged. Very useful shortcut! |
| NOTE: The robust copier is only available when you copy to or paste from Edit menu (if GIOPT_ROBUSTPASTE registry tweak is enabled). If you transfer files with drag-drop, or the source or target is on a non-filesystem folder (e.g. FTP), you get the normal windows copy operation. |
Robust copy usually requires both source and target folders to be regular filesystem items (e.g. in your C:\ drive or network). However for windows Vista and later, you can have one side of the equation in a "virtual" folder, e.g. copy files from your mobile phone or a zipfolder into a regular folder or vice-versa. Then you can use advanced copy options like "overwrite if newer else skip", and do an intelligent backup only of new and changed files. At present you cannot use file filters in this mixed folder mode, only (most) of the options in figure 5a.
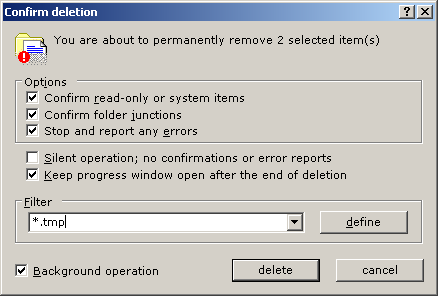
Similar to robust copy, xplorer² can do robust file and folder deletion. When you delete a lot of files with windows explorer and one happens to be locked or any kind of error is encountered, the operation is aborted mid-way. The robust deletion engine in xplorer² is designed to keep on going where windows explorer falters.
Whenever you start a delete operation that cannot go in the recycle bin (e.g. you press <Shift+Del>) the robust delete dialog kicks in (see figure 5b). Whenever some error occurs, you can choose how to deal with it, either stop and report it, or log the error and continue with the remaining files. xplorer² also will warn you if you try to delete through a folder junction that could cause havoc to your filesystem. You can even specify a filter (either a simple wildcard or a complex hyperfilter) so that only files that match it will be deleted.
You can rename large collections of pictures, songs and other files using File | Mass rename menu command. The dialog works in three modes; "Replace whole name" sets the new name using a template that may include file attributes and other reusable $-tokens. The rest are search and replace modes that replace parts of the existing filenames, for example replace occurrences of NEW with OLD or delete a range of characters. The difference between "Match and replace part" and "Search and multi-replace" is that the first will replace (at most) once, and the second will replace all occurrences of the matched string in each filename.
Two extra special modes cater for changing the case of filenames, either to UPPER or lowercase. When changing case, you are not allowed any other changes to the filename — it will remain the same except for the change of letters. Camel case mode changes spaces and word breaks into capitals (e.g. "hello world-son.txt" becomes helloWorldSon.txt). Finally remove accents leaves only plain vowels in filenames so the German über.jpg will become uber.jpg.
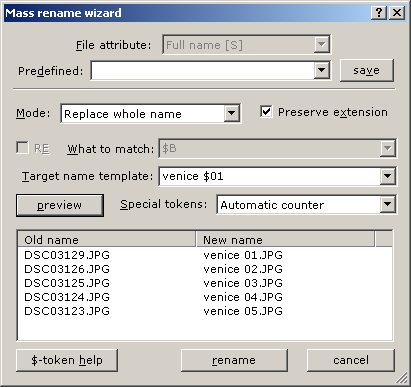
Here are examples of composing the entire name (mode 1):
For the search and replace modes you specify two strings, what to match (search for) and what to replace it with. For example you can search for NEW and replace it with OLD so that a file named newFile.txt will end up as oldFile.txt (the search isn't case sensitive). Using "Match and replace part" mode, only one (the first) occurrence of the matched substring is replaced, so a file called newAndNew.txt would end up as oldAndNew.txt. To replace all occurrences switch to "Search and multi-replace" mode and you would end up with a file called oldAndold.txt. Tick Preserve extensions box to avoid damaging the file extension in these replace operations.
You can use $-tokens here too if you want to add extra variability to your search-and-replace renames. The character range token is especially useful to extract substrings of the original filename. The format is $[first:length], so $[3:2] acting on the name trial.txt will extract 2 characters starting from position 3 (that is "ia"). You can use this in a variety of ways, e.g. leave the replace (target name) field empty to remove that part of the name. Passing 0 for length is equivalent to an insertion operator, e.g. searching for $[3:0] and replacing with "add" will insert the string "add" before position 3.
The mass renaming dialog is very powerful but all these tokens can be confusing. It is recommended you use the Preview button to check the rename will do what it is meant to be doing. It is very hard to undo and repair a mass rename gone bad!
| TIP: The mass rename dialog has many options. You can save your favorite rename operations, including all options, search and replace strings and so on with a name, and repeat them again later. Use the Predefined drop-down box to supply a name for the current options, then click Save button to store them. |
Tick the RE box to enable changing filenames with complex regular expressions. This is an advanced renaming mode that can help with certain kinds of rearranging parts of the filename using backreferences.
Here is an example. Let's say we have a filename LOG.17112006.TXT that contains a date in DD-MM-YYYY format, and we want to convert it into a more standard YMD (year first) format. We use a regular expression to match the 8 digits separated in 3 groups (day, month and year), then use backreferences to rearrange the 3 groups.
To match the original date format, we use (\d\d)(\d\d)(\d\d\d\d) in the What to match dialog box. There are 3 groups defined in brackets that match the date in the filename:
(\d\d)(\d\d)(\d\d\d\d)
LOG.17112006.TXT
To invert the location of the 3 groups and add separating dashes between the year, month and day, we use $3-$2-$1 in the Target name template (replace) box. $3 is a special backreference that stands for the 3rd group (year), so the resulting filename will be
LOG.2006-11-17.TXT
Note that parts of the original filename that were not matched by the regular expression remain unchanged. You can use any kind of search and replace trickery for other tasks too, e.g. to eliminate parts of the filename (leave the replace string empty). Sadly you cannot combine $-tokens within regular expressions.
Sometimes you may need to apply various rename operations to get the filenames in the shape you want, and you cannot do it all in one search and replace step. In this case you must run the mass rename command 2-3 times in succession, e.g. first replace spaces with underscores, then capitalize the names. Mass rename command makes such operations possible by keeping the originally selected files selected, despite the name changes. Then each subsequent <F2> command will work on the same set of files!
Depending on your sort order, the selected files may be rearranged after each rename step, e.g. if you sort by name. If you want to preserve the original order as well (e.g. if you plan to add numbers to them), tick off "automatically resort contents..." option (Tools | Options menu, Window property page).
This procedure could be automated using macros, especially if each rename step is saved and available from Predefined drop-down list (see figure 5c)
The shell property sheet allows changing some filesystem attributes like Archive or Read-only, but not all of them. xplorer² offers access to all attributes as well as to timestamps of files. Using Actions | Change attributes on a selection of items you get the dialog in figure 6 which allows you to change attributes and touch dates/times.
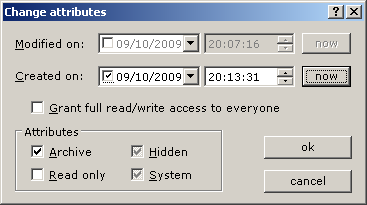
Only things that you actually change are affected; so if you don't check any date boxes, these won't be updated. In this way you can change only attributes or just dates, or both at the same time.
If you want to bypass file security and grant full access to everybody tick the relevant box. Note that this will erase all prior security information for the selected files and folders so please use it cautiously. If you need to preserve group access permissions then use the file property page instead (click on security tab and add the Everyone group and assign full access permissions).
| NOTE: Some special attributes supported for files on NTFS partitions like Compressed or Encrypted are still modifiable through the shell property sheet <F12> (Advanced button in General page). A few attributes are inherent to the nature of the object and cannot be changed at all, like the Offline file and folder Junction attributes. |
If you are in detailed view mode, you can change many file properties, including dates and attributes, using the mouse. You just click on a property you want to change and if it is editable you get a chance to edit it. This is similar to in-place renaming of filenames. Using the keyboard, press <F2> key (or use File | Rename menu command), then press <TAB> until you reach the column you are after. To cancel any changes press <ESC> key while editing. Note that not all properties are editable and some apply only to a particular file type (you can edit the Artist information for a music but not a text file).
Except for fixing dates, you can interchange various date attributes and shift a file modification date forward or backward. Use Actions | Change dates menu command (or the equivalent ribbon UI command found on Workbench tab, under Attributes button) to modify the selected items' dates.

First choose which date to change (Modified or Created) using the leftmost dialog drop-down box, then choose the operation to apply. You either set the date to some other date property of the same file (e.g. set the modification date to the date a picture was taken or the video media creation date), or you can shift the existing date relatively by some amount forward or backward. Use negative numbers in Shift by box to set the date in the past.
It is also possible to set a date from the filename too, if the name contains the standard date format YYYYMMDD HHMMSS (e.g. pic_20181026_192237.jpg). Naturally trying to set non-existent or invalid dates will generate an error message.
Sometimes you may want to transfer large files between two PCs and find that a single file is way too big to fit on e.g. a floppy disk or even CD. The Split and Merge commands from Actions menu will come handy in such a situation.
First you break down the large file in as many portions as necessary, declaring your preferred size in kB in the split dialog (figure 7) as well as the target folder. For example if you have a file called bigone.dat that is 10MB and you break it down in chunks of 1MB, you will end up with 10 files named bigone.dat.01, bigone.dat.02, ... bigone.dat.10.
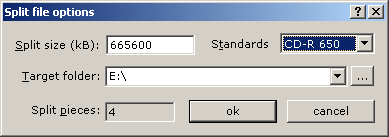
This will allow you to place the file segments on floppy disks and do the transfer to another computer. There you just need to make sure to place all fragments in a single folder, select them all after sorting by name (so that they'll be in order), and use Actions | Merge to put them back together; the file will be restored keeping its original modification date.
| NOTE: You can also merge file segments using the DOS copy command. For example copy part1+part2 whole will merge file parts 1 & 2 to create a file called whole. This is not as convenient as the built-in Merge command; it merely demonstrates that you don't need xplorer² to put files back together! |
Comments are small pieces of text associated with files and folders, 100% controlled by the user and ignored by the filesystem. There are many possible uses for comments:
| NOTE: File comments rely on an advanced NTFS feature called alternate data streams (ADS). Imagine a file as a kind of "folder" that has a stream for the regular contents and secondary streams for other information, including comments. When you move the file around, all these alternate streams are silently carried along. Checkout the Stream explorer program for more information on ADS. |
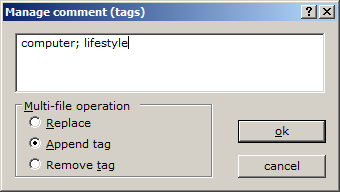
File comments are supported from windows 2000 onwards, and there always existed a way to manipulate them through shell properties dialog (Summary tab). xplorer² makes comment handling much more easier:
[PRO] Most important of all, xplorer² allows you to use comments as search rules, so you can easily check and retrieve files that have a set of keywords.
WARNING: When using comments you should be aware of some limitations arising from the mechanism that underwrites the functionality for windows filesystems:
Managing Contents Maintenance
What are they? What do they do? Why do I need them? These and other questions are bound to occur to users since scraps are such a novel concept. But soon you'll appreciate their flexibility and discover many ways to put them in good use.
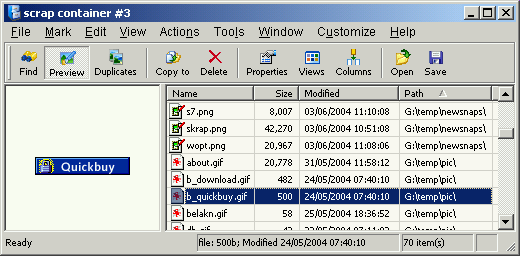
These windows look very similar to the main window and support nearly all commands and operations available in "normal" windows where you browse a single folder at a time. The difference is that in these containers you can see contents of multiple folders in a single pane (notice the Path column in figure 8), even collections of hand-picked items ("scraps").
The only noticeable difference in terms of appearance is the lack of a folder tree pane, which doesn't make much sense for the multi-folder context of scrap containers. Other than that it is mostly similarities: a quick preview pane, toolbar capable of command execution, the same status bar, a menu bar with the same commands (even some additional ones!), etc. All the file management operations, including filtering, selection, drag-drop, shell context menu etc are available, too.
You can have as many of these special windows open as you wish; just use Window | Scrap container to open a fresh one. Also many commands may create a scrap window if one doesn't exist, like Send to scrap and Browse flat (File menu). Tools | Find files command will also open a scrap window for its results.
When you place items in scrap containers, their actual disk location remains unchanged. Think of the Find Files command in windows explorer; the matching files are placed in a results window and they may come from all over the namespace. Scrap containers are similar, only you control what gets into them. There are many ways to add items in a scrap window:
Once you have some items in a scrap container, you can work with them like as if they were in a single folder, using the same palette of previewing and file management commands. For example when you Edit | Copy selected items they will be available for Paste-ing to other windows. Even if the selected items come from different folders, the paste will place them in a single target folder - unless Edit | Paste special | Structured scrap clips command is used.
| NOTE: Scrap containers accept items from both filesystem and "virtual" folders. This may create confusion in terms of column information; that's why only stock and filesystem columns are available in these multi-folder windows. |
You can remove items pressing <Delete>; this will just remove them from the window without affecting the actual files on disk. If you want to delete the files themselves then use <Ctrl+Delete> or File | Delete command.
Although you can work with items in scrap containers, sometimes you need to open the folder that contains the item in a normal xplorer² window. Use <Ctrl+Enter> key or right click on the item and pick Open file location command from the menu.
Scrap containers have some unique commands too, not available in normal browser windows. You can check for duplicate files and compare the content of folder hierarchies. They also underwrite the functionality of the Tools | Find files command, as already mentioned.
The term "scrap" suggests something fleeting and impermanent, and indeed these containers were originally conceived as quick-and-dirty temporary holders of items, which would be discarded as soon as some simple file operation was performed on them. However, it was soon realized that there was another possible use mode: saving scrap contents for future use.
Actions | Write contents creates a file with .cida extension and writes location information for all the items in a scrap pane. You can reopen such saved files at a later time and restore the scrap container, just like as if it was a shell document. xplorer² registers .cida files for its own use so you can open them by merely double-clicking on them even when xplorer² isn't running.
You can take advantage of this functionality in many ways. For instance you can create cida files as "table of contents" that keep the locations of files with similar content throughout your filesystem. This would be equivalent to creating a normal folder and keeping shortcuts to the same documents, but if you go the scrap way you have direct view of the actual files.
| NOTE: We stress that only the location of the files is stored in .cida files, not the files themselves. If you delete or move the actual file, xplorer² will not be able to reload it when reading the .cida file. When such errors occur you can optionally see a log of all missing files that may help a subsequent manual repair. |
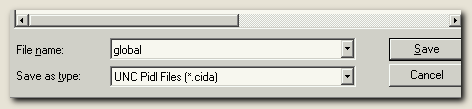
Normally you will be reusing cida files on a single computer to access a set of related files. If you want to access the same files from a different PC you must save some extra information to make the cida file location-independent; that is the purpose of "UNC pidl files" type in Save as type drop-down box, as in this snapshot:
Another nifty trick is browsing the contents of a folder and all its subfolders in a single scrap window. There are a number of ways of "flattening" a folder (or .cida file):
Such flat views are useful when you want to operate on items recursively, for instance change file attributes, create printer-ready listings using Edit | Copy columns, execute a command on each file, and generally whenever you want a flat overview of a folder's contents. We are sure you'll discover many more uses yourselves!
It can be argued that in some situations it will be more convenient to have a scrap pane (virtual folder, drop box, "playlist", multi-folder view or however you want to call it) within the main xplorer² window, rather than opening a separate scrap container. This functionality is furnished by View | Mini scrap menu command.
There is only one such pane available per window, but it is quite versatile. It is almost identical in functionality to a stand-alone scrap container: you can put in it files and folders from many locations, you can select view modes, sort orders, even arrange the content in groups. Most of the menu commands are available too, including load/save through the background context menu. Here are a few possible uses:
| NOTE: To stop the mini scrap reloading the last document on startup, empty its content before you close it, e.g. select all and then hit <Del>. |
Scrap containers Contents Searching
Daily heavy-duty work on a PC will invariably result in a system that is suboptimal at best and unstable at worst. xplorer² has a number of advanced commands that help you restore order and reclaim wasted hard disk space.
Many times you have two or more folders that have the same contents and you want to keep them synchronized, i.e. make sure all "versions" stay updated whenever you make changes to one of them. One way to achieve this would be to use folder junctions or hard links but this isn't always convenient. One of the folders may be on a floppy disk or on a remote computer, a zip file, FTP site, etc, where these advanced linking techniques won't help you.
That's when xplorer² and its dual pane layout comes in handy. It is ideal for comparing the contents of any two folders, and finding items that are missing from either one, or have been changed in any way. Once you identify the differences, you can decide how to deal with them.
The dialog in figure 9 (Mark | Sync wizard command) indicates that comparison has two facets; first you determine how you want to compare items and then which items to mark. The large number of combinations allows you to do all sorts of checks to suit your synchronization needs.
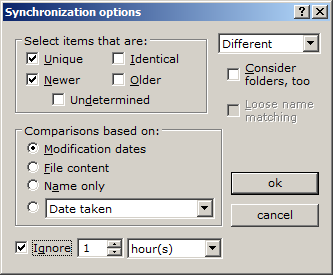
The comparison logic first tries to match items left and right using the filename as a guide. If a file in one folder doesn't have a matching namesake in the other folder, it is immediately considered unique (cf. the checkboxes in figure 9). If a file exists in both folders, the two copies are compared for differences, using the mechanism you specify:
| NOTE: When comparisons are based on date modified (or any other date) two items are considered different if their dates are more than +/- 2 seconds apart. You can use the Ignore tickbox at the bottom of the synchronization dialog to specify a different interval to ignore. E.g. if a change in daylight savings DST resulted in artificial 1-hour differences, you can set it to ignore this 1 hour — files differing by up to 1 hour will be considered identical as long as their size matches. |
The relationship between files is fixed by their properties and the comparison scheme you select. The second phase is to decide which files you want to mark, ear-tag them for further processing. There are checkboxes for all item states and you can check as many of them as you wish - although not all combinations make sense, e.g. selecting both "older" and "newer" files. The drop-down menu lists some common scenarios for your convenience.
A typical scenario is to select unique and newer files. By copying them to the "passive" folder you ensure that the files in both folders are the same, both in number and most recent content. Note that there may be unique and newer items in both folders - obviously not the same items - that need to be carried across. Let's take a look at an example.
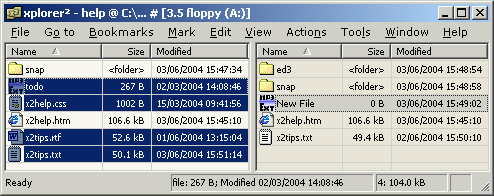
The figure shows the results of a <F9> command on two folders. On the left there are 3 unique files that don't exist on the right (todo, x2help.css, x2tips.rtf), a file that is newer (x2tips.rtf, please check the modification dates left & right) and a file that is the same in both folders (x2help.htm). All the marked files must be copied to the inactive pane to establish "synchronization" of contents. But also note that there is a unique file marked in the right pane (New File) that also needs to be copied to the left folder.
Also notice that on the right pane there is an extra folder called ed3 but this wasn't marked by the <F9> command. By default folders are excluded from comparisons, unless you check Consider folders, too (see figure 9).
Sometimes you may need to synchronize folders including their subfolders, as in the situation depicted in figure 11. If the hierarchy is shallow (few folders) you can turn on mirror browsing (Go to menu) and let xplorer² keep the inactive pane in the right folder, as you browse folders in the active pane. As an example, starting from folders A:\ and c:\documents\kenny in the active and inactive panes respectively, if you browse into A:\help the inactive pane will automatically follow to read c:\documents\kenny\help. This mirroring will continue in both down and up direction, as long as folders with matching names exist.
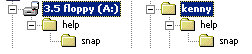
When many subfolders are involved, mirror browsing is cumbersome. You can take advantage of flat folder views and use a dual scrap frame (use View | Dual pane) to browse all the files involved in the two hierarchies. If there is a good match between subfolders as in figure 11, the same <F9> command will reveal all the changes that need to be made but now acting on all subfolders simultaneously.
The easiest way to compare two folder hierarchies is to browse the required root folders in a normal dual-pane window and pick Tools | Compare subfolders. This command will open a dual scrap window, flattening each hierarchy in a separate pane and will also launch the synchronization command. If grouping is supported, items will be grouped by folder helping you to inspect the comparison results.
Once files are marked, use the special Edit | Sync-o-paste command available in scrap containers to copy all the files in their matching folders. So items selected in A:\ will end up in c:\documents\kenny, those in A:\help will end up in c:\documents\kenny\help and so on. Note that Sync-o-paste acts on the selected items and doesn't require a prior Edit | Copy command.
|
NOTE: Scrap containers may host items from arbitrary locations. The deep synchronization logic tries to match folders first, and then applies the usual content comparison procedure for each folder pair. Sometimes it won't be possible to match all folders left & right, when the hierarchies are completely different. In such cases there will be a lot of items left in an undetermined state, and a little red question mark will appear overlaid on their icon.
If you want to compare items that don't belong to similar folder structures, you can try checking Loose name matching option (figure 9); this will compare items matching just names - ignoring folders - but you won't be able to use the sync-o-paste command on the results. Multiple same-name items are matched in the order they are listed in each pane. |
If you find this form of deep synchronization a bit of a headache you can try an alternative that is based on robust copy <F5> command. Selecting Overwrite if newer else skip transfer option will result in copying only files that are new or changed, just as if you did a synchronization based on modification dates - and it doesn't need scrap containers or any prior synchronization commands! This will work best if you have all the changes in one folder hierarchy and you want to mirror them to some other "backup" location.
The folder synchronization command just described checks for modifications of different versions of the same file. A variation on this theme is checking the state of file transformations, when the compared filenames are slightly different.
If you are involved in programming, then you will recognise this situation as compilation of source code to object files. So starting from a C++ file xplorer2.cpp the compiler churns out the machine translation in a new file called xplorer2.o - notice the change of extension from .cpp to .o. Mark | Check build command checks the states of source files comparing them to their "transformed" versions.
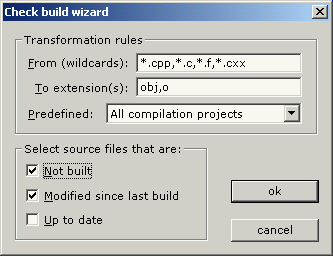
The dialog shown in the above figure accepts as input the transformation rule, which observes the source and target filename extensions. It can be seen that multiple comma-separated extensions can be used to check for all compilation projects in one stroke. Also note that a generic wildcard is accepted for the From field whereas the To field must be just the target extension(s), without the "." (e.g. type o instead of .o).
Once source and target files are matched their modification dates are examined to figure out which is newer. If the source is newer, it must have been modified since last build (cf. figure 12 checkboxes) and it requires re-compilation. If the target is newer then it is up to date, whereas if it doesn't exist at all the source is not built. You can check as many boxes as you want to tell xplorer² which source files to select. Let's take an example.
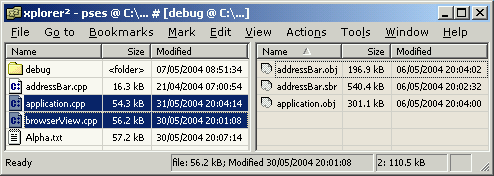
Using the options in figure 12 on a pair of hypothetical source and target folders, xplorer² marks all source files that require compilation. The file application.cpp was modified after it was last built (check the date of its target application.obj) so it is marked. browserView.cpp hasn't been compiled at all (no browserView.obj exists in the inactive pane), so it is "not built" and hence marked. addressBar.cpp on the other hand is up to date, and finally Alpha.txt is completely irrelevant for this transformation rule so it is left unselected.
Like the folder synchronization command, Mark | Check build merely ear-marks files that require building without actually taking any further action. It is up to the user to decide what to do with the selection afterwards, e.g. generate a script file that executes the compiler for each source file.
| NOTE: This command doesn't make claims of being a substitute for make type tools. For instance it cannot check for cross-dependencies from modified header files etc. Still it can be useful for simpler scenarios like MatLab projects. |
According to the second law of computers, no matter how big your hard disk, eventually it will fill up with movies, videos, pictures and what have you. While browsing a folder with subfolders, Tools | Subfolder size command will show you the size of each individual subfolder, so you can tell which one takes most space.
For more details use Tools | Folder statistics menu command. It will calculate details for each subfolder like number of files and size used, and will do so recursively for all the contained folders, and present the results as a tree:
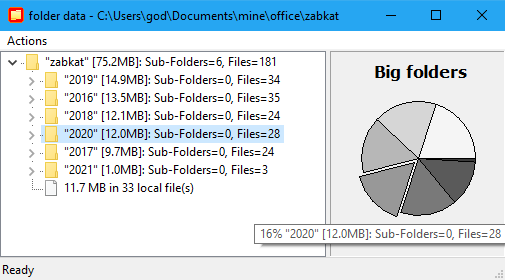
The largest folders appear first. To aid visualization of space usage, a little pie chart is shown too, popping out a pizza slice for each folder you select in the tree. Drag the splitter bar with the mouse to make the pie bigger or smaller. You can also use the tooltips over the pie pieces to discover the folder names.
The second main tree branch shows the biggest files in the hierarchy examined, arranged by size. Examine the big files branch to see whether you don't need some of them and you can delete them to save space. Select a file and press <ENTER> key to browse its containing folder.
The single menu bar item called Actions holds a few commands, the most useful of which perhaps is Copy, which copies the entire selected tree branch as text, that can be subsequently pasted in a text editor for printing or whatnot. Another useful menu command is Empty folders which detects folders that are empty (they have no file contents), and puts them in a scrap container for further action (e.g. select all of them and delete them)
Once you discover the biggest size offenders, clean up your space deleting junk files, e.g. duplicates, similar pictures etc.
What if you have a ton of MP3s collected and you are not sure how many times you have Christina Aguillera's "Dirty" (this must be a video then :) , or John Abercrombie's "Back wood song", eating up your hard disk space? Enter the duplicate finder.
Duplicates come in many guises. In the simplest case a file will exist in many carbon copies using the same name. A little bit trickier is when a file exists with many different names but the same data content. Tools | Check duplicates command (in scrap windows) will help you detect all these kinds of extra files.
The procedure is as follows. First you open a Window | Scrap container; then fill it in with all the suspected duplicate items; finally launch the duplicate checker command from Tools menu to examine the contents. Note that the command only considers the items in the scrap container, so you have the flexibility to hand pick selected suspect folders. Alternatively you can flatten your whole "My Computer" folder that includes all your hard disks and do a thorough - albeit time consuming - investigation. Most of the times it would suffice to flatten "My Documents" folder.
Another way, handy if you want to examine the folder currently browsed, is Tools | Check duplicates menu command, that will automatically flatten the current folder (and optionally the one you browse in the inactive pane) and launch the duplicate checker parameters dialog below. If you go this route, you also get to exclude small files from the comparison, that don't take up much space. See nMinDupeSize registry tweak for more information.
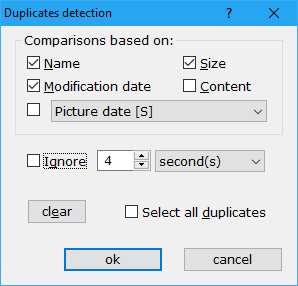
The options set in the dialog determine how the investigation is to proceed. You can have any combination of boxes checked (use clear button to reset all checkboxes before a fresh search) but the fastest would be to assume that duplicates will have the same name, modification date and size. (Sometimes detecting duplicates is as simple as sorting the scrap contents by size or by checksum and visually inspecting for items that have the same size or checksum.)
If you are comparing modification dates, there could be phantom differences introduced e.g. by FAT32 partitions, that are only 2-second accurate for stored files. For such cases use Ignore XXX seconds box in the dialog. You get to choose how many seconds (or hours!) to ignore when comparing modification dates. Any 2 files that fall within the date tolerance limit are considered to have the same date.
Custom file properties can also be used as criteria for "sameness". Select the property you want using the drop-down box and you can extend the duplicates tester in creative ways (e.g. find all music files by the same artist or owner)
If you suspect you have identical files with different names or/and timestamps, then you can clear all boxes except for content. This is the most robust detection mechanism but at the same time very time consuming, since each file is compared to each and every other file in the container, regardless of their name.
|
TIP: Ultimate xplorer² edition has among other things a much quicker duplicates detection algorithm, that allows you to search your entire hard disk for duplicates and get results in reasonable time.
There's also a new zabkat tool purpose built for finding duplicate and similar files, called i-DeClone, which is even more capable than xplorer² |
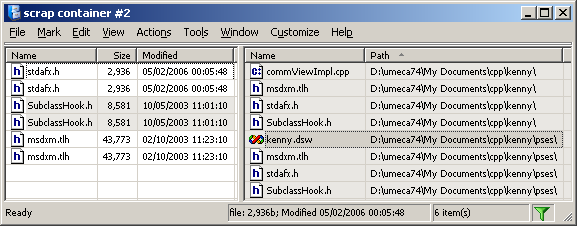
After the command finishes its work, all files that match the user criteria are bunched together in groups with different background color as in figure 15. All unique items are hidden. The example situation started with 8 files (shown in the inactive pane). Three pairs of duplicates were detected and the unique items like kenny.dsw were removed from view.
If you intend to delete duplicate files, please make sure you check Select all duplicates box in the dialog (figure 14) before you go ahead with the command.
| TIP: This command can't tell which is the "original" out of the identical files, but it uses the initial order of the items, leaving the first one unselected and marking all the others. If you want to keep the older copy then make sure you sort by Modification date - from older to newer - before starting the duplicates checker. |
Such listings provide preliminary evidence of duplicate files. Depending on your dialog parameters you may need further proof before actually deleting the redundant copies. A good guide is the checksum column that you can activate using View | Select columns. It shows a numeric "summary" of a file's contents. When checksums are different files are 100% different; equal checksums on the other hand do not guarantee identity - although they imply a strong possibility that the files are identical.
Once you are confident about extra files being duplicates, you can delete them using File | Delete - or pressing <Ctrl+Delete>.
Technically speaking, when duplicate files are shown, the pane is both filtered since unique files are hidden from view (notice the filter icon on the statusbar of figure 15), and unsorted since files are displayed in groups regardless of the original sort order. You can cancel this mode using Tools | Reveal unique or View | Show all.
Another source of clutter in your hard disk is your photo collection. It is very easy to snap lots of photos with your mobile phone or camera, but not all of them are worth keeping:
xplorer² has commands that let you quickly discover bad and similar pictures, offering you the option to delete them and clean up your disk space. First you can choose the Blur file detail (use <ALT+K> keys to choose columns in detailed view mode). For JPG pictures it shows a number, which is big for pictures that are suspect; values greater than 100 indicate bad quality, whereas smaller values indicate smaller defects. Sort your picture collection by this column to bunch the bad pictures together, then inspect and delete what is not worth keeping.
To get rid of similar pictures, flatten a picture folder or use any other means to fill up a scrap container window with JPG photos to examine. Use Tools | Find similar photos menu command (or if using the Ribbon UI see under Duplicates button on the Home tab) to group them by similarity. Whereas checking for duplicates will only find files (pictures) that are exactly identical, this command finds pictures that are slightly changed.

The dialog controls how similar pictures are found. To achieve reasonable detection speeds, it examines pictures either by filename or by modification dates, so that it only considers pictures that are likely to resemble each other (shot one after the other). Alternatively you can choose As they appear in pane radio button if you want to be in charge of the order photos are examined (e.g. in whatever sort order is in effect). You can tweak the similarity threshold up or down, to match pictures that are more closely (or loosely) related.
Any similar photos found will be placed in groups, as per the duplicate checker function (i.e. in bands organized by Group ID column) and thumbnail view mode will be automatically enabled to let you compare the similarities discovered. Then just select and delete those you don't need, leaving 1-2 best pictures per group.
| NOTE: Both blur detection and photo similarity are probabilistic methods based on artificial intelligence algorithms (SVMs). As such they are not perfect and should be taken with a pinch of salt. But even if you only find some of your bad pictures automatically, it is still a significant help compared to manually going over your photos one by one! |
Fuzzy grouping is an interesting (albeit oddball) feature that could be put in various uses. It uses fuzzy matching to group together items that are similar but not identical. For example, we can put all our music album folders in a scrap container, then use Tools | Fuzzy groups menu command to group the folders by similarity. Just watch the groups in the following picture:
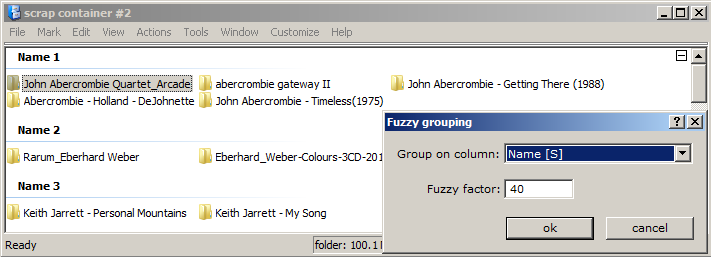
As you can see, using a 40% fuzzy factor, the first group contains all folders that contain "Abercrombie" in the title, the third group has works by Keith Jarrett and so on. The command picks up the groups automatically. If you make the factor bigger (say 60), the fuzziness decreases, so items have to be more alike to be grouped together. For best results try a few different values until you hit on the desired groupings.
Fuzzy grouping is a special case of custom grouping.
If you use a regular expression (instead of a number) as the fuzzy factor, you can identify common substrings in filenames or other properties, and group on them. Let's use an example, consider these files:
alpha (2002).mp4
beta (2002) action.mp4
New File 2123
old (2001).mov
alien (2001).mp3
Four of these have a year, or 4 digit number, in brackets. If we use the regular expression \(\d{4}\) that matches this pattern for a fuzzy factor, we will generate these automatic groups:
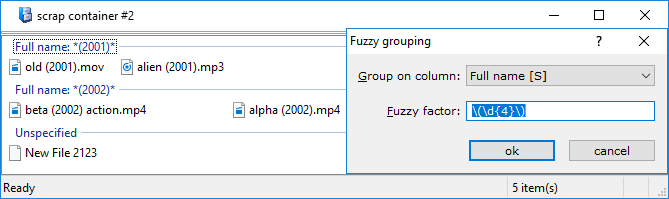
See how the file that doesn't have a year in brackets ends up in the unspecified (non-matching) group.
Here's another use of this command. If you browse shell:recent folder of recently accessed documents, you cannot arrange by file type because all files in there are shortcuts; the .LNK extension is masking out the real file type. You can work around this problem putting all items in a scrap window and do a fuzzy group on NAME [S] property (not full name) and this regular expression:
\..*
You will see that files are grouped by their original extension!
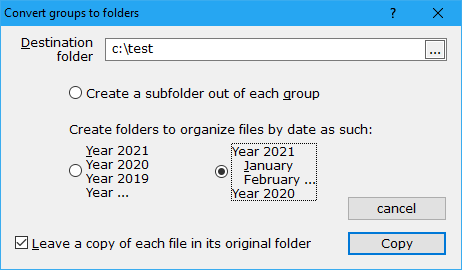
Say you used View | Arrange by | Show in groups menu to show items alphabetically grouped using their first letter, you can then use extract groups command to create folders that contain the items of each group. You choose a top destination folder and xplorer² creates subfolders under it, one per group (the folder names match the group titles you see). You can either copy or move the original files into these subfolders, depending on the checked state of Leave a copy... box.
Unlike other xplorer² commands, all the visible items are sent to group subfolders, not only those selected. A few other irregularities to note with this command:
This command can also organize items by date, whether you have groups or not. This is useful e.g. if you have a truckload of photos in a scrap and you want to automatically move them in subfolders according to their modification date. Use the two date radio buttons to choose how to have them organized, either one folder per year, or you can have items organized by year and month (i.e. each year subfolder has 12 subfolders corresponding to months). Usually last modified date is used for automatic folder creation, but you can pick any other date you want (e.g. picture date) by placing it before the date modified in the details. To reorganize column order either use ALT+K command or drag-drop using the column header
You can apply additional order to your photos using the export groups command in stages. For example, if you want to organize your photos by camera model as well as by date, so that you have one folder per camera model, and inside that you organize by year/month, you can do it as such:
This procedure could be automated using macros
Maintenance Contents DOS commands
xplorer² unleashes the full potential of file searches since you can use any and all pieces of file information as parameters. You can thus home in to the files you are after with unparalleled precision avoiding irrelevant hits. You can search a few hand-picked folders - even within zip archives, or whole networks, and even refine search results.
You initiate a search using Tools | Find files command. The ensuing dialog (figure 16) is strikingly simple considering the amount of information it conveys. Broadly speaking it is divided in two sections, the search context that specifies where to search, and the hyper-filter that controls what to search, the parameters of the files that will be considered positive hits.

By default the search context is the folder you were browsing when you issued the <Ctrl+F> find command. You can also specify broader contexts using the Special folders drop down box. The Look in box itself accepts multiple comma-separated folders; e.g. typing C:\ , d:\temp will instruct xplorer² to search both these folders. You can also exclude folders using a leading minus sign, e.g. C:\, -*temp* will search all C:\ except any folders with "temp" in their name.
Usually you will want to search all the subfolders below those specified in the Look in field, as long as Search subfolders is checked. You can also control the traversal method: Depth first will favor files in deep subfolders whereas Breadth first will scan the folder tree in layers.
If Archived content is checked, xplorer² will step into zipfolders, FTP sites (if supported) and pretty much any other unusual folder that comes in its way. You can use all stock columns and even search for contained text just like in regular folders. The down side is that searches become much slower, so only check this box if you know your target file is within an archive.
By checking Local search, you instruct xplorer² to search within the files already contained in the scrap window, possibly inserted by an earlier find command. This essentially refines the search. A similar result can be achieved using Mark | Matching a rule command.
When it comes to defining the search parameters, you are really spoilt for choice. The search hyper-filters defined in the dialog comprise:
You can define hyper-filters with as few or many criteria as you want. You can go from a nearly empty filter (e.g. all fields clear except for Folders box that will find all folders) all the way to any arbitrarily complex filter with tens of rules combined in boolean contexts. Only items that match all aspects of the filter are considered hits.
| NOTE: The more rules in a filter, the longer it will take to process it for each file. Some columns (e.g. checksum) or text searches are the most time consuming. Still xplorer² checks easier rules first and leaves slow ones for last, optimizing searches as much as possible. Users needn't worry ordering the rules, this is done automatically. |
Whereas in windows explorer (and all other file managers) you can only search for sizes and dates - in addition to usual names and contained text - xplorer² takes advantage of all available columns and does so in a boolean fashion. This allows you to search for text within comments, MP3 tags and pretty much everything else you know about your files and folders.
You can add, edit, reorder and delete rules using the toolbar on the right of the Additional rules list box (figure 16). All the usual keyboard and mouse commands are also recognized within the list. Each rule has a descriptive text and an icon reflecting its boolean context (see below).
Searchable file properties (aka columns) belong to three broad categories: dates, numbers and text. This determines how the properties are interpreted & searched, whether ranges are possible, etc. The rule definition dialog for a date (Modified) property is shown in figure 17. As you browse the Properties drop-down box, the middle part of the rule definition dialog changes to reflect the property type.
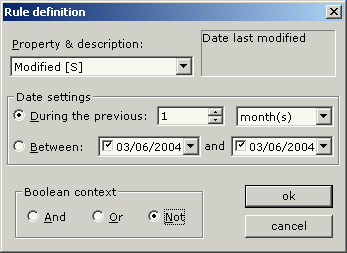
As you can see, date properties can be defined as periods from the present (During the previous) or as ranges (Between). Leaving any end of the range empty (unchecked) removes the respective date boundary. For example if the low end of the Between range is empty, the rule will match any files that are up to the date specified in the upper limit box.
Number properties like Size are also defined in ranges between a Minimum and a Maximum value. Leaving any end of the range empty (note: not zero but no text at all) again means a number up to or at least, for the low and up bounds, respectively. If you are after an exact number, make both minimum and maximum identical.
| NOTE: The units of number properties depend on the property type; Size properties count bytes, Page property counts pages and so on. If you need to work with larger numbers you can pick one of the listed units (kilo, mega etc). For example, if you select kilo, and enter number 3 it will correspond to 3K - equivalent to typing 3072 flat. A special unit called minutes is useful for matching media duration, e.g. MP3 music track length. |
The third and final property category is plain text. Columns like Comments or Owner are text, failing to fit in any other category. You search text properties like you search for text in files: just type part of what you are after in the Find box - you don't need to know the exact phrase of the column. All searches are case insensitive. Wildcards (* and ?) are supported unless you tick the verbatim option. Advanced string matching is possible ticking the Regular expression option.
| ADVANCED: Each text rule can contain many comma-separated substrings combined in boolean expressions as in find text in files command. For example, since the Attribute column is a string that contains letters A, H, S, R etc, searching for +A, -H within file attributes will match files that have the Archive but not the Hidden attribute (note the use of + & - to assign the boolean context for AND and NOT respectively). You can also use the $xx notation to search for non-printable characters using the hexadecimal ascii code xx. |
The Boolean context options in figure 17 determine how each rule is combined with the existing rules in the hyper-filter. All And rules must be satisfied, at least one of the Or rules and finally none of the Not rules. If you are not familiar with boolean algebra, just leave the default And button checked. If on the other hand you are familiar, you can have field day playing with hyper-filters!
Let's have an example. Say you want to find a file whose size is either smaller than 1K or above 2K but not inbetween. The simple solution would be to use two Or rules, one searching for files up to 1K and another one above 2K. Or you can use your boolean skills and define a single rule that says: Not "size between 1024 and 2048". Isn't this time-saving?
| WARNING: As always, increased power must be accompanied with extra care to avoid subtle error conditions. xplorer² will try its best to validate rules but it is not fool-proof. For instance it will allow you to set two contradicting rules (e.g. size less than 1K and size greater than 2K) resulting in a filter that will never be satisfied. |
You can save hyperfilters for use in future search operations.
Searches can take a lot of time to complete. As soon as you initiate a search, a scrap window opens and shows matching files and folders as they are discovered. An active message pump allows you to start working with the first matches immediately, while the search is ongoing. You can abort a search by pressing the <Esc> key.
| NOTE: A running search command slows down both the scrap and the main window. Sometimes it will be better to Window | Clone a new main window before you start a search. This clone will run in its own thread and will be relatively unaffected and more responsive to user input. Still you should beware the windows OS limitations described under file transfers. Sometimes patience is the best policy! |
You can check the progress of a search either by noticing the folder being scanned on the statusbar, or use Tools | Search status for a more detailed report, including all the folders that have already been examined, information about errors or exclusions, etc. This information is available even after the conclusion of the search.
| ADVANCED: There are two ways to exclude folders from being searched. One is to use the leading minus (-) notation mentioned in the Look in field. A more permanent solution is to make a folder blacklisted, and the find command will never get into it. You achieve this by entering the folder's full path under the registry key HKCU\Software\ZabaraKatranemia Plc\xplorer2.global\Find Blacklist. This list has some common troublemakers in by default. You can add and remove folders from this list at will, but first you must quit xplorer². If you are unfamiliar with registry editing you should not attempt this, since you risk rendering your PC unusable! |
If you repeat a certain search often it makes sense to keep it for later. Once you search using <Ctrl+F> use Tools | Save search menu command in the scrap window to save the last search scope. This includes all the properties of the search dialog (figure 16): the starting folder, the search context (e.g. search subfolders and other flags) and the search filter. To repeat a search saved earlier, open a scrap window and use Tools | Recent search menu.
xplorer² installer registers the .X2FND extension for saved search files. So another way to start a saved search is to double click on a saved search file.
If you have windows XP with desktop search 4 installed, or windows vista and later, xplorer² ultimate edition can tap in the fast searches available in windows explorer, querying the indexing server directly. You will notice a substantial speed increase especially if you search for text in the file contents.
You don't need to do anything special to take advantage of this integration; when you press <Ctrl+F> to start a search in many situations xplorer² will automatically retrieve results quickly from the system index in phase 1 of the search. It will then pause and allow you to review the results. If you think the file you wanted wasn't found just click on ROBUST SEARCH button to continue with xplorer² robust (albeit slower) search.
There are a few limitations to keep in mind. Searching for text in files will only find whole words and not partial keywords. You can't search for special characters like brackets or quotation marks (they are ignored). xplorer² will not use the indexing server in the following occasions:

A simpler way to access the system index is Tools | Fast search menu command. Instead of defining detailed search rules, you just type a keyword. xplorer² then starts a search under the current folder for any file or folder that contains this keyword in its name, text contents or any other searchable property (e.g. tags or author). Again note the limitation that only alphanumeric keywords can be searched (no symbols); text in the middle of the word cannot be found either (e.g. right will match a file containing right or righteous but not copyright - as in all internet searches). If you type more than one keyword then all the words will be matched - in any order.
The ultimate edition has yet another way to find files fast by Name. If you search only by name, and if you are looking for files in a local hard disk, xplorer² will use the NTFS Master File Table (MFT) to find the results very quickly. To use this mode you must be running with full administrator privileges.
Despite their expressive power, fumbling with hyperfilters and text rules can be too time consuming. Quick search (Mark menu) is a convenient shortcut that selects files that contain a phrase, either in their content or in some text column, including filename. It is a local search mode (scans items already in the pane) equivalent to a hyperfilter with one rule per text column, each matching your phrase in a boolean OR fashion (i.e. any one match will be enough); if no column matches the phrase the command searches the text within the file. This latter stage can be skipped if not required, hitting <Esc>.
Quick search will only scan columns that are visible in the active pane. To make the most of this command you may have to activate a few interesting columns, e.g. Comments, Version information etc, depending on your context.
| TIP: A quicker way to use quick search is to type your phrase in the addressbar, beginning with a colon, e.g. : your_phrase and press <Return>. If instead of marking you want to filter the matching items (hide everything that doesn't match), type your text and press <Shift+Return>. Stored hyperfilter names are also understood if enclosed with curly braces, e.g. :{saved_filter_name} is a valid input |
In a sense, most of the work you do in xplorer² involves finding, filtering and selecting items, before doing something with them. The edit box next to the addressbar is a convenient way to do all these things from a single tool, extending the quick search feature mentioned above.
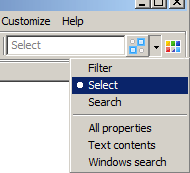
Using the above context menu you switch among the different modes of operation (filter, select and search). Type part of the word you are looking for and click on the toolbar button (or press <RETURN> key) to activate the tool. You don't need to use wildcards, just plain text will do. The text is normally matched against the filename (plain mode), but you can also tell xplorer² to search in All properties (columns) or even in the file Text contents to find the match.
When set in filtering mode (plain filename), you can immediately see the results as you type. xplorer² will gradually show less and less items in the active folder pane, so you can quickly find the item you are after. If you do a mistake, delete a few letters to show more files in the pane. xplorer² will automatically jump to the quick-filter box if you start typing anywhere within the folder pane for more convenience!
Finally when set to search mode, a new window opens to find matching items in the current folder and its subfolders. If you have the ultimate version you can tick on Windows search option to pass the query to windows desktop search for faster results. If you do a simple search for filenames only, then the first few search results appear in a popup mini-search window, for immediate use. You can open documents, open their containing folder using the context menu, or click the footer for robust search, which will do a regular full scale file search.
The color tag filter button to the right of the mode selection drop-down button, is another way to quickly filter files based on their color tag. Please see the following section for more details.
Sometimes you need to mark a file for later processing. One way is to place the item in the mini scrap pane. Another possibility is to color tag it, so whenever you browse its container folder it will stand out with a color border drawn around its name. Likewise you can color tag a folder in the tree pane, making it easier to locate. Color tags are set through the context menu:
There are three predefined tag colors to choose from, so you can color code your marked files and folders (you can add more colors with registry editing). These colors won't change the actual files in any way; you just use them to mark files for whatever reason you like. The color borders drawn around the names can be combined with rule-based color coding — but color tagging is much simpler and quicker.
| TIP: When a folder is tagged, its tab is also painted with the same color. Tagging folders is also possible by right clicking on a view tab. Using this trick you can make a tab stand out. |
You can quickly filter a pane (except the folder tree) to show only items tagged with particular color, using the color filter button in the addressbar, next to the quickfilter box. This color button opens a submenu with all the filtering options. This menu includes a Find tagged command that can show you color tagged files in other folders. In the tag search dialog first specify which colors you are after using the checkboxes, then state your search scope: do you want to search only below the current folder or everywhere?
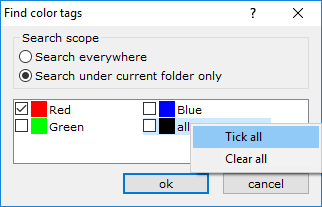
The tag search dialog is very fast but will only search for colors. If you want to combine colors with regular file attributes like names etc, use the find files dialog and add a rule on the color tag stock property. In this context tags are plain numbers in the order they appear in the color list (1=red, 2=green etc).
You can color tag any type of file or folder, even virtual items residing in zipfolders and other shell namespace folders.
| NOTE: color tags are rather fragile. If you rename a tagged file or move it to a different folder, the color information is lost. Likewise they are not very portable as paths in one computer usually cannot be found in another PC. If you need more persistent color tagging, consider the old "manual" method using file comments and color coding rules |
Searching Contents Programming
In spite of the drag-drop and click-happy era of file management we're living in, for some tasks you can't beat the efficiency offered by traditional command line execution of programs. In the old days, instead of clicking on icons to start a program, one had to type its path/name in a command processor window (DOS console). This may seem quaint and antiquated but it is very powerful since you can specify extra arguments that modify the behaviour of the program in question, specify which files to operate upon etc.
xplorer² brings the command line into the third millennium, easing its use while maintaining all its power and flexibility. If you are familiar with the DOS console, you can regard the active pane cum addressbar combination as a graphical console that shows the folder contents of the "current directory" at all times. As you browse folders the "current directory" is updated automatically, and the commands you type can access the folder contents directly.
You can start composing text commands using Tools | DOS command, or just get into the addressbar with <Shift+Tab> and type the special prompt $ character that instructs xplorer² to interpret the input as a DOS command - otherwise it could be mistaken for a folder path. For instance typing $ dir and pressing <Return> will execute the DOS dir command, producing the listing of the current folder's contents - arguably not the most useful command within x²'s context!
| NOTE: The commands you type correspond to names of executable files that exist on disk - minus the .exe or .com extension - and in the end of the day launch the respective application. So you must make sure you type the names correctly and that the files themselves can be located. If you have a program called windiff.exe located in c:\tools and you want to call it while browsing c:\work, then you must type its complete path in the addressbar, e.g. $ c:\tools\windiff. Alternatively you can add c:\tools to the PATH environmental variable and reference it just by name. |
Except for DOS commands ($-prompted) you can also execute generic windows programs using the special character >, e.g. typing > winword will launch MS Word. In this sense you have all the functionality of the standard Start | Run menu straight from the addressbar. This execution mode is mostly for programs that have their own user interface and don't need a console window for their output.
Except for launching both DOS and windows commands, the addressbar assists you during the typing process in a number of ways:
Commands launched from the addressbar normally apply only to the single focused item in the active folder view. If you want to apply the command to all the selected items use a double prompt character, e.g. >> or $$. This construct is a simple road to scripts without a dialog window.
Instead of typing specific filenames as parts of a command, you can use special characters that get automatically substituted with the name of the item(s) that happen to be selected when a command is executed. For example the commands $type file1 and $type $N are equivalent if file1 is the focused item in the active folder pane. Using special tokens like $N saves keystrokes and allows for reusable commands. So whereas $type file1 can only be used to type (show the contents of) file1, the version with $N can be used to type any file, as long as it is selected in the active view.
There is a variety of $-tokens, each representing a different part of the active item or even the all selected items taken as a whole. Let's use a hypothetical situation to clarify the meaning of each $-token. Suppose we have a dual-pane arrangement where the right view is active and the contents are:
The following table lists all the available tokens. The third column shows what each token would have been substituted for, given the above scenario. Unless stated otherwise all tokens act on the single focused (or active) item in each pane.
| Token | Description | Example |
|---|---|---|
| $N | Local filename | active.cpp |
| $B | Base name (before .) | active |
| $E | Filename extension (past .) | cpp |
| $P | Parent folder path | c:\work\c++ |
| $D | File modification date | 13/3/2004 10:12 |
| $C | Parent folder plain name | c++ |
| $F | Full path name | c:\work\c++\active.cpp |
| $U | UNC path name (network accessible) | \\comp\share\active.cpp |
| $S | All selected filenames | active.cpp file.txt |
| $A | All selected filenames (fullpaths) | c:\work\c++\active.cpp c:\work\c++\file.txt |
| $> | Like $A but selected fullpaths are saved to the list file %TEMP%\x2tmpList.txt and this file is used as argument | %TEMP%\x2tmpList.txt |
| $L | Left (top) pane path | c:\music |
| $R | Right (bottom) pane path | c:\work\c++ |
| $I | Inactive pane path | c:\music |
| $Q | Filename from inactive pane | titles.txt |
| $G | Path and filename from inactive pane | c:\music\titles.txt |
| $Z | Temporary filename extracted from zipfolder, FTP, etc Within normal filesystem folders it behaves like $F |
%TEMP%\x2TMP_001_active.cpp |
| $nn | Automatically incremented counter starting from number nn Possible counter formats are $1 for the sequence 1,2,... $001 for 001,002,..., $5 for 5,6,... and so on | 01 |
| $[s:l] | Extract part of the filename starting at s and for l letters $[4:3] will extract 3 letters starting from character 4 Use a negative start to count from the end of the name | ive |
| $? | Asks for an argument | (whatever you type) |
| $$ | Escape for a single $ | $ |
Many of these tokens are intended for renaming large numbers of files, as they are used in File | Mass rename command. But you can use them for any other purpose too; just type as many tokens as necessary in a single command and they will all be substituted according to the above rules.
You may have noticed that all tokens were listed in uppercase. If you type a token in lowercase then it is interpreted in a slightly different fashion, using the short 8.3 version of whatever name the normal uppercase token would have produced. To clarify, had $N corresponded to undocumented.h the lowercase $n would have resulted in UNDOCU~1.H, which is the equivalent old DOS filename.
Another kind of token can be used to extract the text of a particular file column. The generic format is ${column_name}, e.g. ${size} will fill in the file size as it appears in detailed view mode. You can use any of the available columns, which comes handy for mass renaming as e.g. you can use MP3 tags as part of the filename - just make sure you don't use any columns that may insert characters invalid for filenames as * or :.
| NOTE: The addressbar in scrap windows also supports command execution. The only difference is the concept of the "current directory". So whereas in normal browser windows the current directory is synchronized with the active folder, scrap windows contain files from many folders and as a result there is no current directory in the DOS sense. Therefore you should only use tokens that carry full path information, e.g. $F instead of $N, otherwise you may have problems addressing the intended files. The tokens $L, $R and $I don't have any meaning for scraps altogether. |
Most DOS commands don't have a GUI of their own and rely on the console window for their output. This is the traditional black & white system DOS box, which is rather awkward to use. The "pro" version comes with a substitute console that is nearly equivalent in functionality and much easier to work with, e.g. it can mark and copy text like a normal editor window, search for text, etc.
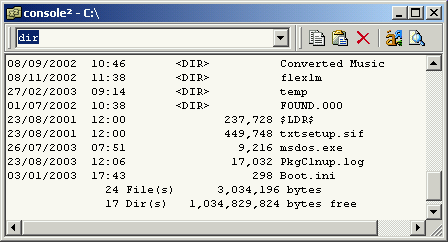
This modern version of the DOS console automatically follows the browser window, changing its current directory as you browse folders with xplorer². The working path is shown on its title bar. It receives the output of all $-prompted commands issued from the addressbar and from command scripts, too.
You can also type commands directly in the console window - that's the purpose of the input field shown in figure 18, as well as deliver input to running programs (e.g. Y/N responses). This input area supports path autocompletion with F1 and maintains a history of past commands too.
If despite all the extra functionality you prefer the traditional DOS console, you can disable it from Tools | Options | General. Note that in such a case you'll get a separate console for each command you execute.
Commands launched from the addressbar operate only on the single focused item within the folder being browsed (unless a double prompt as >> is typed as discussed above). In some occasions you may need to apply the same command to a number of files as for instance for batch conversions of MP3 files. For this task it is more convenient to use Tools | Command script to treat all selected files in one stroke.
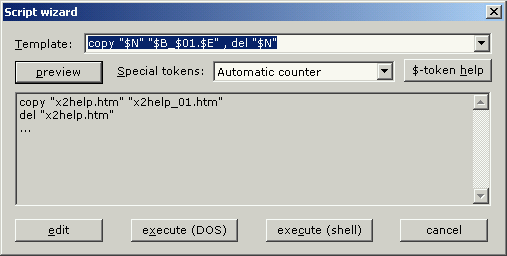
In this dialog you specify a command Template that will be applied to each and every selected file name. The syntax is identical to the addressbar commands, using the familiar $-tokens instead of actual file names. Command templates may contain multiple comma-separated commands as the above snapshot illustrates.
The script generator replicates the command template for each selected file in succession. Plain text parts are reproduced verbatim and $-tokens are replaced on a per-file basis. If you have 100 files selected then 100 sets of commands will be generated, effortlessly. Let's have an example using the template ren "$N" "$B_$01$$.$E" on a selection that comprises 2 files, x2help.htm, x2help.ccs.
This template has four special $-tokens, N for the whole name, B for the base, E for the extension and an automatic counter starting from 1 with a leading zero ($01). The double dollar is an escape for a single $. For each file the generator copies the constant parts of the template including spaces and quotation marks, and substitutes the variable parts using the file in question. For our two files this translates to (notice the counter in the second line):
ren "x2help.htm" "x2help_01$.htm"
ren "x2help.ccs" "x2help_02$.css"
| NOTE: The use of quotation marks around the filenames covers for situations where names contain spaces. An alternative is to use lowercase token versions like $n that are guaranteed to be free of spaces, albeit rather mangled. |
Once the script is generated, there are a number of alternative modes of execution, each activated by a dialog button:
You should note that the wizard is merely manipulating strings and is oblivious about their meaning or command syntax. If you make any mistakes you will notice during execution!
When executed from the command line xplorer² accepts a number of optional arguments that control some aspects of the program. The complete command line is:
xplorer2.exe /F:n /P /R:rootFolder /S:registryKey /L:searchFromFolder /I:settings.REG /M /1 /2 leftFolder rightFolder
All arguments are optional and are described in the following table. The last two arguments - without the / switch character - specify starting left & right pane folders for the main window. These can also be the names of folder groups saved in Customize menu if you want to reinstate a particular set of tabs upon startup.
If you start with a scrap container (/F:1 switch) leftFolder can be a cida file or a name of a folder to flatten.
| Switch | Function |
|---|---|
| /F | Starting window type. By default a normal browser window is opened, equivalent to /F:0. If you want to start with a scrap window use /F:1 |
| /P | By default xplorer² runs in a system resource-friendly single process mode, even when you launch separate instances. Using /P you force new instances to open as separate processes. |
| /R | Roots the program on a folder other than the default desktop. For instance /R:c:\winnt will force both the tree and view panes on c:\winnt and won't allow users to reach other parts of the namespace unless underneath the root node; e.g. d:\ will be off-limits whereas c:\winnt\system will be accessible |
| /S | Registry key extension for storing program options. The default key is HKCU\Software\ZabaraKatranemia Plc\xplorer2 but you can have multiple parallel keys with different options. Keys can be changed dynamically with Window | Save layout menu. For instance /S:preview will load options from the key ...\ZabaraKatranemia Plc\xplorer2.preview |
| /L | Causes a scrap window to issue a "Find Files" command when it first comes up. The search is rooted at "searchFromFolder"; alternatively it could be a saved search .X2FND file. Can only be used in conjunction with /F:1 |
| /M | Does not allow window to open in minimized mode on startup |
| /N | Do not restore slow folders from last session (e.g. network) in case they are unavailable |
| /1 | Forces single pane mode |
| /2 | Forces dual pane mode |
| /T | Doesn't restore folder tabs on startup (by default you get all tabs reopened - as you left them at last use) |
| /D | Force xplorer² to nag you for a registration key |
| /I | (portable version) Initialize registry with a custom settings file. The settings file should be in the same folder as xplorer² and be created with Actions | Extract settings on your "home" PC. For ultimate version this can also be a INI file bypassing the registry |
| /E | Run in windows explorer replacement mode |
| /Z | Silently start and stay in the background without a window |
| /B | Execute one of the saved macros (see Customize | Macros menu) when xplorer² starts. For instance "/B:sample macro" will launch the saved "sample macro" (assuming the name exists). This switch is useful for automating tasks using the task scheduler |
You can take advantage of these options by creating a desktop shortcut for xplorer². Using the property page, add the required arguments in the Target field, past the executable name. The above snapshot illustrates a shortcut that launches the program using the options /1 c:\, which means start with a single pane and browse folder c:\.
DOS commands Contents Customization
One step up the ladder from DOS scripts, come user interface macros and file property algebra. These advanced topics are closer to computer programming than casual file management, but they don't require a degree in computer science to take advantage of. If you are used to MS Excel cell expressions, you should get the hang of it quickly. Note that xplorer² doesn't offer a fully scriptable programming model with file and user interface objects, but a simpler macro language for user interface elements, that should be within the reach of xplorer² medium-to-advanced users. As for the programmers amongst you, I refer you to the windows scripting host for the full monty <g>
| TIP: There is a much easier way to automate xplorer² with macros, using the macro recorder. |
A simple in-app "programming language" allows you to automate many program tasks. It is not a full blown scripting language (as e.g. the one in MS Excel) but it is surprisingly versatile and easy to use. You write scripts, that is sequences of simple text commands that manipulate the program window as if a robot was in control. You can do these sorts of tasks:
All in all you can do whatever any user could do using the keyboard and the mouse to operate the program, only do it in a tightly controlled fashion. You can string commands together that operate on a series of dialogs to achieve complex results. Here is an example script:

COMMAND "copy to"
WAITWND
FINDWND filter
FINDCLASS combobox
SETTEXT *.pdf
OK
As you can tell from the command names, this macro is equivalent to clicking on the Copy To toolbar button, waiting for the dialog to appear, then finding the Filter box and setting its value to "*.pdf" ; and finally "clicking" the OK button to start copying the files with the selected options (only PDF files will be copied).
Press <F12> key to start the macro editor (or use Customize | Macros | Edit macro menu), then copy/paste the above script, then click Run button to see it working. When a macro is running you cannot work with the main program window. A macro control window appears on top of other windows that shows the progress of the execution. To abort a macro mid-way through its execution click on the Cancel button.
| NOTE: While a macro is running you should not switch to another window or application, otherwise the macro will probably fail. Nor should you interfere with random clicks or keypresses. Just hang in there till the macro is finished! |
Each line of a macro contains just one command and its arguments, if any. For example:
COMMAND "copy to" # start the copy to dialog
COMMAND is the reserved command name that tells the macro what to do, "copy to" is the argument (which program command to execute), and the rest is the comment. Comments are ignored by the script but help you to make sense what each command is doing. Inline comments begin with the hash # symbol.
Arguments are necessary for many commands. They are usually constant text strings as the name of the toolbar button you are trying to click. Use "quotes" whenever you have spaces in arguments (many words). Arguments can also be numbers e.g. 32793 is the equivalent identifier for "Copy to" toolbar button (use Help | Command finder menu to find numeric equivalents to commands). Most of the time it will be easier to use the text label, but sometimes there will be no alternative than to use the number, e.g. for hidden commands. Arguments can also be variables, which will be discussed below.
| NOTE: Commands should be searched as they appear in xplorer² menus or toolbar. If you are using a translation, search commands in your native tongue. |
Many commands return a value, e.g. FINDWND returns the handle to the window found. You don't see this result immediately but it is stored in the last result register ($0). Subsequent macro commands may rely on the previous result to function properly, e.g. CLICK needs a window handle found earlier. The last result is piped from one command to its successor automatically.
9 elementary variables are supported to be used as arguments, called $1 to $9. Most of the time you will use $0 if you want to visualize the result of the last command (MESSAGE $0).
The most important operations you will be using all the time is finding control windows (buttons, edit controls etc) to operate, and issuing message commands (using menu or toolbars) to the program — using FINDWND and COMMAND respectively.
If you are familiar with windows programming, you will know that each menu command and toolbar button appearing in a program's user interface correspond to a message number. Likewise, controls that appear in dialogs have an identifier number. For instance 32793 is the message number corresponding to "Copy to" toolbar button; and the OK button in most dialogs translates to number 1. Unless you are a big time geek <g> that can use Resource hacker or Spy++ you cannot be expected to know these numbers!
Laymen needn't worry. Instead of fumbling with cryptic numbers, you can use the text that appears on a menu, toolbar or dialog button to tell the macro which command you are after. Take note which text appears on the menu command you want to issue, and use it as the argument to COMMAND. For toolbars use the tooltip if the button you are after has no text showing. It is best to use the full command text as it appears in the GUI, which will ensure that the intended command will be issued. Partial names can be used too, but keep in mind that the first matching name will be used, which may be some other command or window!
| TIP: When troubleshooting macros, insert a MESSAGE $0 instruction under a FINDWND or COMMAND. This will show you which window or command was found ($0 is the last result variable). Once you are done debugging you can delete or comment out these MESSAGE $0 instructions. Alternatively you can run the macro in debug mode where you single step the execution and see detailed information about each command, see which window is operated upon etc. |
Finding buttons on dialogs is easy, just use the name of the button with FINDWND. Other controls have some descriptive text label before them, which may be used to locate the control. Sometimes a control has no useful text or label; in these cases locate the control nearest to the unlabeled one, then move forward or backward with NEXTWND or PREVWND instructions till you hit the desired dialog control. The directions "forward" and "backward" correspond to the tab order in the dialog — or in plain english, what happens when you press <TAB> key to move around in a dialog window.
| TIP: When searching for commands and windows, keep in mind that the search is within the active window. If no dialogs show, that means the main program window; if a dialog is showing, the search is within the dialog controls. Use the wait instructions (e.g. WAITWND) to make sure the window you want to manipulate has had time to show up. |
When you first start working with macros, inevitably you will make mistakes. For example you can misspell an instruction name or forget a necessary argument. In that case a syntax error will result and the macro editor will highlight the token that caused the trouble. Here are some pointers to keep in mind:
Once the basic syntax is correct, you can try running the macro. Here you may encounter subtle problems that will cause execution errors. The macro will stop, highlight the command that faulted and show an error message. Here are the runtime error codes explained:
Error code 2 (wrong argument) is raised also when an instruction cannot find the correct last result from the previous command. For example you cannot use CLICK without a preceding FINDWND. Most commands that operate on dialog controls require a window handle in the last result $0.
When you get an unexplained error 3 (not found), it could be that the dialog didn't have time to appear. If you use COMMAND and expect to operate the dialog controls, use WAITWND to make sure that the dialog is visible before you start manipulating its controls. FINDWND instruction is searching the dialog that is currently active (excluding the macro dialog itself).
Finally you may realize that a running macro is doing crazy things that were not intended. In that case click on Cancel button to abort the macro execution.
By default all execution errors are terminal and stop the macro dead. However you may want to take responsibility and manage the execution despite previous errors. For example, if a control cannot be found you may want to try to search for another. If you want to ignore all errors, use the instruction: ERRORSTOP 0.
Once you turn off the automatic error handling, the last result $0 variable will reflect the execution status of the last instruction. You can test for success using the JUMPOK instruction, which will jump to a label (i.e. move the point of execution) only if everything goes well — otherwise the instruction immediately below it will execute. Here's an example that looks for a window called test and stops execution manually if not found:
ERRORSTOP 0
FINDWND test
JUMPOK found
MESSAGE "window not found"
EXIT
LABEL found
CLICK
Using conditional jumps and GOTO instructions you can modify the order that script lines execute. Instead of linearly executing all lines in sequence, you can jump to earlier or later lines depending on your logic. Jump destination points (LABEL) can be any text you like to make sense of your script. If you have multiple jump points, make sure each label gets a unique name.
Simple loops are also possible using a control variable as a countdown counter, as such:
POP 5 # repeat 5 times
STORE $1
LABEL repeat
MESSAGE $1
DECR $1
JUMPOK repeat
# end of loop
The trick is that DECR instruction updates (decreases by 1) the counter variable $1 and the last result, so when it reaches zero, you break the loop (JUMPOK fails). Also note the roundabout way to initialize the counter variable using POP then STORE.
The macro composition dialog has a listbox with the most common commands so you don't need to remember the names. Below you will find the full list of supported macro instructions and their expected arguments.
A typical instruction accepts a single argument, but there are some that apparently work on thin air without arguments. This is because they use the result of the previous command as their argument — this is called pipe argument. For example CLICK operates on the result of an earlier FINDWND command. If a command fails the result is zero (void).
Arguments can be either constants (strings or numbers) or variables ($0 to $9). Variables represent strings, numbers or window handles, depending on what is stored in them. The last result is kept in variable $0. Unless otherwise stated, the following table uses name for either a string or number, furnished either as a constant or variable.
| Instruction | Argument | Pipe arg. | Result | Description |
|---|---|---|---|---|
| FINDWND | name | window | Find a window by name on it or next to it (if labelled). Searching for part of the name is ok if you are sure that it will uniquely match the window. Also finds by window numeric identifier. The search is in the topmost active dialog or the main window. FINDWND 0 returns the currently active dialog. | |
| FINDCLASS | name | window | window | Find a window by its exact class name (e.g. edit, button etc). If the prior result is a window, it finds the next window of the same class, if any, possibly cycling from the top. |
| FINDFRAME | title | window | Find a top level window by its titlebar text and switch to it (make it active). The window must be selectable, e.g. not blocked by a modal dialog. | |
| GETFOCUS | window | Returns the active window (where you last clicked). | ||
| SETFOCUS | window | Activates the window | ||
| NEXTWND | window | window | Returns the next window in the tab order | |
| PREVWND | window | window | Returns the previous window in the tab order | |
| CHILDWND | window | window | Returns the first child window (of whatever was found earlier) | |
| PARENTWND | window | window | Returns the parent window | |
| CLICK | window | Clicks on the window found earlier. May fail if the button is disabled | ||
| CLICKDEF | name | window | Executes the default accessibility command for child name (if using a number, start from 1). This is for non-standard buttons that don't have window handles (exposed through MSAA). For many standard controls it's equivalent to double-click on a list item. | |
| SETTEXT | name | window | Sets the window text to name. Only meant for edit controls and combo boxes. | |
| GETTEXT | $var | window | Gets the text of the last result window and stores it in variable $0 - $9 | |
| GETCOUNT | $var | window | Gets the number of items in listview control and stores it in variable $0 - $9 | |
| GETITEMTEXT | index | window | text | Extracts individual item text from windows like listview controls. Items should be specified by a number from 1 to GETCOUNT. |
| SELECT | name | window | Selects an item in a combo, list or listview control either by name or by number (1 → max items present). SELECT 0 will unselect everything | |
| GETSEL | $var | window | Gets the selected item number in selectable controls and stores it in variable $0 - $9 | |
| SETCHECK | 1/0 | window | Checks or clears a checkbox or radio button, if enabled. Special value 2 means flip previous state | |
| OK | Terminates the active dialog. It is a combination of FINDWND "ok" followed by CLICK. It may fail if the dialog won't close due to validation errors. | |||
| CANCEL | Simulates pressing ESC key. If a dialog is active this will be equivalent to clicking on Cancel button | |||
| COMMAND | name | help text | Issues a program command (WM_COMMAND) by number or by name. It is equivalent to using a menu command or toolbar button. Searching by name is more intuitive; it finds the command from a menu or toolbar that corresponds to the (partial) name. For toolbar buttons without names use the tooltip (popup) name. If the active window is a dialog, it finds the named button and simulates a click. If the command is disabled (e.g. ghosted toolbar button), it fails. If successful, returns the explanation text of a the command issued (use MESSAGE $0 to see it). | |
| CMENU | name | window | number | Simulate a context menu (right click) on the window last found, and find the menu command that corresponds to name. Returns the command identifier of the menu item found. Can be used for the shell context menu or any other background menu |
| WAITWND | Wait till the active window changes, e.g. a new dialog window opens | |||
| WAITIDLE | Wait till the active window finishes processing the last command. | |||
| WAIT | period | Wait a fixed amount of time in milliseconds (1000 = 1 sec). The argument may also be a window handle in a variable, where it behaves like WAITIDLE for that particular window. | ||
| ERRORSTOP | 1/0 | Turns the "resume on error" policy on/off (default is to stop on any error). | ||
| LABEL | name | This instruction doesn't do anything but marks the destination of a jump/goto instruction | ||
| GOTO | label | Unconditional jump to label name | ||
| JUMPOK | label | any | Conditional jump to label name. Checks the result of last command and if it is failure/empty/0 then does nothing. So it only jumps if the last command was successful | |
| JUMPERR | label | any | Conditional jump to label name. Checks the result of last command and only jumps if it was 0/failed/empty — the opposite of JUMPOK | |
| EQUAL | name | any | 0/1 | Compares its argument with the last result. If the 2 values are compatible and equal, the result is 1, else 0 |
| DECR | $var | $var-1 | Decreases the variable ($1 - $9) by one and updates last result too. Used for loop control. | |
| INCR | $var | $var+1 | Adds 1 to a variable ($1 - $9) and updates last result too. | |
| MATH | expr | number | Calculate the expr argument and store the integer result. Allows performing simple integer arithmetic e.g. ($1+3)/2 | |
| POSITIVE | $var | 0/1 | If variable is positive (>0) returns 1 else 0. Meant for integers mainly. | |
| EXIT | Stops execution; any instructions below this are ignored | |||
| JSR | label | Unconditional jump to label name as a subroutine. There is no stack and no nesting is supported. Use regular $0-$9 variables for information exchange | ||
| RET | code | =code | Resume execution at line following the last JSR instruction. Used to return from a "subroutine" with a code inserted in $0 | |
| MESSAGE | name | Pauses execution showing a message. Debugging aid mainly used to visualise the result of the last command as MESSAGE $0 | ||
| ADDSTR | name | old | old+ name | Adds name to the old string result. If you need a newline use "\n". Intended for composing longer messages. With an empty argument it resets (empties) the string result. |
| CHOPSTR | format | full | part | Splits the last result string into tokens and returns one of them. The format argument includes the split character and the substring number to return. For example \2 would separate a path on \ points and return the second part; \t-1 would split on tab characters and return the last part (negative numbers count from the end) |
| REM | any | Comment line that doesn't do anything but explain something. For inline comments use # | ||
| INPUT | prompt | text | Pops up an input dialog where you enter a string, which is then stored in the result. Prompt is used as the question to ask. Tip: use INPUT 0 to import the text from the clipboard. | |
| STORE | $var | any | Stores the last result in a variable $1 — $9 for future use | |
| POP | any | =any | Copies the constant or stored variable into the $0 register to be used in a subsequent command | |
| SENDKEY | keys | window | Send keyboard input to a window. E.g. CTRL+LEFT will send a combination of control and left arrow keys. Most special keys are recognized by name (see VK_xxx names), and for the rest you can use the equivalent virtual key code number, e.g F1=112 (from hex 0x70) | |
| KEYDOWN | key | Simulate a single key press down (and hold). Unlike SENDKEY a window target isn't required as pipe argument, the key goes to whatever window has the focus. Can be used to simulate <SHIFT> combined with button clicks in dialogs. | ||
| KEYUP | key | Simulate a single key release. Each KEYDOWN should have a matching KEYUP or the keyboard will go funny. | ||
| NOPOPUPS | 1/0 | Turn silent mode on/off, i.e. don't show any of the dialogs that would normally appear during macro execution. This mode is on by default if you repeat a macro. | ||
Harnessing macros will take some practice. Below you will find some sample macros you can play with. Try running them in debug mode (line by line) to see what they do with xplorer². Observe the inline comments for extra explanations.
⊕ Click here to show sample macros →
If you don't need the full power (and learning hassle) of the scripting language, you can record simple macros pressing <F12> key to start the macro recorder (or use Customize | Macros | Record macro menu command). Use the mouse and the keyboard to do what you like (issue commands, tweak dialog controls and buttons, etc), then click on FINISH button to stop recording. The equivalent script representing your actions will be generated automatically and presented to you, just as if you had typed in the instructions.
The recorder will only generate plain macros, and the resulting code looks spaghetti, but it should be adequate for the average macro requirements — and you don't need to do any "programming". If you start the recorder and click Finish immediately, without any actions, you will be presented with the last macro used.
You may be familiar with DeskRule's desktop detective panel that enables searching with combinations of file properties and attributes. xplorer² (ultimate edition only) new programmable column is an extension to this concept: it allows you to combine file properties, boolean and arithmetic operators and a few functions into expressions, whose result is the value of the Programmable [S] stock column. This result can be then used as any other column, for display, sorting, filtering and searching for matching files. It is really versatile and the possible uses are too many to enumerate — just use your imagination!

To define or change the programmable column, right click on the detailed view column header row and pick Programmable from the menu. This will allow you to change the expression and will show the programmable column too. The programmable column definition dialog has boxes that guide you to create expressions, and it also supports autocompletion of file property names for the more experienced users. If something goes wrong, it will pop a syntax error with the likely error location.
All file properties (columns) can be used in the calculations. The rules can also search in files (GREP function) and extract specific file bytes (FBYTES function). The result of the expression can be either text or number or even a date, depending on the properties and operators used. If you use conjunctions of boolean operators, the result will be 1 or 0, for true or false respectively.
|
NOTE: programmable expressions are not programs. The expression can be as long as you like but it is evaluated as a single line of "code". Think of cell expressions in MS Excel =SUM(A1:A5) |
You can save expressions you use frequently by supplying a name in the Predefined box in the above dialog and clicking Save button. This is similar to storing hyperfilters for search commands. Then expressions become available for future use from the history drop-down dialog control.
This dialog allows you to do amazing feats which would normally require you to write a program or advanced shell script. You can combine any file property with arithmetic (add/subtract/multiply etc), relational (equal, greater than etc) and boolean operators (and/or etc) to create arbitrary expressions that can be evaluated for each file. For example take the expression:
(${Modified} > ${Created} + 2) & ${Size} + 5KB < ${Size on disk}
It will match files whose modification date is later than the creation date + 2 days, and (&) their reported size plus 5 kilobytes is less than its total size on disk. When you become familiar with the "official" property names and operators, you can type such expressions manually (press <Ctrl+DownArrow> key to autocomplete properties), or you can use the dialog drop-down lists to help you compose a complex rule with properties, operators and functions. A few clarifications are in order:
| TIP: Sometimes it is hard for the program to automatically fathom out a regular expression or differentiate it from a wildcard, if there are not enough special characters present. In that case, to force a regular expression enclose it all in brackets e.g. '(a.+)'. The meaning of the regexp will be the same and it will be unambiguously recognized as such. |
| TIP: If you want to use a string constant that happens to be a reserved function name, use quotes, e.g. len("len") is a valid expression that would return 3. |
| Function | Description |
|---|---|
| num=LEN(str) | Return the number of characters in string, e.g. len('abc') returns 3 |
| substr=MID(str, nStart, nLen) | Extract a substring out of a bigger text string, starting at position nStart and extracting nLen characters, for example mid('abc12', 2, 3) would return the string 'bc1'. Can be also used to access individual characters if nLen is 1. |
| str=TRIM(str) | Eliminate whitespace around a string, if any. It cuts off any leading or trailing spaces, e.g. trim(' ab ') would return 'ab' |
| num=FIND(strHaystack, strNeedle) | Find a needle in a haystack and return the position of the first occurrence — or 0 if nothing is found. find(abc12,bc) would return 2. The search isn't case sensitive. |
| num=DPART(date,str) | Access parts of the date, e.g. dpart('march 2016', year) would return 2016. The second argument str can return other parts of the date e.g. month or day (or even just d). |
| date=DATE(str) | Converts text to dates. Usually this is done automatically; still this function can be used without an argument (DATE("") ) to return the current date and time. This can be used e.g. to calculate the file age in days. |
| str=DATETIME(date,dfmt,tfmt) | Format a date using separate date and time format strings. If you omit tfmt (3rd argument) no time will be shown. Format strings are the usual windows specifiers yyyy MM dd (see the documentation for GetDateFormat). |
| xxx=MIN(xxx,xxx) | Compare the two arguments and return the smaller one. This function accepts all kind of argument types (numbers, dates, etc) and returns the same kind. So min(-1,2) would return -1. |
| xxx=MAX(xxx,xxx) | Similar to MIN function, this returns the larger of the 2 arguments |
| xxx=IF(term, if_true, if_false) | Evaluates term and if it is true returns the second argument, else the third. The 3 arguments can be whatever makes sense for your conditional logic. term is true if it isn't empty or if it is non-zero. |
| num=ABS(num) | Returns the absolute value of a number, e.g. abs(-1.3) would be 1.3 |
| str=STR(xxx) | Convert any type of argument into a string, useful for passing dates and numeric variables to other string functions. It can also convert hex strings obtained by FBYTES into plain text |
| num=GREP(str) | Search file contents for occurrence of text (can be a wildcard). If successful a positive value is returned, else 0 if keyword is not present in file. |
| str=FBYTES(nStart,nLen) | Extract nLen bytes from file, starting at file offset nStart (beginning=0). The returned string is the hexadecimal representation of the file bytes. For example PNG files can be identified because FBYTES(1,3)="50.4E.47" (use a hex file viewer to understand why) |
| num=INT(xxx) | Convert any type of argument into a number; it can also convert hex strings from FBYTES if up to 4 bytes long. |
| substr=TOKEN(str, separ, nTok) | Break up a string at separ points, and return the nTok entry (1=first token, -1=last). Special separator values are " " to break at spaces, \n which breaks at newlines and \t that splits on tabs. Similar in concept to CHOPSTR macro instruction. Example: token("hello world"," ",2) returns 'world'. |
| stdout=SYSTEM(strCmd) | Execute DOS command strCmd and collect its console output. For example system('dir "' + ${path} + ${name} + '"') will execute the DIR command on each item (this example isn't particularly useful :). Note the use of 'single ears' to compose the command including the "double quotes" around the path name -- in case it contains spaces -- and the + operator used to compile the command string. With a little imagination it can be used as a poor man's (slow) column handler! Commands executed should be in %PATH% or full paths must be specified. External commands that don't write to a console (e.g. GUI programs) are not supported. |
| num=DIRCNT(wildcard, type) | Applies only to folder items and returns the count of direct subitems that match the wildcard ('*.JPG' will count all the JPG files, '*' will count everything; regular expressions allowed). The second argument can be files, dirs or both, to count items of the specified type (dir=folder). |
| xxx=FILE2(expr, path) | Calculate a complex expression on a different file path for comparison purposes. The expression can contain anything (except for an embedded FILE2) and must be included in a single "quoted" string, e.g. FILE2("GREP('hello world')", "d:\path\" + ${name}). If you need quotes within the subexpression, use 'single ears'. |
| xxx=FILEPROP(prop, path) | Fetch a certain file property from a different file path, for comparison purposes. For example ${Modified} > FILEPROP(${Modified}, "d:\path\" + ${name}) will compare the current item's date with its namesake in D:\path folder to see if it is newer. Note only a single property can be fetched, which should not be in "quotes" — but you can have multiple FILEPROP statements if required |
| path=PNEXT(num) | Returns the path of the next (num=1) or previous (num=-1) item, as they appear listed in a pane. This path can then be used in FILEPROP or FILE2 to fetch a property of a neighbouring item, e.g. ${size} - FILEPROP(${size}, PNEXT(1)) would calculate the size difference of 2 items (except for the last one in the list). PNEXT cannot be used for sorting or searching for items. |
| ok=EXISTS(path) | Test if a path exists. Return value is 1 if it is a file, -1 if a folder, or 0 if nothing exists. |
If there is some problem with the complex expression like a misspelled file property or an operation between incompatible arguments, xplorer² will report a syntax error, highlighting the trouble spot. Correct the typo and you are ready to search.
Sometimes a property name on its own can be a useful rule, e.g. ${Keywords} without any other operators will match files that have some tags defined. Or combine it with a leading NOT (!) operator to match files that do not have tags! Bare property names are also convenient for yes/no properties like ${IsFolder}, otherwise you must be careful to compare them only against zero (=false or no).
The programmable column is useful for many advanced search tasks, e.g. find pictures whose width/height ratio is 4/3. It will also allow general tomfoolery like (${Modified} - ${Date taken})/2 = ${Size}, which arguably is not much use <g>. A final note is that extracting this column is rather slow; the more properties you use in an expression, the slower it gets. If you use multiple properties in a search expression, use the faster ones like filename and size first, and leave the slower ones (e.g. GREP) at the very end.
Programming Contents Customer support
xplorer² helps manage the complexity of sequences of commands users may find themselves repeating time and again. It allows you to organize such tasks in user-configurable menus and toolbars, in a similar way Bookmarks are managed:
You only have to enter information once, and use it with great ease from that point onwards. In a sense these customized lists resemble various command history facilities dispersed throughout the program, but they are more persistent and easier to access.
You add new list items using the various Add new commands found in Customize menu. All entries have a title that appears in the menu or toolbar and identifies the command. The description field gets its meaning from the list type. For instance for Bookmarks it is the actual folder path whereas for Layouts it is merely a comment.
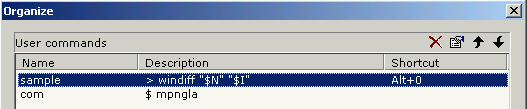
When you have many entries in a list it may pay dividends to Organize it, again using the respective command from Customize menu. Using the dialog in the above figure you can rename, change the definition (description), reorder, delete and assign icons and shortcut keys to list items. The toolbar on the top-right may have some actions disabled depending on the list type being organized.
When you double-click on an entry or click on the Properties button you can change an item's properties as for example the user command definition shown in the figure below. You can assign a keyboard shortcut which greatly increases the usability. The range of numeric keys 0-9 in combination with modifiers <Ctrl>, <Alt> and <Shift> are available; overall this gives you 60 adjustable shortcuts to distribute according to your needs and preferences.
| NOTE: The definition of some complicated commands like column sets and layouts cannot be edited from the Organize dialog. If you need to make changes you'll have to delete the old command and redefine it (or overwrite it, i.e. save it using the same name). |
The order of items within each list determines its position in the respective submenu. Items in the top of the pile are easier to access so you should keep the most frequently used ones near the beginning. Each submenu shows up to 20 user commands; however you can define up to 100 items for each category and access them using the More... menu items.
Exceptionally, saved layouts (Window menu) cannot be reordered, since they correspond to registry key extensions. However this menu is sorted alphabetically so you can implicitly arrange a new layout's position by picking its name appropriately.
Items normally get shown with normal font and text attributes, according to your desktop preferences (e.g. black text on white background). Windows explorer can show certain kind of files with alternate colors, making them stand out and easy to recognize, as for example encrypted files in blue. xplorer² extends this feature allowing you to customize the text color and weight for filetypes you are interested in.
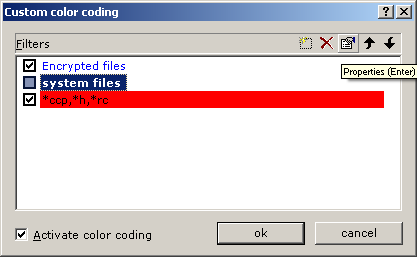
Using the above dialog (Customize | Color coding menu command) you can dictate the filetypes you are interested in and pick the text attributes, using the little toolbar on the top-right corner. File types can be defined as simple wildcards or even as full hyperfilters. The above example colors C++ source files against red background and system files (with "S" attribute) with bold font.
To turn on color highlighting check Activate color coding; clear the checkbox to return to normal colors. You can also turn individual rules on/off using the checkboxes in the above dialog box (notice how the "system files" rule is disabled). Note that coloring is a view-related property, so you can have e.g. the left pane highlighted and the right normal.
Bookmarks and other items listed under Customize menu can be assigned custom keyboard shortcuts (in the range 0-9) using dialogs similar to figure 22. To change the keyboard shortcuts of all other menu commands use Customize | Keyboard command. This way you can assign e.g. <F5> to be used for folder refresh and so on.
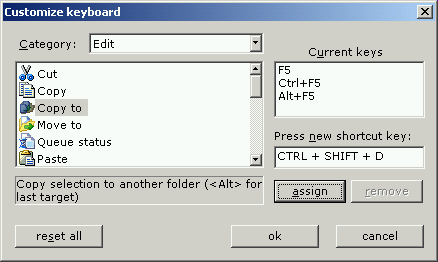
Customize | Keyboard use command lists the current key assignments. You can copy out the text, paste it to an editor and print them out so that you remember the quickest way to reach your favorite commands.
Another way to make your favorite menu commands easier to reach is to edit the shell context menu. When you right click on a file or folder the first command is a xplorer² popup menu. The Organize command can be used to add/remove commands from the main xplorer² menu, so you have your favorites handy when you right click on a file.
The first 20 items from each list can be placed onto the main toolbar or any of the (up to) 14 extra toolbars you can add using the Customize menu. You can control the buttons that appear in each toolbar by right-clicking on one and picking Customize.... You can select among a large number of commands, both fixed and adjustable; all menu items that have an icon can be placed on any toolbar.
Use descriptive text labels for your bookmarks and custom commands to tell them easily apart on a toolbar. For extra grip you can assign your own icons to each button using the controls in the properties dialog. Icons can be chosen from all standard icon files including DLLs.
| TIP: It makes sense to organize extra toolbars in a task-oriented fashion, bunching relevant buttons together. Whenever the need arises you activate the toolbar using View | Toolbars. You don't have to keep all toolbars visible at all times. |
For a quick face-lift of xplorer² appearance, you can download and install custom toolbar and menu item images that other xplorer² users have created and shared with the community. To see what's available click here.
You can also create your own skin. It's easy and no programming is required. Just grab the original button images and modify to taste with any image editor, then drop them in the installation folder. You may also consider sharing them with the rest of the world - just drop us an email.
Download skin designer pack (17 KB)
The extended filters used for the Tools | Find files and Mark | Matching a rule commands can be saved and reused in the future - and just as well since each filter can be tweaked to hold many rules that you don't want to retype each time.
To store a filter, type a descriptive name for it in the Predefined combo box and click on the Save button (see figure 16), and the current definition will be added in the drop down list. From then on you only need to select it from the predefined list and its rules will be automatically inserted for you.
To delete a filter, first select it, press the Clear button to delete all rules and finally click on Save to confirm the deletion.
xplorer² has many options that you can fine tune so that it behaves to your liking. Use Tools | Options menu to bring up the program options dialog, a property sheet as in the picture below. There are even more options to tweak, using Tools | Advaned options menu command, which opens a separate program with a plethora of possible adjustments.
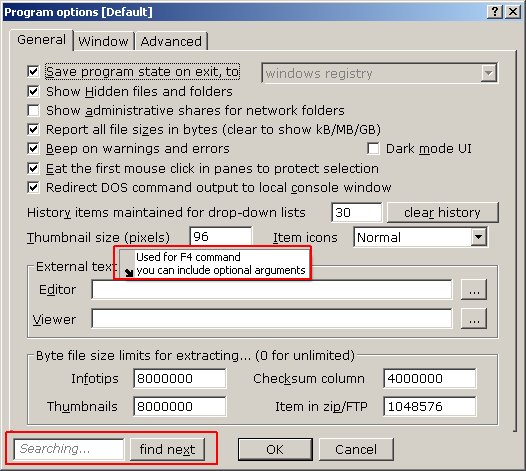
The main options dialog is organized in three property pages, each focusing on a section of the user interface. Most options are self-explanatory once you read the checkbox description. Many options come with a help tooltip, which pops up when you leave the mouse pointer hanging over the option (see the highlighted boxes in fugure 23b), helping you understand what they are meant for. If you have difficulty locating an option, use the search box at the bottom left corner with a suitable keyword. Click on Find next button a few times till you locate the option you seek.
| TIP: Most program checkboxes and settings are explained in the tips file. Use the option's text to find it in the tips document and understand its use. |
Customization Contents
xplorer² is a program with vast context and a great number of advanced commands, that will no doubt cause problems or questions for users sooner or later. We want to believe that the program is rather intuitive and users can troubleshoot themselves with simple reasoning and extrapolation from familiar circumstances, but there is no magical one-size-fits-all unfortunately.
The quickest route to solving your problems is to do-it-yourself! No hanging around waiting for support from the author. Sometimes the solution will be close at hand, in the help texts of commands as they appear on the status bar, or described in the tooltips of input fields in dialog windows.
For more substantial issues there are quite a few useful resources you can use for self-help:
buttons for demos.
We made an effort to write all this information about the program and we strongly believe you will benefit no end by reading the available documentation in full - at least this "bitesize" guide. You will learn many tricks and explore the available commands to increase your productivity using xplorer².
Still if reading manuals is not your thing you can skim across the documentation, searching for keywords (using your browser's Edit | Find on this page command) that describe your query or problem. Then follow hyperlinks to related information, if necessary.
If you fail to find what you need using the documentation, you've got these further options:
If you think you've discovered a bug, please ask yourself a few questions before seeking support:
Thank you!
xplorer² will run in a basic trim on all win32 platforms (95/98/ME/NT4/2000/XP/2003/Vista/Windows 7/8/10), however a subset of its features depend on windows services that may or may not be available on all PCs. In most cases you can get full functionality by installing a recent version of Internet Explorer.
| Feature | Requirements |
|---|---|
| Toolbars | Windows 95 with Internet Explorer v.3 or better |
| Thumbnails | Windows 98 or NT4 with Active Desktop update |
| File comments | Windows NT4 (NTFS formatted partitions) |
| FTP | Internet Explorer v.3 |
| Zip folders | Windows ME or Windows XP (for windows 2000 please see FAQ B4) |
| Audio/Video preview | Windows Media Player v.6 |
| Column handlers | Windows 2000 for extended file information |
| Text filters | Windows 2000 or later. For PDF see FAQ D3 |
| Arrange in groups | Windows XP |
| Ribbon toolbar | Windows Vista |
The companion text viewer application editor² requires richedit control version 3 (riched20.dll 5.30.xxx or better) which may not be present on systems pre-2000. However this is not an issue since you can associate any external editor with xplorer².
This table summarizes the main differences between windows explorer (2000) and alternative file managers from Zabkat's stable: the old 2xExplorer and xplorer². The table shows at a glance the increased functionality available in the pro version too.
Note that the "lite" version is free for private and academic use only. For any other use including commercial, government, military etc, you must purchase a licence for xplorer² pro. See licence.txt for more information.
|
FREE TRIAL: xplorer² professional is free to evaluate for 21 days. You can make sure the program meets your requirements without obligation to purchase.
Click here to DOWNLOAD FREE TRIAL → |
| Feature | windows explorer | 2x Explorer | xplorer² lite | xplorer² pro |
|---|---|---|---|---|
| All-area shell namespace access |  | | | |
| Shell integrated with drag/drop, context menu etc | | | | |
| Automatic sensing of changes in all folders (networked etc) | |  | | |
| Multithreaded & multi-window operation | | | | |
| Folder tree panel | | | | |
| Bookmark and quicklaunch panel (mini-scrap) | | | | |
| Dual pane mode (browse 2 folders in one window) | | | | |
| Tabbed interface | | | | |
| Docking and floating panes | | | | |
| Save and restore tabs (folder groups) | | | | |
| Keyboard shortcuts and overall usability | | | | |
| Path autocompletion | | | | |
| Filtering of item visibility | | | | |
| Filtering on arbitrary criteria (hyperfilters) | | | | |
| Fuzzy filename matching | | | | |
| Selection engine for precision marking of files | | | | |
| Selection with arbitrary criteria (hyperfilters) | | | | |
| Extended filesystem information columns (comments etc) | | | | |
| Even more columns (checksum, 8.3 name etc) | | | | |
| Column handler support for vista & windows 7/8/10 | | | | |
| Multi-column sort (using shift+column click) | | | | |
| Show in (collapsible) groups | | | | |
| User defined groups | | | | |
| Individual folder settings | | | | |
| Custom/skinned system icons (drives etc) | | | | |
| Extended icon overlays (e.g. TortoiseSVN) | | | | |
| Color coding of filenames | | | | |
| Window layout saving and management | | | | |
| Export folder information as text (for printing etc) | | | | |
| Extract plain text from office/PDF/WPD/ODT documents | | | | |
| Robust background file transfers with optional filters | | | | |
| Robust deletion with error control and filters | | | | |
| Hard links (NTFS) | | | | |
| Folder junctions, symbolic links (NTFS) | | | | |
| Mass renaming | | | | |
| Mass tag/comment management | | | | |
| Change file dates (touch) | | | | |
| Find text in files | | | | |
| Search for multiple keywords with boolean context | | | | |
| Search for text in office and PDF/WPD/ODT documents using filters | | | | |
| Search for contained text and filenames using regular expressions | | | | |
| Customizable info bars (status bar for each pane) | | | | |
| Context sensitive file information (details) pane | | | | |
| Unicode, UTF-8 & file encoding aware | | | | |
| Unicode version available | | | | |
| Split/Merge/Shred | | | | |
| Text/RTF/Hex preview | | | | |
| Exact preview of ActiveX documents (office etc) | | | | |
| Text editor | | | | |
| Graphics preview | | | | |
| Thumbnail view mode (using fast system cache) | | | | |
| Mini- and densely packed thumbnails | | | | |
| Multimedia preview (audio & video) | | | | |
| Find files with arbitrary criteria | | | | |
| Search within archives, FTP, webfolders (webDAV) etc | | | | |
| Refine previous search | | | | |
| Scrap containers (simultaneous management of many folders) | | | | |
| Folder synchronization | | | | |
| Deep synchronization (including subfolders) | | | | |
| Script wizard for DOS & win32 text commands | | | | |
| Intercept command output in user-friendly console | | | | |
| Customizable user command menu | | | | |
| Detect duplicate files & cleanup | | | | |
| Toolbar customization | | | | |
| Add extra toolbars and custom button icons | | | | |
| Toolbar skinning | | | | |
| Drivebar for easy access of local drives | | | | |
| Detailed breakdown of subfolder disk usage (statistics) | | | | |
| Calculate folder sizes in detailed view | | | | |
| Long path support for big folder names (>260 letters) | | | | |
| Total commander WLX/WDX/WCX plugins for archives, preview and attributes | | | | |
| Keyboard customization | | | | |
| Programmable user interface with macros | | | | |
| Native 64 bit executable | | | | |
| Sample reading speed for folder with 7000 items (sec) | 1.05 | 1.5 | 0.83 | 0.83 |
| Program size (KB) | 237 | 596 | 683 | 970 |
| Commands in the menu system | 48 | 100 | 154 | 229 |
The professional version can be installed and tried in full trim without obligation for the first 21 days - and a further 10 days with some extra nags. The registration dialog will pop up every time you start the program, but you do not have to buy a key immediately. Click on Continue button (see below) to proceed on a trial basis. When you are ready to order click on Secure order and follow the online instructions (or use this order page).
| NOTE: As a matter of courtesy to new users xplorer² does not ask ('nag') for a registration key during the first day you start using it. If you have a key and you want to use it immediately then start xplorer² and use Help | Activate with key menu command |
After the end of the 31-day trial period you must obtain a registration key or the program will refuse to start.
After you complete the order process, the registration key will be sent to you via email. Click on I have an unlock key button to start the external license manager. The license manager is a separate program that will run elevated to bypass any UAC problems in windows vista or later. In there you copy/paste the unlock key you received via email and click Activate button (see below). Once the key is accepted just restart xplorer². You can confirm your registration using Help | About menu command.
In some rare cases the key may not be accepted. There are a number of possible causes, explained in this FAQ. If you still have problems please ask for help including a snapshot of the exact error code.
NOTE: The professional and ultimate editions have different unlock keys. If you bought a license for xplorer² professional it can only be used if you install the professional version (and vice versa for the ultimate edition). You can check which xplorer² version you are running using Help | About menu command. If you don't have the correct version installed just get the relevant trial version from the website. You can quickly tell which license you bought from the format of the registration reference number (see the email receipt). Ultimate version keys are bigger.
|
If you are using xplorer² on the move you will find that saving program settings in the windows registry is not an option. One of the main advantages of xplorer² ultimate version is its portability. Using Tools | Options you can tell xplorer² to store its settings in a file instead of the registry:
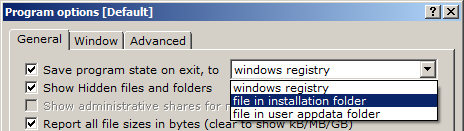
If you keep your ultimate version on a USB stick then pick the option "file in installation folder", which will save the settings in a file called X2SETTINGS.INI next to the xplorer² executable program. If you installed the ultimate version on your hard disk and still don't want to use the registry, pick the option "file in user appdata folder" (usually C:\Users\<you>\AppData\Roaming\zabkat), as the installation folder inside C:\Program Files will most likely be protected and inaccessible.
Here are the step-by-step instructions to place xplorer² ultimate in a USB stick environment. For example assuming we want to setup the portable version within F:\x2portable\ folder:
If you have problems setting this up please watch this demo video:
|
NOTE: Not all your favorite settings may be reusable in different computers; e.g. some of your bookmarks may point to inexistent folders. Using environmental variables in path definitions may alleviate this problem. If you have more than one Layouts (Window menu) please open one window from each layout when you export your settings from registry to the INI file. |
xplorer² defines the environmental variable X2DIR as the full path to the folder where xplorer² is running from, e.g. F:\tools\ (trailing backslash included). You can take advantage of this when you define external commands (Customize | User commands menu). E.g. if you have another tool on your USB place it in the same folder as xplorer² and call it using %X2DIR%myTool.exe - which will be equivalent to F:\tools\myTool.exe but won't depend on the drive letter your USB stick happens to be assigned.
After you properly set up your portable edition in a removable medium like a USB stick, then you have these advantages:
To ease the way you access xplorer² from your removable media you can create an AUTORUN.INF file in your root USB drive folder, and set it to open xplorer², editing it as such:
[autorun]

open=x2portable\xplorer2_UC.exe [optional arguments]
| TIP: The ultimate edition comes in separate 32 and 64 bit versions. Thinking about portability you will be better off using the 32 bit version, as it will run on all computers - whereas the 64 bit one will be limited to those installed with 64 bit windows. |
xplorer² was developed in C++/WTL, almost singled-handedly by Nikos Bozinis. Completing the picture, shouts go out to:
Here are the people that translated the program in various languages:
During the long years of development many testers have helped with suggestions, testing and bug reports. Thanks to you all!
Big up for all the "old hands" from the forum who have helped over and above anybody else with their tireless testing and constant flow of suggestions - did I say harassment? :) - that drove xplorer² in the shape and form it is now. In alphanumerical order thanks out to: BRX, fgagnon, JRz, MKairys, Morning Star, narayan, PhilipSutton, Starsurfer and vserghi.