|
|
Desktop RulesFind needles in a haystack |

|
|
Desktop RulesFind needles in a haystack |
TABLE OF CONTENTS
Introduction
Program Interface
Search modes
Search for files and folders
Property selector |
Rule definition |
Boolean algebra |
Normal search mode |
Desktop detective |
Picture geolocation
Inspect search results
Refine search
Search the offline file catalog
Search removable storage |
Add media to the catalog
Program Settings
Search template customization |
Advanced tweaking
Macro commands
Licensing and registration
Miscellaneous
Are you in a hurry? Too bored to read manuals? Make sure you watch the demo videos (look out for  signs)
This is a new generation desktop search tool, that uses the "new" property system supported by windows VISTA+. It helps you find stuff (files) on your desktop and offline external media, and does so in a fast, powerful and easy to use manner. It will help you find (among other things):
There are 1000+ properties available for shell items, and I believe that around 300 of them are usable for file queries. That is around 295 more than you or anybody else are using at present. Such a waste must be ameliorated! Wouldn't you care to find all your pictures taken at a particular GPS location? You bet!
Existing desktop search tools and file managers like windows explorer and xplorer² (another ZabKat product) do not tap into the extended property system, they are limited to old-school shell column handlers. DeskRule (as we will be calling this program from now on) ignores completely column handlers and focuses on system properties. These include all the legacy column handlers but add many other interesting attributes like picture people tags (face recognition data embedded in JPG files) and much more.
DeskRule is not a generic file manager like xplorer². Its main and only job is to find files on your desktop using a rich set of attributes and complex boolean algebra. Once you find what you are looking for, you can open the document or picture or what have you, and use some other simple desktop operations like drag-drop and shell context menu (copy/delete/properties and the like). But you will not have the rich toolset of file management functions; for that you will still need a tool like xplorer².
DeskRule is more like an explorer with desktop search. Here are the general ideas:
DeskRule is fully shell integrated. This means that it can search everywhere your windows explorer can, not just in filesystem folders, and it supports all standard shell extensions and handlers. You can improve your search and the presentation of the results downloading from the array of available content and preview handlers.
The program window is split in two major parts, the top half where you define the search parameters (where and what to search for), and the lower half that shows the items matching the search criteria and found during the search.
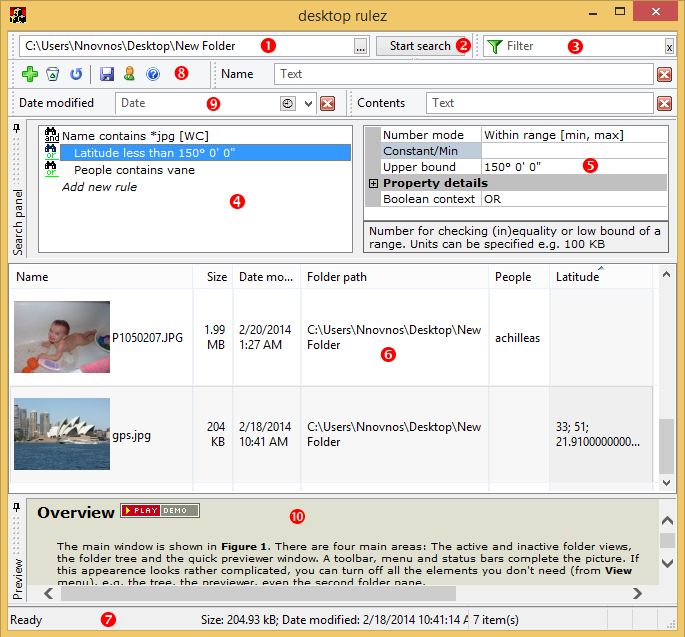
Here is a brief description of the main window elements:
The tool is minimalistic, without a menu bar. A few commands will be found right-clicking on the window titlebar (or system menu — top left corner) and various context (right click) menus. You can also use the usual drag-drop operations.
Managing 300 search attributes is not an easy job and could lead to confusing GUIs. How do you tell DeskRule you need to search by Date picture taken and Rating attributes? There are four ways to do it, in order of increasing complexity (and finer search control):
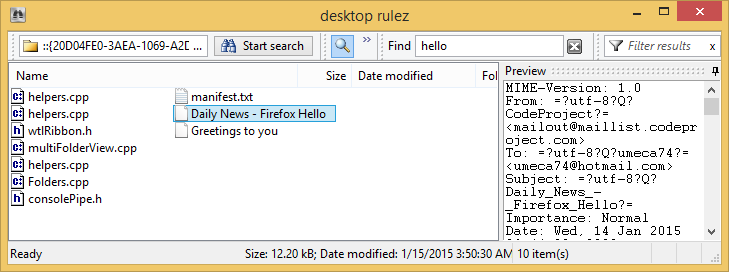
Deskrule starts in normal mode with the most frequently used search boxes present. You can type in any one (or all of them simultaneously) to define your query, then click on Start search button. If you want something simpler than that click on the first toolbar button (simple search, depicted by a magnifying glass). Now you will only see one search box called Find. You can tightly arrange the toolbars as you can see in the picture 1a above. In this super simple mode the advanced panel is hidden. Click on the magnifying glass again to restore the normal search mode.
Simple mode relies heavily on windows search index. If you are searching in folders where WDS cannot reach then only filenames will be fetched. No wildcards or special characters are allowed in search keywords.
For more control please switch to the normal search mode (click on the simple mode magnifying glass toolbar icon to turn it on/off).
NOTE: To add more folders in the fast search index, use your system control panel indexing options applet.
If you only search for filenames and don't care for contents and other indexed text properties, enable search as you type from program settings. Then simple search is performed live; matching filenames start appearing immediately without pressing start search button. As you modify the search keyword, the results update to match it automatically!
For more complex searches in simple mode, use Advanced Query Syntax (AQS), a search language many of you will be familiar with e.g. date:this month size:small hello will find documents containing hello and that were modified this month and are of smallish size. For more information see AQS help. You can also use system property names as System.IsFolder:TRUE. At present AQS can be used only inside search indexed folders.
There are two issues in searching, where and what. DeskRule uses traditional (filesystem) folder hierarchies to explore and look for matching items. You supply the root folder of the search in the addressbar (see figure 1), and DeskRule will search this folder and everything under it (picture the root folder and its subfolders in windows explorer folder tree control). You can type the folder name or use one of the easier alternatives:
You can search in special folders like ZIP archives, FTP, connected phones and the like, as well as normal folders on your hard disk. To search in special folders make sure you enable the option Enter virtual folders (press <F12> key for program settings). You can search in compressed archives like 7Z and RAR if you install a special shell extension.
The what part is more complicated, on account on the large number of available file properties and the complex boolean algebra available for declaring search rules. The search rule can be something simple as a filename, but it can also include any number of file attributes out of the available system properties. The more rules you use, the more accurate the search results, and less matching items will be found — and the longer it will take to find them!
First we will discuss the advanced search mode.
Double click on Add new rule to bring up the property selector dialog. This is the only dialog in the program (not counting the About dialog :) and looks like this:
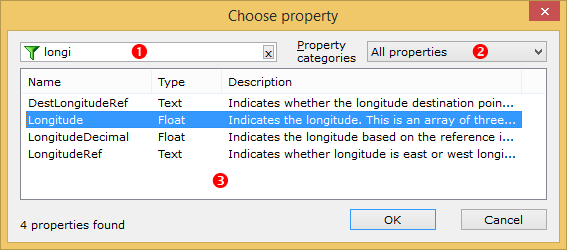
The approximately 300 system properties available for search rules are organized in categories (general, audio, picture, music, document etc). However the easier way to find a property is to set the category selector [2] to All properties then use the auto-filter box [1] to find your property. You can add any number of keywords separated with spaces to find the property you need. Matching properties are shown in the list [3] with further explanations. Use double-click to choose the desired property.
If you see an [I] mark in a property's type this means that the property is in the windows search index and can be used for fast searches.
A special type of property is Contents, which allows you to search for text within documents. It is available under the "Simple" category along with other stuff you frequently search for. Also under the Legacy category you will find some of xplorer² stock columns and even older windows XP column handlers (TSVN and the like) and WDX content plugins. Finally if you want to search for folders only, add IsFolder attribute.
Each property (search attribute) you add has to be further determined with a desired value. When you add the Name property you must add what name you are looking for. To change rule property values, first you select the rule in the search panel. The available tweakings for the selected rule will appear in the property control [5] (see figure 1).
There are 3 main classes of file properties, text, numbers and dates. Each category has variations, e.g. a date could be a range or something simple like "yesterday". Number attributes can be defined either as a range, or fixed to a value (equal/not equal). As you roam about the property control, you see explanatory text for the active (selected) row that should help you understand how to go about setting modes and values.
Text rules have the richest set of available options. Tweaking the Text mode you can supply a single keyword or expression to find, or a list of keywords to include/exclude, or complex boolean text expressions like this AND (that OR "the other"). When you leave the default Auto wildcards mode on, each keyword can be a wildcard or a regular expression — DeskRule guesses what it is from what you type, e.g. *.jpg will be assumed a wildcard and file[1-4] a regular expression. If you insert any uppercase letters, the whole string expression becomes case sensitive — have all characters in lowercase if you are not interested matching the case.
The property control will appear awkward at first but it is well thought out and easy to operate using the keyboard:
Here you also set the boolean context of the file property rule (in relation to other rules you add)
Unlike xplorer² where individual search rules are stringed in a linear fashion (this AND that OR other), DeskRule supports full boolean algebra including nested brackets, so you can test for things like:
(size > 100 AND Modified in 2013) OR (kind=document AND (extension=pdf OR NOT name=something))
How do you put expressions in "brackets" in a user friendly manner? The search rule composition window uses indentation. To push a rule inside brackets you indent it right, using either the pop-up toolbar or the context menu (or use the keyboard shortcut <Ctrl+Right>). So you can have: (+ is AND, ^ is OR):
+RULE1
	+RULE2
	+RULE3
^RULE4
	+RULE5
which corresponds to (RULE1+RULE2+RULE3) OR (RULE4+RULE5). The leading (unindented) item is the first in the bracket; the bracket "closes" when you indent some item to the left, beginning a new group. This way you can have arbitrarily deep nesting and subexpressions. A bit quirky but that's the "easiest" idea I had — please feel free to suggest something easier if you have an inspiration.
Using other menu commands you can move rules up and down (rules are evaluated in the order shown, so try to put slower rules like contents search toward the end for quicker search results), duplicate or delete rules etc. To clear all the rules, first select all with <Ctrl+A> then press <DEL> key and start afresh.
The advanced search mode is powerful and expressive, but can be also taxing to operate. The normal search mode is much simpler to use albeit at the expense of accurate control in rule definition. Still you can use all the system properties in this mode.
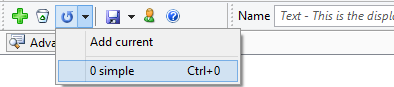
To activate the normal mode, minimize the advanced search panel clicking on its pin and use just the toolbar input fields. By default you can search by Name, Date modified, Type and file contents (keywords) but you can add more rules using the green plus [+] toolbar button. To remove a rule click on the red [X] button to the right of the rule's input field. Use the Reset toolbar button to default to the 4 basic search rules. You can choose your own default rules using Set default command from the reset button's drop-down menu.
You can size and move around each box rule dragging it from its gripper handle to the left — this way you can customize the appearance of the normal mode to taste. Or right click on a toolbar and pick Auto-arrange menu command to have the boxes arranged automatically for you. If you enable the program option Vertical toolbar, the user interface stacks search toolbars vertically as in the picture below. You will identify each property by its cue text e.g. Contents - Text means the box is for searching in file contents.
You don't have to fill up all the normal mode boxes, just fill in the parameters you want, e.g. specify a Name and leave the date and contents fields empty to search only for filenames. For example the sample search below is looking for Name containing report, Type is documents but doesn't search for text contained in the file (Contents box is empty):
Properties as usual come in 4 varieties, text, number, dates and enumerations (lists). Except for the latter mode, the input boxes are plain text fields where you can type in what you want to search. The enumerated mode is for parameters like System.Kind where you must choose one of the predefined options from a drop-down list.
Rules that accept numbers like Size, can be defined in a variety of ways e.g. all the next inputs are valid:
| 5 kb | find files that are exactly 5KB in size |
| >=4096 | search for files at least 4096 bytes large |
| <=6MB | size up to 6 MB |
| 5 .. 10 | size in range from 5 to 10 (note use of .. range operator) |
| ~1GB | size approximately 1GB (10% tolerance) |
| <> 5 | Not equal to 5 |
Many numeric properties can have units, for example searching for file size you can either specify 1024 or 1KB which are equivalent. Audio length can be specified in the form MM:SS and GPS coordinates as 145°3'0" (degrees/minutes/seconds). Note some properties are shown in units different to those that are used to find files, e.g. to search for audio bitrate you must enter the number in bps not kbps (128000 vs 128). The units are often shown in the Property details section in the Rule property control [5] — click on the [+] box to see this information.
The same operators can be used for date fields e.g. >=30/3/2014 would mean a date newer than March 30, 2014. Partial dates like "December 2015" or just "2015" are also allowed. Date inputs also accept strings like "yesterday", "last month" etc, through a drop-down list. You can click on the little clock icon to compose a date if you are too bored to type it!
For text rules, usually you put one keyword, which can also be a wildcard or regular expression — these are automatically identified from their special characters like * or {}. If you put in more than one keyword then all must be present (in any order) for a successful match. If you need to match a whole expression put it "in quotes". For negative keyword match add a leading minus symbol, e.g. THIS -THAT will match documents that contain THIS but not if they also contain THAT.
When searching for multiple keywords in document's text contents, you can use proximity matching so that 2 or more keywords you search for occur closely together in the text (as opposed to anywhere in the file). For this mode to work you need to use NEAR keyword as such: (note NEAR must be capitalized otherwise it is considered as another keyword to search for!)
this NEAR that
There are a few provisos using proximity searches as follows:
Text searches are much faster if you don't use wildcards and regular expressions. In this case only stems are matched, that is beginnings of words. For example, searching for TEST by name will find files called TESTME.TXT and FIRST TEST.TXT, but will not find A1TEST.DOC. To find the last file you must use explicit wildcards like *TEST*. To match exactly (is instead of contains) use a leading equal sign (=TEST)
The normal mode is good but it cannot match all the breadth of options offered in the advanced mode. In particular you cannot do any of the following:
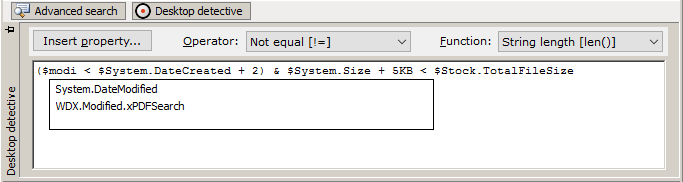
This panel allows you to do amazing feats which would normally require you to write a program or advanced shell script. You can combine any system property with arithmetic (add/subtract/multiply etc), relational (equal, greater than etc) and boolean operators (and/or etc) to create arbitrary search expressions that can be evaluated for each file searched. For example take the expression:
($System.DateModified < $System.DateCreated + 2) & $System.Size + 5KB < $Stock.TotalFileSize
It will match files whose modification date is earlier than the creation date + 2 days, and (&) their reported size plus 5 kilobytes is less than its total size on disk. You don't see that every day in a desktop search program <g>. When you become familiar with the "official" property names and operators, you can type such expressions manually (press <Ctrl+DownArrow> key to autocomplete properties), or you can use the form buttons (Insert property and Insert operator) to help you compose a complex rule. A few clarifications are in order:
|
If there is some problem with the complex expression like a misspelled system property or an operation between incompatible arguments, Deskrule will report a syntax error, highlighting the trouble spot. Correct the typo and you are ready to search.
Sometimes a property name on its own can be a useful rule, e.g. $System.Keywords without any other operators will match files that have some tags defined. Or combine it with a leading NOT (!) operator to match files that do not have tags! Bare property names are also convenient for yes/no properties like $System.IsFolder, otherwise you must be careful to compare them only against zero (=false or no).
Desktop detective is useful for many advanced search tasks, e.g. find pictures whose width/height ratio is 4/3. It will also allow general tomfoolery like ($DateModified - $DateTaken)/2 = $Size, which arguably is not much use <g>. A final note is that this search mode is rather slow; comparing file properties is not something the WDS index was designed for, therefore all searches are performed the hard way, file by file. The more properties you use in an expression, the slower it gets. You can minimize the inconvenience by narrowing the search in smaller parts of the filesystem (that is choose the search root folder wisely). Also, if you use multiple properties in a search expression, use the faster ones like filename and size first, and leave the slower ones (e.g. GREP) at the very end.
If you right click on a JPG picture and choose to see its properties, you will find all the stored EXIF information in the Details tab. If you see a GPS section, the picture knows where it was shot; two numbers Latitude and Longitude define the exact spot on the earth's surface. Deskrule has a Map data property category that allows you to search for pictures in a given location, but you would be hard pushed to know that New York is found at latitude 40°45'31"N and longitude 74°1'17"W !
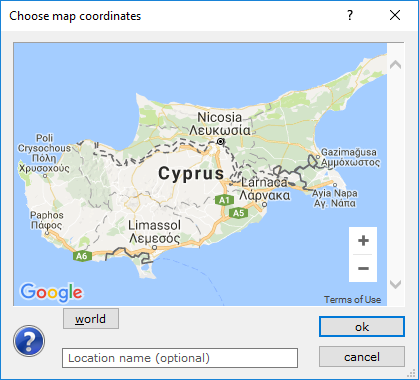
Enter Deskrule's unique picture map tool. If you click on the map toolbar button, you will see a dialog that shows you the map of the earth, where you can define a search area intuitively. Click on the World button to see all of the earth, then scroll and zoom in to find your desired location. Whatever you see on the map will be searched; if you pan onto the whole of USA, you will find pictures shot anywhere in the USA. Or zoom in more to find pictures shot in New York, or even in Central park!
Click on the OK button to close the map. Deskrule will then use the map data to define a range of latitudes and longitudes to search for, e.g. the range 40..41 latitude defines most of New York. Note the use of the range .. operator that defines the range of numbers to match. Click Start search and off you go! Searching for geotags isn't different than searching for any other file property; you would still have to define a starting search location (e.g. inside My Pictures folder) etc.
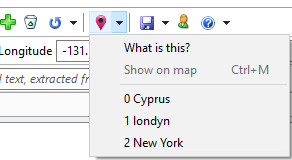
The map dialog allows you to save locations you wish to search for time and again. Just type in a Location name in the respective box and this will become available in the map toolbar button drop-down menu (see figure 2c below). This will save you the effort of zooming and panning the map for your frequently used search locations.
The only down-side to picture geolocation searches is that latitude and longitude data aren't indexed by windows search. Deskrule will search for the geo properties, but rather slowly. But if you consider that no other tool allows such geo searches at present, it is a valuable first step.
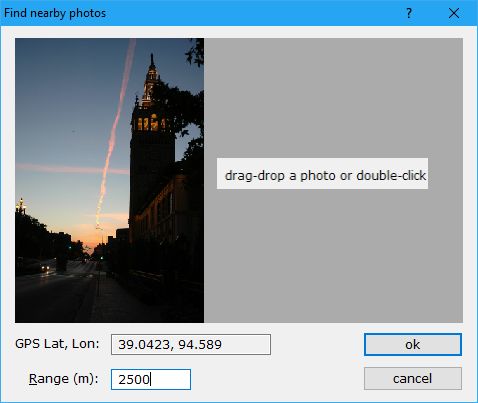
To specify the base photo, either double click on the empty space to browse for pictures, or use windows explorer to drag-drop a JPG with geolocation information. You can see the photo's latitude and logitude details once it is opened. Then you supply the search range, how many meters around the base location (e.g. 2500 searches a square of 5km centered on the current picture). Click OK button to convert the GPS information into latitude and logitude search rules.
You can add more search parameters if you like at this point, using the rule toolbars, e.g. a date. Double check the starting folder and click Start search button to find photos close by!
Once you have defined where and what to look for, click on Start search button to get the ball rolling. Search results are added as they are discovered and are available to operate on as in any shell explorer window. To keep the interface simple there is no button to Pause the search, but you can effectively pause it if you open any dialog window, e.g. click on the settings button. To resume the search dismiss the settings dialog; to cancel the ongoing search altogether click on Stop search button.
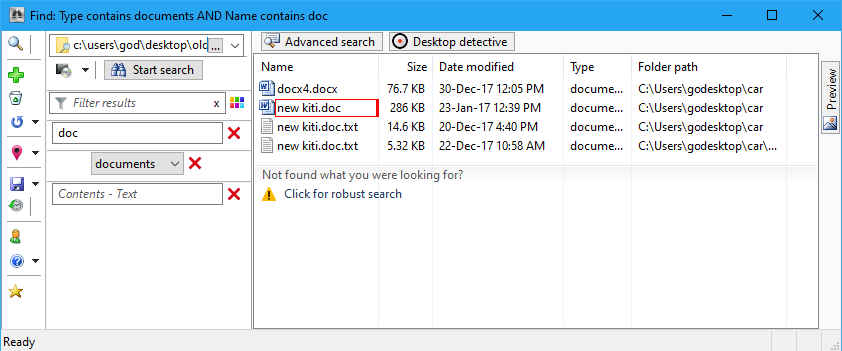
The search is performed in two stages. First WDS index is used to obtain results fast, whenever possible. If you don't see what you are looking for among the results, you can click on the footer button Click for robust search. Then the same search will execute bypassing WDS. Results will be slower to come but if your file is there it will be found.
The default view mode is details. The columns shown are implicitly defined by whatever search rules are active (e.g. if you search for Author there will be an Author column for all matching items), plus a few standard columns like Name/Size/Date modified that are always present (to see more file properties, right click on the column header and use Select columns menu command). You can switch to plain list mode using the background right click menu. Using the same menu you can opt for normal icons or thumbnails (interestingly you can even have thumbnails combined with details!).
If you search for text contained in documents, expand the previewer panel to see all the keywords found highlighted, in plain text mode. Pressing <F3> key will take you to the next occurrence of the hit keyword. Hit highlighting works even for peek preview mode, when you press both mouse buttons simultaneously on a search result.
To operate on search results, first select them using all the usual methods (e.g. Ctrl+Click, mouse lasso etc) then drag them off the window with the left or right mouse button. The right click menu when items are selected shows the standard shell context menu, including some extra commands:
You arrange the search results by clicking on the column header. You can sort by secondary columns holding down <Shift> key while clicking on a column (as in xplorer²). Finally use the quick filter toolbar [3] to show only items matching some text. To see all the results clear the quickfilter contents or double click on the statusbar filter pane.
You can also export the search results as text in the clipboard. Hit <Ctrl+A> key to select everything, then press <Ctrl+P> to copy all the information as text. You can then paste them in any text editor or in MS Excel for printing or log-keeping.
Conceivably you can refine a search for something completely different, e.g. change the Contained text or Name boxes, but practically you apply refining using the same criteria as the original search. This isn't as daft as it sounds: if you search the index for text that includes special symbols, these will be ignored — only pure text is indexed. Clicking on refine search button will correct this problem, where the original results will be double-checked to ensure that the symbols are there too. Try it with a search keyword like How-to (notice the hyphen) to see what we mean. This is much quicker than searching the entire hard disk robustly!
Refine search acts as a super visibility filter, like when you type keywords in quick filter (filter results) box — with more powerful search criteria of course. If you double click on the statusbar filter icon, you cancel the refine search filter and you can see all the original search results.
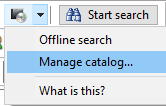
If you are an old school "trust no cloud" type of person and have lots of stuff stashed in numerous external hard disks, DVDs, USB sticks and the like, Deskrule's catalog search is designed for you. First you create a database of your "offline" files (kept outside your computer); this part is a bit of a burden but you only have to do it once. Then you can search this offline catalog as much as you like to discover where did you put that Star Wars (The empire strikes back) movie.
The real advantage offered by the Catalog is searching for files in disconnected devices. If you have 10 USB hard disks, you don't normally have them attached all the time. Once you discover the file you are after, Deskrule will prompt you to connect the right device so you can use the file. It's that simple!
Other than the search root folder, you can use the same techniques as for regular folder searches. You enter search parameters in the same boxes and see the results in the same fashion. Here is an example catalog search for Excel spreadsheets (XLS in name) modified in the year 2017 containing the word ZABKAT, can you tell it is a catalog search?
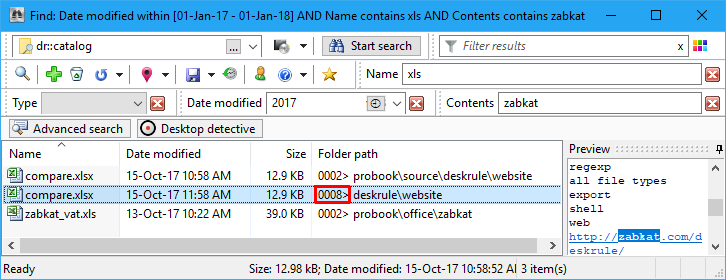
The hint is the reported file path: instead of a drive letter like F:\ (which you'd expect if it was a regularly available file) you see a media identification number (0008 in the above figure) which means that the selected spreadsheet is on a disconnected disk. The rest of the details are familiar modification dates, size, even a small plain text preview. Some file types like pictures can show a little thumbnail too!
Many useful file attributes can be used for searching the catalog. You cannot search for the full 300+ file properties, but you can do a few "advanced" properties like tags, comments and author if you include them at the time you insert the items in the catalog (see the following section). Searching for contained text is also somewhat limited; only 1KB of plain text is added to the index by default (mainly for preview purposes), so you cannot do complete text searches. Still lots of documents contain important information in the first few pages, so this preview text is useful for locating offline documents.
You cannot work with catalog search results immediately as with regular files (e.g. you cannot drag-drop them or right click for the shell context menu); first you must connect the device where they are being kept. Just double click on an offline file or hit <Ctrl+Enter> keys (or right mouse click) to open the containing folder, and you will be prompted to attach the actual storage:
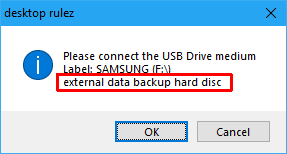
The prompt message includes the media type (e.g. USB drive), the last known drive letter and label, and the all-important description that helps you identify what to connect. You control this description; add as much information as you like, e.g. the number on the DVD case or the storage cabinet where you keep it. Once connected you can access all the search results that belong to the same storage medium.
Catalog searches are seamless in Deskrule. Sure you are limited regarding the number of search properties, but other than that you can use the full arsenal of simple or advanced search modes — even the desktop detective panel. You can use multiple keywords, wildcards and regular expressions and all the other normal search conveniences. A couple of final gotchas:
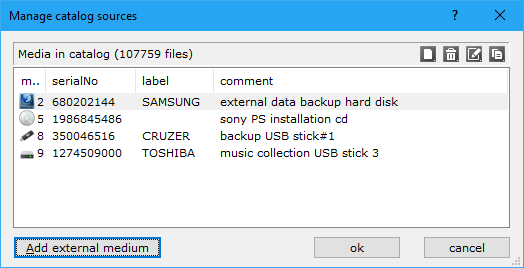
This dialog displays media that are already in the catalog. The little icons help you make out the type of storage (hard disk, DVD etc). Each device has a unique serial number used for its identification, but you don't need to worry about it; just provide a good description (comment) to help you identify the device in subsequent catalog searches. If you have too many media to catalog, it is a good idea to add a note about where you keep each one of them (filing cabinet 3z). Double click on any item to change its comment. There are a few commands on the dialog toolbar (top right) but you hardly ever need them.
Use Add external medium button to add a new external device like a USB drive, thumbdrive, DVD (or even CDR if you are really old school :). A browse for folder dialog will guide you to choose your (connected) device. Usually you add the entire storage unit to the catalog, but it is possible to only add a subfolder of it, in case you don't care about the rest of the files in other folders.
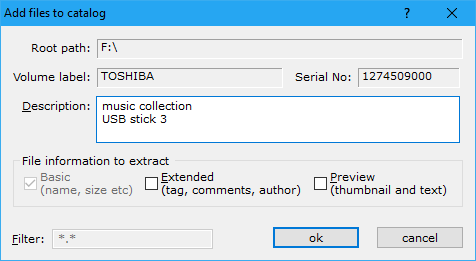
Once you select the removable folder to add, you must choose what file details you want included. All files are inserted with basic name, size, date and folder path information automatically, for basic searches. You can add more information ticking the checkboxes: Extended information will include file Comments, Tags, Title and Author (e.g. music artist, document author etc). Ticking Preview will insert a small plain text preview (for documents that have text) and a small thumbnail image for photos and such. Basically you trade off richer search and preview experience with increased database size:
The thumbnail picture stored is fixed, as set by the thumbnail pixel size in options dialog. It is quite small by default (100 pixels) so you may want to tweak it before creating your first catalog. Likewise the default text preview is small. If you want more text please increase the preview length setting from program options. Then you can do almost full text content searches on catalog items, but the catalog size may explode as a result.
As already mentioned, once you add an external drive to the catalog, it creates a snapshot of the content and any subsequent changes are ignored. Deskrule will not automatically scan for changes or update the catalog every time you attach the drive. If some of your media change a lot just re-add it in the catalog; the old files will be replaced automatically.
Click on the settings toolbar button to modify various program options. The options are organized by category and you can see what each option does at the bottom of the settings dialog as you choose each option. Click on the Defaults button to reset all settings to "factory" values.
An important setting for international (not english) searches is Ignore diacritics. If this is enabled, then all text searches (filenames, file contents etc) will become accent-free; for example "hállö" will match "hallo" (notice the missing umlauts etc). Note this option makes searches rather slower.
You can change most settings by double clicking on the name. To quickly jump to a property press <CTRL+letter>, where letter is the starting letter of the property, e.g. Preview. For more information see the property control in the search panel.
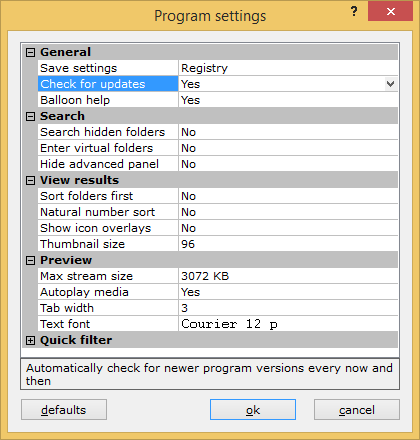
DeskRule normally saves its settings in the registry, but you can have it in a portable mode too, keeping a file called DESKRULE.INI next to the program (say if you use it off a USB stick).
You can define and reuse templates for different properties to search for in normal mode. First add and remove the search rule boxes you need using the toolbar [8], then use the drop-down menu under the Default rules button (see figure 4) to add a search box template. Use a descriptive name to remember what it is all about. Then you can activate any saved template from the drop-down menu.
You can also save search parameters (attributes) for repeating a search in the future. Define and start searching, then once the search is through use Save search button to keep it for later. To repeat a saved search use the drop-down menu next to the Save search button. If you want to keep the search folder along with the saved search parameters, turn on the respective option using Program settings dialog.
Both these customized lists are managed in a simple fashion. The most recently saved entry is placed first in the list. If there is an older item with the same name it gets overwritten. To remove a saved item right click on the menu and use the context menu (in the menu!)
Some advanced program tweaks are possible through registry editing (or editing the INI settings file). You must first fully quit DeskRule pressing <Alt+X> key (or right click on the titlebar for the menu command), then fire up the registry editor typing REGEDIT.EXE in Start > Run dialog (<Win+R> key). Then locate the main registry key HKCU\Software\ZabaraKatranemia Plc\Desk_Rule and change values documented below. It goes without saying that if you are not familiar with registry editing you should stop right here!
EDITING THE REGISTRY CAN RENDER YOUR COMPUTER UNUSABLE.
Unless you are 100% certain you know what you are doing, you are advised not to modify it in any way.
Names that start with "bin" imply values that are made up as the sum of individual bits. Please sum up all the numbers representing the options you want and set this total number to the value. Don't modify any bits that are not documented in the table.
| Key | Value | Data | Explanation |
| General | binFlags | x80 | minimize overhead for slow folders (e.g. plain icons for network items) |
| x8 | Hide advanced and detective search panels (if you don't use them) | ||
| x10 | Allow local and network folders in the offline catalog (not recommended) | ||
| x100 | enable searching in very deep folders (overall path >260 letters ) | ||
| x800 | disable fast searching filenames using MFT for NTFS drives | ||
| x1000 | follow junction points, search them like normal folders | ||
| x8000000 | disable fast desktop search through windows index | ||
| binMoreOptions | 4 | Loud mode, if enabled all errors show up as message boxes instead on the statusbar | |
| 16 | disable window alpha-shading when a dialog shows up | ||
| binSearchFlags | 8 | clear this bit to stop searching in filtered documents like DOC/PDF; only search plain text files | |
| bin1OffNotify | Set this to 0 to reset all the "don't show this again" type of messages and see them all over again | ||
| bSantasLittleHelper | Set this to 0 to disable background threading (not recommended) | ||
| msCatalogIncl msCatalogExcl | list | Comma separated list of wildcards to include/exclude from catalogs, e.g. *.txt,*.pdf . By default all file types are catalogued | |
| nCatalogMinFile | limit | Smallest file size added in catalog (by default really small files <1024 bytes are excluded). Set to 0 to add all files | |
| rgbViewBgcol | xBBGGRR | background color for search results, -1 for the default windows color | |
| szGrepExcludeTypes | list | Comma separated list of file types (extensions) that you don't want to search for text. E.g. set it to pdf,doc if you don't want to search in PDF and Office documents | |
| szTextViewerPath | path | Full path for editor you want to associate with <F3> command to view text files (if xplorer² is installed this defaults to editor², else notepad is used) | |
| szPluginINI | path | Path to total commander plugin settings file. Default location is %APPDATA%\zabkat\tcplugins.ini. You only need this if you are using WDX/WLX plugins to extend DeskRule. | |
| szFileCountRule | wildcard | Comma separated list of wildcards for Stock.FileCount property. E.g. *.txt,*.log would count items with txt and log extensions. This can also be a name of a saved search, enabling you to use very complex filters. The default value * counts all the direct subitems in a folder. | |
| szSimplePropertyList | list | Comma separated list of system properties to search for simple mode, e.g. System.ItemNameDisplay,System.Search.Contents. Only text properties are allowed. | |
| nPeekTextWidth | pixels | Pixel width for peek preview window used for text documents (pictures preview according to their dimensions). | |
| bRebarLabels | [0-2] | When search boxes are stacked vertically on the left of the window, by default no property names are shown to save space. If the search box hint text (cue banner) is not enough, you can set this tweak to 1 to show a single letter from the title, that is usually adequate as a reminder. Or set bRebarLabels to 2 to show the full property name in a separate row — if you don't mind the wasted space. | |
| nFastFilterCnt | items | Filtering using all file properties may take a long time, when there are many items shown. This tweak sets the limit of items in the pane above which only fast properties are used for filtering, e.g. Name or Path, but not music Genre — or anything similar that takes too long to extract. Set it to 0 to disable the protective feature. | |
| nLineSpacing100 | [100 - 200] | Extra line spacing in detailed and list mode using taller icons. 150 would mean 1.5 line spacing (100 is default for single line spacing) | |
| view_e900 | nMaxListColumnWidth | pixels | Maximum pixel width of list view mode. Set it to 0 for unrestricted size |
| QuickView | binMiscOptions | 4 | Preview in a background thread for responsiveness |
| 8 | Use internal text viewer for all text content | ||
| 256 | Don't animate peek preview window | ||
| 2048 | Keep external previewers alive for faster document loading | ||
| File types | title | list | Extend the file types that appear in the Type selector (a default legacy property). You can both edit the default types or add new ones. Each type is a comma-separated list of extensions (without the dot) |
A simple in-app "programming language" allows you to automate many program tasks. It is not a full blown scripting language (as e.g. the one in MS Excel) but it is surprisingly versatile and easy to use. You write scripts, that is sequences of simple text commands that manipulate the program window as if a robot was in control. You can do these sorts of tasks:
# script to add FRAME RATE rule on the toolbar
COMMAND "add rule"
WAITWND
FINDWND categories
SELECT video
NEXTWND # focus on the listview control
SELECT "frame rate"
OK
As you can tell from the command names, this macro is equivalent to clicking on the Add Rule toolbar button, waiting for the dialog to appear, then find and select the Frame Rate property and finally "clicking" the OK button to finish and insert the boxrule for the Frame Rate property.
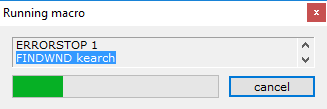
Press <Alt+F9> key to start the macro editor (or use the system menu which holds a Macro command), then copy/paste the above script, then click Run button to see it working. When a macro is running you cannot work with the main program window. A macro control window appears on top of other windows that shows the progress of the execution. To abort a macro mid-way through its execution click on the Cancel button.
COMMAND "add rule" # start the rule dialogCOMMAND is the reserved command name that tells the macro what to do, "Add rule" is the argument (which program command to execute), and the rest is the comment. Comments are ignored by the script but help you to make sense what each command is doing. Inline comments begin with the hash # symbol.
Arguments are necessary for many commands. They are usually constant text strings as the name of the toolbar button you are trying to click. Use "quotes" whenever you have spaces in arguments (many words). Arguments can also be numbers e.g. 32821 is the equivalent identifier for "Add rule" toolbar button. Most of the time it will be easier to use the text label, but sometimes there will be no alternative than to use the number, e.g. for hidden commands. Arguments can also be variables, which will be discussed below.
Many commands return a value, e.g. FINDWND returns the handle to the window found. You don't see this result immediately but it is stored in the last result register ($0). Subsequent macro commands may rely on the previous result to function properly, e.g. CLICK needs a window handle found earlier. The last result is piped from one command to its successor automatically.
9 elementary variables are supported to be used as arguments, called $1 to $9. Most of the time you will use $0 if you want to visualize the result of the last command (MESSAGE $0).
If you are familiar with windows programming, you will know that each menu command and toolbar button appearing in a program's user interface correspond to a message number. Likewise, controls that appear in dialogs have an identifier number. For instance 32821 is the message number corresponding to "Add rule" toolbar button; and the OK button in most dialogs translates to number 1. Unless you are a big time geek <g> that can use Resource hacker or Spy++ you cannot be expected to know these numbers!
Laymen needn't worry. Instead of fumbling with cryptic numbers, you can use the text that appears on a menu, toolbar or dialog button to tell the macro which command you are after. Take note which text appears on the menu command you want to issue, and use it as the argument to COMMAND. For toolbars use the tooltip if the button you are after has no text showing. It is best to use the full command text as it appears in the GUI, which will ensure that the intended command will be issued. Partial names can be used too, but keep in mind that the first matching name will be used, which may be some other command or window!
Finding buttons on dialogs is easy, just use the name of the button with FINDWND. Other controls have some descriptive text label before them, which may be used to locate the control. Sometimes a control has no useful text or label; in these cases locate the control nearest to the unlabeled one, then move forward or backward with NEXTWND or PREVWND instructions till you hit the desired dialog control. The directions "forward" and "backward" correspond to the tab order in the dialog — or in plain english, what happens when you press <TAB> key to move around in a dialog window.
When you get an unexplained error 3 (not found), it could be that the dialog didn't have time to appear. If you use COMMAND and expect to operate the dialog controls, use WAITWND to make sure that the dialog is visible before you start manipulating its controls. FINDWND instruction is searching the dialog that is currently active (excluding the macro dialog itself).
Finally you may realize that a running macro is doing crazy things that were not intended. In that case click on Cancel button to abort the macro execution.
Once you turn off the automatic error handling, the last result $0 variable will reflect the execution status of the last instruction. You can test for success using the JUMPOK instruction, which will jump to a label (i.e. move the point of execution) only if everything goes well — otherwise the instruction immediately below it will execute. Here's an example that looks for a window called test and stops execution manually if not found:
ERRORSTOP 0
FINDWND test
JUMPOK found
MESSAGE "window not found"
EXIT
LABEL found
CLICK
Using conditional jumps and GOTO instructions you can modify the order that script lines execute. Instead of linearly executing all lines in sequence, you can jump to earlier or later lines depending on your logic. Jump destination points (LABEL) can be any text you like to make sense of your script. If you have multiple jump points, make sure each label gets a unique name.
Simple loops are also possible using a control variable as a countdown counter, as such:
POP 5 # repeat 5 times
STORE $1
LABEL repeat
MESSAGE $1
DECR $1
JUMPOK repeat
# end of loop
The trick is that DECR instruction updates (decreases by 1) the counter variable $1 and the last result, so when it reaches zero, you break the loop (JUMPOK fails). Also note the roundabout way to initialize the counter variable using POP then STORE.
The macro composition dialog has a listbox with the most common commands so you don't need to remember the names. Below you will find the full list of supported macro instructions and their expected arguments.
A typical instruction accepts a single argument, but there are some that apparently work on thin air without arguments. This is because they use the result of the previous command as their argument — this is called pipe argument. For example CLICK operates on the result of an earlier FINDWND command. If a command fails the result is zero (void).
Arguments can be either constants (strings or numbers) or variables ($0 to $9). Variables represent strings, numbers or window handles, depending on what is stored in them. The last result is kept in variable $0. Unless otherwise stated, the following table uses name for either a string or number, furnished either as a constant or variable.
| ||||
Here's an example of a complex script that will show all the names in a listview control, demonstrating the use of some of the advanced instructions:
FINDWND "search results"
STORE $1 # listview (search result) window
GETCOUNT $2 # total items, process in reverse

LABEL loop
POP $1
SELECT $2
CMENU rename
WAIT 100 # for edit box to appear
FINDCLASS edit
GETTEXT $0
CANCEL
MESSAGE $0
DECR $2
JUMPOK loop
To avoid the roundabout way to extract the item name through context menus, we could have used COMMAND 32798 which copies the entire path (ALT+C shortcut command). Or even more simply use the GETITEMTEXT instruction <g>
The property control used for rule definitions (and program settings dialog) is a modified windows LISTBOX control. You can manipulate it using SETTEXT macro instruction, which will change the value of the currently selected property — hence you must first select what you want to change. For example:
FINDCLASS listbox
SELECT "text mode"
SETTEXT 3 # option 3, keyword list
SELECT wildcards
SETTEXT 1 # 1=yes, 0=no
# other way to flip yes/no options
CLICKDEF "exact match"
The recorder will only generate plain macros, and the resulting code looks spaghetti, but it should be adequate for the average macro requirements — and you don't need to do any "programming". If you start the recorder and click Finish immediately, without any actions, you will be presented with the last macro used.
DeskRule is a "try before you buy" application. You can download and install it, then use it for free at full capacity for a limited time period. This way you can tell if it is the right tool for you before buying it. The longer you take to evaluate the more nags it will throw at you, including this nag dialog when you start it:
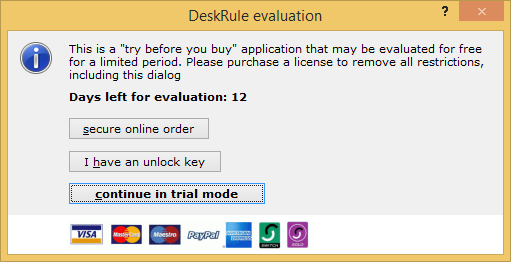
Click on Continue in trial mode to proceed. Eventually after a longish period of evaluation at full capacity, it will switch to restricted mode. After that the search engine will barely work: fast desktop search will be disabled and it will only show the first few search results. At this point really you should make up your mind, whether to purchase or uninstall.
DeskRule licensing is similar to xplorer², in that it is licensed per user. If you are the only user and have 2 computers, you only need one license key. But you must add a seat for each extra user. Your purchase will entitle you to free upgrades and support for one year (at minimum, perhaps longer). Click on the Secure online order button (see figure 5 above) to start the ordering process. All the usual payment methods are available.
Once you receive your key by email, click on I have an unlock key and start the license manager in full administrator mode. Copy/paste the long funny looking key (all of it) and you should be able to activate your DeskRule. From then on you can use the search engine at full speed without any nags whatsoever.
Software details
DeskRule runs on windows Vista or later (7/8/10 etc). The installer includes both 32 and 64 bit versions and installs the most suitable for your Windows system.
Customer support
If there is something that you cannot understand using this help file and the demo videos (there are a few under the HELP toolbar button), please contact email support. If you suspect any bugs (e.g. the program crashes) please use the Reliability command from the toolbar help drop-down menu, adding as much information as possible to help us reproduce the problem. You can also ask questions in the forum.
Command line arguments
You can edit the shortcut icon properties (what you click to start the program) to add command line switches and arguments.
COMMAND LINE OPTIONS
| /A | disable assertion messages |
| /I | use settings file (default=deskrule.ini) |
| /P | run a new process |
| /F | don't load filter used in last search |
| /G:name | start a search with saved search filter name; if the saved search name doesn't exist, it performs a simple mode search for name |
| /J | load all system properties without exclusions (1000+) |
| /C | Print search results in a console window and exit (must be combined with /G). Program must be started from a console (DOS) window. |
A folder name can be passed to start the search where you want. Another way to pick the starting folder is to right click on it and pick Search with DeskRule command from the context menu.
Keyboard shortcuts
Many keyboard shortcuts appear next to the (context) menu commands, e.g. right click on some item or at the background of the file list view. Here are some other available commands (similar to xplorer²)
| Key | Function |
| Ctrl+A | Select all |
| Alt+A | Unselect all |
| Num * | Invert selection |
| Ctrl+C | Copy |
| Ctrl+X | Cut |
| Alt+Ret | Properties |
| Ctrl+Ret | Open selected item's container folder |
| Del | Delete selection (real file delete) |
| Ctrl+Del | Remove selection from pane (files not deleted) |
| Alt+C | Copy selected path names |
| Ctrl+P | Copy selected information (all columns and details) |
| Ctrl+Plus | Autosize columns |
| Ctrl+Q | Toggle the preview pane on/off |
| Alt+Q | Quick popup (peek) preview of the focused item (press any key to dismiss the preview window) |
| Ctrl+Shift+I | Add folder to the windows search index |
| F1 | Displays this help file |
| F12 | Program settings |
| F2 | Rename |
| F3 | View selected file as text |
| Ctrl+F | (in the previewer pane) search for text; F3 to find next |
| F5 | refresh pane contents |
| F6 | Move to next pane (<Shift> for previous) |
| F8 | Clear search parameter fields |
| F9 | Start macro recorder (<Ctrl> to repeat last macro; <Alt> edit last macro) |
| Tab | Switch address/filter box (<Shift> for opposite direction) also from rules to property control |
| Alt+D | Jump to addressbar (search path) |
| Alt+letter | Jump to search rule that starts with letter e.g. <Alt+N> will jump to the Name box |
| Ctrl+wheel | Change thumbnail size using the mousewheel |
Navigating around the window is achieved pressing <F6> key (or Shift+F6), that moves you to the four main areas: toolbar, search panel, search results and previewer pane. Within each area (e.g. search panel), pressing <TAB> key cycles in the locally available windows. Note that the property control is also very much keyboard happy.
To select multiple items use the middle mouse button. This toggles the selection status without affecting the selection of other items. Another solution is to hold down <Ctrl> key while selecting with the left mouse button.
Press both left and right mouse buttons together to see a popup draft preview of the item under the mouse cursor. Let go of the mouse buttons and the preview window will disappear. The size of the preview window is controlled via program options.
While in the addressbar you can select folders previously searched typing part of their name then the <UP> arrow key.